Sunday, December 06, 2020

Wild Ride

Hi!

It's Anja here. I got a package of most adorable dies this week. And decided to make a frame as my first project.

 
For this project I used: 
- Cottage Cutz dies (Safari Peekers, Savanna, Circle Set),
- Distress Inks,
- white card stock for die cuts and background (20x15 cm),
- picture frame (for 13x18 cm  photo),
- moss effect and grass effect paste,
- velvet powder,
- silver pigment ink,
- black pen,
- white pen,
- plastic stencil (clouds),
- heat gun,
- paper glue,
- washi tape,
- adhesive foam pads.

First I cut all parts for the trees. I used moss effect paste for trees and green effect paste for grass. I add generous amount of the paste on the cuts and dried it with the heat gun. The heat blows up the paste and gives it 3d effect. After that I colored the pieces around the edges with Distress Ink. For the grass cuts I added velvet powder before I dried the pieces with the heat gun. The powder gives it a nice effect.

 
Then I cut and colored all the other parts. 

After all the pieces were ready I started on the background. I colored the grass and the road with Distress Inks. I made a stencil for the sun. First I used the negative of the circle to color the sun. Then I used the cut circle and washi taped it on the colored sun. Next I used the stencil and made the clouds.

 
When all the part was ready I adhered the trees and stones to the background. Then I inserted the background into the frame and added the car. I adhered the car with adhesive foam pads. And my frame was done. 


That's all from me for today. Have a nice week and see you again next Sunday. 

Anja Z. 


Cottage Cutz dies I used for this project:


Saturday, December 05, 2020

Safari Giraffe Birthday

Hello Scrapping Cottage friends! Thanks for taking the time to stop and visit with us today. It's Mary Marsh here bringing you the Saturday edition of the Blog. 

Today, for your viewing pleasure I have a birthday card featuring the new Safari Giraffe die. This new release made it's debut as a Black Friday special. The individual dies are still on sale at 25% off. They are such versatile dies and perfect for so many occasions. Think birthdays, get well, encouragement, baby, anniversary and thank you cards. They would work for both children and adults, and for male or female.

So let's get started on some details of how I created my card. 

Design Steps:
I started my card this week with the sketch #830 from Splitcoaststampers. As soon as I saw it, I knew it would work for a card featuring one of the new Safari animals. 
Then I remembered I had some wild themed designer paper that looked like giraffe spots so I decided to use the Safari Giraffe die. 
Next, I cut the giraffe image in a taupe and light brown shades to match the designer paper. 
I stamped my sentiment on a Circle die. Used the 3rd largest die. Added a black layer using the Stitched Circle die - again the 3rd largest. 
 
Now that all elements are cut and stamped it's time to start card assembly. I wasn't sure what pattern to use for element 1 of the sketch. I decided to go with the wonky stripes pattern.
taupe layering panel: 5 3/8" x 4 1/8" 
element 1 (striped designer paper): 4 1/8" x 3 7/8"
element 2, 3 & 4 - 1/2" x 3 7/8"
Next, I attached the sentiment circle and the giraffe image. The circle is secured with double sided tape and for the giraffe I used dimensional adhesive. For element 6 of the sketch I added some leaves, and I cut those from the Safari Adventure Gang die
 
To finish off my card, I attached the image panel to the black card base and scattered a few black enamel dots. Decided to add a couple of leaves under one of the enamel dots. 

Well, that's it for me for this post. I hope I have given you an idea for a way to use this new die. See you next Saturday.

dies I used to create card


Friday, December 04, 2020

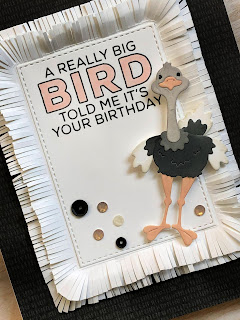
A Big Bird Birthday

Happy Friday!  I'm enjoying this new release of Safari dies immensely!  They are wonderful for so many occasions and are perfect for both children and adults, and for male or female.  Today is the last day of the big Black Friday Blowout Sale where you can get these dies at a great discount so make sure to visit the store!

Now on to my really big bird birthday card.

I wanted my card to have the feel of ostrich feathers so I created panels with fringe to frame the ostrich.  It took a little planning but was actually quite easy and did not take much time at all.

I cut a panel from a black and charcoal grey patterned paper 4 1/4 x 5 1/2 inches to cover the front of my A2 card.  

I then cut a rectangle from white cardstock using the third largest of the Stitched Rectangle dies and stamped my sentiment.  I also cut two rectangles 3 x 4 inches and 3 1/4 x4 1/4 inches.  I placed the die cut piece in the center of each rectangle and lightly traced around the die cut piece in pencil.

Using my scoring board I made score lines on my pencil marks then erased them.

I cut my fringe with paper snips, clipping to the score lines.  I clipped each corner first since the the fringe there is angled and slightly wider on the outside edge.  I gradually made the cut lines perpendicular to the score lines.  Below is a finished one and one that I had just started.

Each fringe cut is about 2mm wide.  It actually went quite fast.  You don't want it too even or perfect - you want it organic like feathers!
I folded the edges up and used a bamboo skewer to curl them.  A pencil would also work well.

My sentiment is colored in Copic R11 and I used Distress Oxide inks and blending brushes to color the ostrich. 

After gluing the black and gray panel to the card I centered each fringe panel and placed the sentiment panel in the middle. 

Then I popped up the ostrich with two layers of foam dots.  She needed two layers to sit up over the fluffy fringe.

Finally I added some black, white and pink sequins for a bit of sparkle.

Dies used:


I hope you enjoyed my card and may you have a fun and creative weekend!


Thursday, December 03, 2020

Sweet Baby

Hello Scrapping Cottage Friends

It is Pam sharing a creative design today!
Just for your info we have one more day of our amazing Black Friday Sale.  And believe me you do not want to miss these fantastic prices.  Today, I am using the little baby zebra from our new Safari Release.  And I am really loving how versatile these dies are.  Everything from birthdays to babies!


Designer Steps:

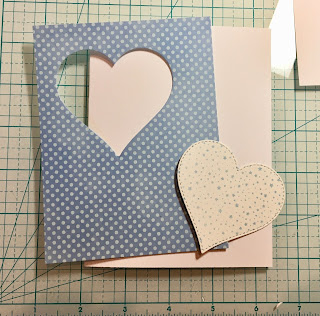
1.  Use a white A2 card base and cut a piece of polka dot card stock 4 x 5 1/4.  Using the Stitched Heart die second from the largest cut out a heart positioned as shown.  Next using the same heart die cut out a piece of star DP.
2.  Stamp the star heart with the word welcome.  Glue the blue polka dot paper to the A2 white card base.  Then fill in the heart with the star DP heart
3.  Next cut out 3 sets of letters using the Stitched Alphabet die.  Stack and glue the letters together with the star DP on the top
4.  Using the Safari Zebra die cut out the animal using grey, white and black card stock
5.  Put together the zebra with glue that has a fine tip for easy and accurate glue placement

6.  Pop the zebra up on the right side of the heart.  Glue the BABY letters below as shown.  Stamp the word sweet in black ink and layer onto blue polka dot designer paper.  Pop it above the word baby.  Last I added a little banner using the Spooky Camper die.  I cut it in white and colored with Copics and finally added two rhinestones to the bows


CottageCutz Products


Just for you info our great Black Friday sale is going on until December 4th!  These dies are a must for any card maker or scrapbooker on your shopping list.  So don't miss out on these awesome prices. And don't forget to treat yourself!


Blessings
Pam