Saturday, February 23, 2019

Bunny in his New Ride

Hello Scrapping Cottage friends! Thanks for taking the time to stop and visit with us today. It's Mary Marsh here bringing you the Saturday edition of the Blog.

We have a new release of 36 Spring dies in the online store. There are a variety of designs so perfect for Easter or Spring cardmaking. Take a look in the store you definitely won't be disappointed. And, they are currently on a 25% off sale.

For my card today I am using the new Bunny Carrot Car  and the Happy Easter Greeting dies. He is just the cutest little thing. So perfect for your Easter card making. So let's get started with some details of how I created my card.

Step 1: I started my card this week with a sketch. I am using the Splitcoaststampers weekly sketch #737. I thought it would work well to showcase this sweet little bunny driving in his carrot car. 

I just had to select my card colors, and I decided on a soft green for my designer paper. 
White card base: 4 1/4" x 5 1/2"
Pistachio Designer Paper: 2" x 5 3/8"
For the bunny and carrot car, I just chose colors that would coordinate well with the pistachio designer paper. 
Step 2: Now that all my elements are cut I am ready to start card assembly. I attached the designer paper to the white card base with double sided tape. 

For element 2 of the sketch I cut 2 rectangles for my Happy Easter sentiment. Used the 4th largest rectangle and pierced rectangle dies.  I was undecided what color to use for the rectangle that would be against the designer paper. I tried several colors and then settled on the pistachio shade. I cut the Happy Easter phrase from a Strawberry colored cardstock.  
I secured these panels together also using double sided tape. I decided to add some soft green sequins to the left side of this panel just to balance it off. 
I added this panel to the card base with double sided tape. 
To finish off my card I place the bunny image atop the rectangle panel. Secured it to the designer paper also using double sided tape. 
The sentiment panel still wasn't right for me so I added 2 additional sequins to the bottom left. And it was a fit and a wrap for my card. 
Well that's it for me for this week. See you next Saturday. The DT has begun showing these new dies so if you missed any of the cards you can look back on the Blog to view.
 
dies I used to create card:


Friday, February 22, 2019

Hoppy Frog-day!

Happy Friday (or should I say Frog-day?)!  It's Jeanne today with another card using the adorable Spring Frog with Lilypad die.  I'm also putting this card up on the SplitcoastStampers color challenge gallery.  The colors this week are Daffodil Delight, Pear Pizzazz and white.  I thought they lent themselves perfectly for this die.
I started by cutting all my pieces from white card stock.
I used Distress Oxide inks in colors close to the challenge colors to color my pieces.  Since you are also allowed neutrals I used a brown and a color close to Mossy Meadow (a neutral).
I like to assemble my elements before gluing everything to the card.
Next I stamped the sentiment and some cute little bugs on an A2 size panel of white card stock.
I used a 5/8 inch wide piece of washi tape on the right side, then glued the lilypad, cattails and lotus to the card.
I adhered the panel to a top folding A2 card base.
Finally I used foam dots to give the frog dimension and rhinestones as the bodies on the little bugs.

Be sure to stop by the online store where the new release is 25% off for a limited time!

Dies:
http://www.scrappingcottage.com/cottagecutzspringfrogwlilypad.aspx


I hope you enjoyed my card today.  It is super simple to make and sure to bring a smile to anyone who receives it.


Thursday, February 21, 2019

Froggie Hello!

Hi Blogging Friends!

I am so happy you stopped by today! It is Pam sharing with you on the blog.

And before we get started I wanted to let you know that we are having a wonderful sale in our online store. The new Spring release is 25% off.  Check out the new dies! They are so adorable.

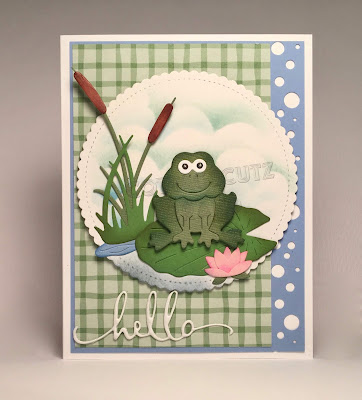
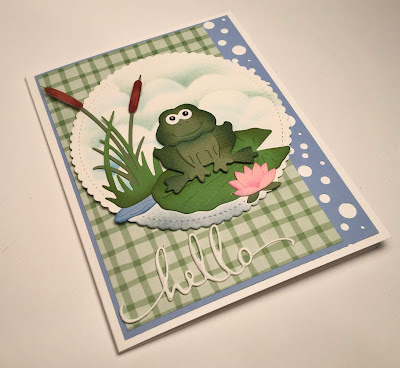
Today, I am using one of the dies from the Spring release.  I think this little frog is just so cute!


Designer Steps:
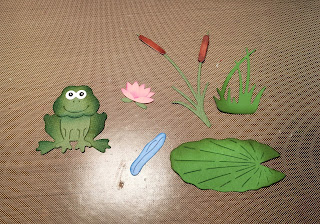
 1.  Cut out your frog using the Spring Frog with Lily Pad die.  I used two different greens, blue, tan, pink and white card stock
 2.  Use a variety of ink pads to shadow your pieces and then assemble the frog.  I used a black marker to color the white die cut eyes and then added a white dot with a gel pen
 3.  Assemble the flower and the cattail
 4.  Use the large Stitched Scallop die and cut out a white circle.  Use a stencil and blue ink to make the clouds
 5.  Arrange the cattail and lily pad on cloud circle and glue them down.  Then pop up the frog onto the lily pad with dimension tape
 6.  Use an A2 white card base and cut out a slightly smaller piece of blue card stock for the front of the card.  Use a punch on the side of the blue to get the different size holes
 6.  Cut a piece of checked green DP 3 1/4 x 5 1/4 and glue it to the blue card stock.  Then glue it to the front of the card
 7.  Place dimension tape to the back of the scalloped stitched circle and place it on the front of the card
 8.  Use the Hello die and cut it out of white foam and glue it to the front of the card as shown

CottageCutz Products


As always I am so glad you stopped by to take a look! Hope you take some time for yourself to be creative!
Blessings
Pam


Wednesday, February 20, 2019

For Peep's Sake

Hello!  This is Sukie and I'm excited to share an Easter card for my guest designer post today. My card was created with one of the many new dies from the new Cottage Cutz Spring release. These new dies are currently on sale too!
I was completely inspired by this fun paper from the DCWV "Pocket Full of Posies" stack, the colors have a "Spring" look to them and are perfect for an Easter card.
I used the colors as inspiration for the die cuts for the Spring Bunnies Trio and for the Stitched Circles.  To achieve the perfect colors, I used my Oxide Inks to shade all of the die cuts.
I used the circle dies to cut out a couple of windows on my card background.  Next, I layered the grass strips behind the windows and along the bottom edge of my card.
The die cut circles were adhered behind the grass in each of the windows.  I tucked in the sweet bunnies between the grass and circles.  I picked out a few paper flowers from my stash and adhered them along the grass on my card.  One of the flowers was strategically placed where the 2 pieces of grass meet.
My card was finished off with a sentiment from the Scrappy Moms (retired) For Peep's Sake stamp set. The sentiment was stamped on a hand cut flag.
Here are the dies used on my card, available here:


Sunday, February 17, 2019

Love Cupcakes


Hi!

It's Anja here. I'm still in Valentine's mode. I made two Valentine's cards this week and I'm showing it to you in today's post. I combined cupcake dies and adorable lovebugs.


For this project I used:
- Cottage Cutz dies (Lovebug Bee & Ladybug, St. Patrick's Day Cupcake, Love Cupcake, Live Laugh Love),
- Distress Inks (Picked Raspberry, Spun Sugar, Worn Lipstick, Black Soot, Barn Door, Fired Brick, Aged Mahogany) and Oxides (Worn Lipstick, Abandoned Coral, Candied Apple),
- watercolor paper (2 pieces of 10,5x15 cm),
- white card stock for die cuts,
- glossy accents,
- glitter dust,
- water spritzer,
- heat gun,
- adhesive foam pads,
- wire,
- foil,
- wire cutter,
- paper glue,
- paper trimmer.

First I cut and colored the cupcakes and lovebugs. I used Distress Inks.


Then I trimmed watercolor paper to make two card bases.


I used Distress Oxides to color the background. I made to backgrounds.


Then I spritzed a few water drops over it and put a foil on top and pressed to get a more interesting details. I used heat gun to dry the base. I did the same with the other card base.


I cut two wires and adhered it to the bugs and to the cupcakes. I used adhesive foam pads.


Then I just adhered both bugs to the card bases. I used glossy accents to add some dimension to the sentiments and hearts. And I added some glitter to the cupcake. And my cards were done.


This is all from me for today. Check out the store for the new release and someother discounts.

Have a great Sunday and see you again next week.

Anja Z.


Cottage Cutz dies I used for this project: