Saturday, May 26, 2018

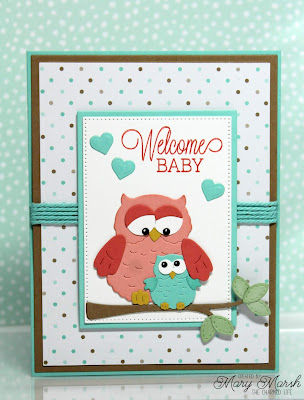
Mama Owl Welcomes Baby

Hello Scrapping Cottage friends! Thanks for taking the time to stop and visit with us today. It's Mary Marsh here bringing you the Saturday edition of the Blog. We are still showcasing the beautiful dies from the Mother's Day release. They are so versatile and can be used for cards other than Mother's Day.

Also, want to let you know that there is a Memorial Day sale going on at the online store. You can save up to 50% on selected dies. Lots to choose from so make your way over there to look around. You just might find something that you can add to your collection.

We also have a new release of dies. This one is our "Just For Guys" dies. There are 14 awesome designs and they will be so perfect for creating your Father's Day or other masculine cards. The design team will begin showing samples soon.

For today's card, I am featuring the oh so cute Mama Owl & Baby die, and I made a card to welcome a new baby. I like to have some of these type of cards on hand for either a baby shower or to send out to congratulate on a new birth. So let's get started with some details on how I created my project.

Step 1: I started by picking my card colors this week. I wanted to use some soft baby boy colors. So I chose a Caribbean blue, brown sugar (soft brown), and a patterned paper that has both of these colors for the card base.  I also had some of the Caribbean blue twine that I decided to use. Thought it would fit well with these owl images. Twine and dotted paper - I like the combo for a baby boy card.
Card Base: 4 1/4" x 5 1/2"
Brown Sugar Panel: 4" 1/8" x 5 3/8"
Patterned Paper Layer: 3 7/8" x 5 1/4"
 
Step 2: Cut my Mama & Baby owl. For baby, I used the Caribbean blue cardstock and sponged his wings with the same ink for a bit of color variation. Mama was cut in a cantaloupe shade and her wings and eyes are cut in coral cardstock.  They are so, so cute. I just love how they turned out.
Step 3: Stamped my welcome baby sentiment on white cardstock that was cut with the 3rd largest pierced rectangle die.
I layered that onto another rectangle cut with the Caribbean blue cardstock.  Added a branch for the owls to perch on. It's from the stitched honey bees set.  
Step 4: Added the blue twine to the background panel and attached to card base.

 I used mounting tape to attach the image panel. I wanted it lifted somewhat from the twine. I dimensional adhesive only on the top and bottom of the panel.  No need for the dimension where the panel sits on the twine, since that's already raised.
I finished off this week's card by adding a few hearts cut from the Caribbean blue cardstock.
I hope I have given you an idea on a way to use this really cute Mama Owl & Baby die. It's on sale this weekend. In fact, all the dies I used on today's card are on sale this weekend.

Have a wonderful Holiday weekend! See you next Saturday.

dies I used to create card:
http://www.scrappingcottage.com/search.aspx?find=mama+owl+%26+baby
http://www.scrappingcottage.com/cottagecutzstitchedhoneybees.aspx


Friday, May 25, 2018

Thank You Tulips

Happy Friday!  You can never have too many thank you cards and this image makes for a perfect one.
I started with an A2 card base in white and a 4 1/4 x 5 1/2 inch rectangle of patterned paper.  I cut two squares using the third and fourth largest dies from the Stitched Squares set.
I cut the pieces for the flowers using the Bouquet of Tulips die and colors that coordinate with my paper.  I also used a sketch from Splitcoast Stampers.  Even though I did not follow the sketch exactly, it does make laying out a card go faster.
I used sponge daubers and ink the same color as the cardstock to give a little depth to my die cuts.
I assembled all the pieces and glued them to the front of the card.

For the sentiment I cut two strips - 3 3/4 x 3/4 inches and 3 3/4 x 5/8 inches.  I stamped my sentiment on the smaller one and used paper snips to fishtail the end.
Then I stacked  and glued them together and used a colored staple to put them on the front panel which I glued to the card base.
Dies used:

http://www.scrappingcottage.com/cottagecutzstitchedsquaresetbasics.aspx

Thanks for stopping by today!  Have a fun holiday weekend and do something creative!!!


Thursday, May 24, 2018

Pretty Vases!

Good Morning Scrapping Cottage Family,

It is Pam sharing with you today on the blog!

We are still showcasing the beautiful dies from the Mother's Day release.  They are so fantastic and can be used for a variety of occasions.

Also, there is a big sale going on in the online store.  You can save up to 70% on dies.  Lots to choose from so take some time to go shopping!  Now is the time to add to your collection!

Now on to today's card!  This card is so great for the spring with lots of flower in beautiful vases!

Design Steps:
 1.  Cut all of the pieces in white card stock using the Flowers for Mom die
 2.  Use your markers and color all of the pieces.  I used Copics: G40, 43, 46 - YR16, Y18, and R46
 3.  Assemble the flowers and then arrange them into the vases
 4.  When I assembled the vases I used tape to adhere the flowers to the vases
 5.  Use an A2 whtie card base, cut a piece of white card stock slightly smaller and run through a dotted embossing folder.  Cut a piece of DP 4 x 5 1/4 and cut out 3 2 inch squares using the Nested Stitched Scallop Square Set.  Glue the DP to the embossed card stock and then to the front of the card.  Pop up all of the vases in the squares, add the sentiment and bow
Cottage Cutz Products


As always we are so happy that you have taken the time to stop by for a visit.  We really appreciate you!

Blessing
Pam


Tuesday, May 22, 2018

For a newborn baby and a birthday

Hi, Janja here.
In the Mother's Day release we find beautiful dies which are also useful for other occasions.
I prepared a baby shaker card and a birthday card.


I used:
- CottageCutz dies: Mama Kangaroo & Joey, Mama Raccoon & Baby, Stitched Numbers, Balloons Variety, Sweet Love Borders, Spring Grass, Stitched Sewing Notions (button), Circle Set
- white card base: 4.25 x 3.35" (10,7 x 13,9 cm), folded
- patterned paper: 4 x 5.2" (10 x 13,2 cm)
- fun foam: 3.74 x 5" (9,5 x 12,6 cm)
- transparent foil
- white and colored cardstock
- a white pen
- Distress ink pads: Worn Lipstick, Vintage Photo, Hickory Smoke
- double-sided adhesive tape, self-adhesive pads, glue

Create A2 card base from a white cardstock. Cut a smaller layer from a patterned paper, and another one from a fun foam. Prepare a piece of transparent foil. 
Round the corners at the bottom. With the die cut the circle opening in a patterned paper, and in a fun foam. Stamp an inscription on a white card base.


Now die cut and assemble the Mama Kangaroo & Joey. This die is a perfect thing to help us welcome all those adorable little newborns. 
Also, prepare two white borders and a button. White and pink hearts will be used to fill the shaker area.


Attach Mama Kangaroo with self-adhesive pads.


For a birthday card, prepare a white card base. Cut patterned paper smaller than a card base. Stamp "Happy Birthday from all of us" in black on a patterned paper. Cut the grass from a green cardstock.


Now cut and assemble the central motif, number four and balloons. Cut off the second baby twice. 
Add dashes on balloons with a white pen. 
All my cutouts are made from colored cardstock that have the edges shadowed with Distress inks.


And we're at the end.


Have a nice day.