Saturday, November 12, 2011

Scrapping Cottage Tic Tac Toe Challenge #7


Hello everyone Cheryl here with a Tic Tac Toe challenge for this month. I thought it would be a lot of fun to do this challenge. So grab your favorite Cottage Cutz and pick your Tic Tac Toe, 3 in a row!

WINNER from challenge # 6 is ........................

# 3 Jill Rugg with her beautiful framed layout here
Congratulations Jill
You've won a $25.00 gift certificate to The Scrapping Cottage. Please email scrappingcottage@cox.net to claim your prize.
On mine i used more than the 3 in a row I used ribbon,trim,cottage cutz ,bling,design paper, buttons. 
Cottage Cutz i used are:
 Front of Christmas Tree Chipboard Album
Inside of album backside of top of tree, and then 2nd page

backside of 2nd page and front of 3rd


Backside of 3rd and front of 4th


Here is a video on did showing the entire album and the backside. I didnt take a picture of the back since i hadnt finished it until right before my video.

All my Cottage Cutz were made in my bed, due to being in my cast for my ankle. It was easy to put them together, but not so easy using a big shots machine in my bed....LOL that was a challenge in itself......hehehehehehe

I really enjoyed putting all the cottage cutz together, they are all sooo CUTE! You are going to want all the christmas ones, i know I do.....hehehehehe
Hope you will join us for my challenge this month, and cant wait to see what you make!!! Challenge is open from November 12, 2011- December 9th, 2011


Hugs to all,
Cheryl

Friday, November 11, 2011

Joyful Greetings !

Hello again from Sunny Singapore , everyone ! 
Pearl here back to share  some non-traditional Christmas color combos 
on cards. 
Love this hot pink , emerald green combo with pops of crisp white or 
sunny yellow. 
For this card, I've used the Holiday Ornament die .
 For added sparkle on the ornament I have used Stickles in green and pink.


Here I used the Flourish Tree die 
and black and clear bling to sparkle up this gorgeous tree. ;) 

I hope everyone's off to an early start with their Christmas projects 
as we are here at Cottage Cutz ! 
Have a fabulous crafting weekend, everyone ! 


Wednesday, November 09, 2011

Fall: It's hard to say Goodbye...


Fall is my favorite season and it's giving way to Winter awful fast around here by turning COLD already....Today I wanted to share with you one last taste of fall with my October Project 12 layout. For those that don't know what Project 12 is - it's a website that introduces a double page sketch each month for you to follow. It's a great way to summarize your families happenings each month.

Of course my CottageCutz dies come in handy for these layouts as it did again this month. I used the Raking Leaves die from last years release and the MLS Summertime Fun die from a couple of months ago to add the fall touches to my layout.


I hope you still have some beautiful fall weather where you are - enjoy it while it lasts!
Have a great day and remember to use your CottageCutz dies when you scrap.
Kay

Tuesday, November 08, 2011

Made with Love

There is something so special about gifts made with love. That little extra thought that goes in to make something perfect. The heart that one used to create it and the time that someone selflessly put into it. Yup, I'm a big fan of homemade gifts.

Hi everyone, Erika Taylor here today to share with you a card I created using some wonderful papers from My Little Shoebox and the Sewing Notions Die Cut . I added a little pleated ribbon, twine and buttons to finish the card off and I know exactly who I'll be sending this one to.

I'm absolutely adoring that little spool and could a pin cushion get any cuter? I think not. Well, I'm off to do some more creating, so I hope you all have a fantastic Tuesday. Until next time

Toodles
Erika Taylor


Monday, November 07, 2011

2 Christmas Pooches

Good morning friends!  Today I have 2 cards to show you.  I used the adorable Santa Puppy and Dog with Sled dies.  I have been enjoying the new winter release dies and will be showing you more cards soon.  I hope you will have a peek in the store and check out all the new, adorable dies.  Enjoy your day!


I used liquid applique on the puppy's hat, sprinkled with glitter and then heat set.

Hugs and smiles,
Janice


Sunday, November 06, 2011

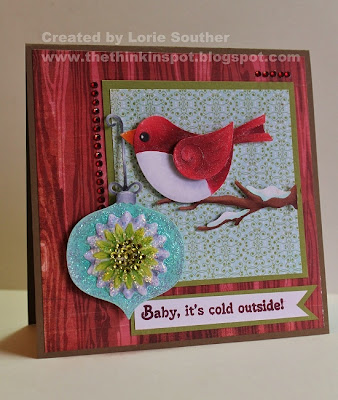
Baby It's Cold Outside!

Good morning!  Yeah baby!  It IS cold outside, and getting colder.  I guess it's time, and after the long hot summer, I'm ready.  It sure makes crafting winter and Christmas cards much easier.   I've been playing with the dies from the latest Christmas release at The Scrapping Cottage, and this card was made with the Winter Bird with Ornament Cottage Cutz die.  This one was really fun to color, and I love the bigger size.  I can't help it, I just love to color bigger images and die cuts.  This was cut with white card stock and colored with Copic markers.
I used some Basic Grey paper for this card, and I added plenty of stickles to the ornament, along with a rhinestone embellishment.  NO ribbon on this one, and I gotta tell ya that it just doesn't feel right!  I think I use ribbon on about every card I make, but it's good to change it up once in a while.  ;-)  I gave the bird some extra shimmer by going over it with a Saukura Gelly Roll pen in red, and smudging it with my fingers to spread the sparkle around.
Here's a closer look at the sparkle on the birdie.  I'm so glad you could drop by today, and I hope you're enjoying a wonderful weekend.  Have a blessed day, and happy crafting!
Love ya!
Lorie


Saturday, November 05, 2011

Tis The Season


Hi, It's Gini and I've got another Christmas Card to share with you today! I hope you've been enjoying all of the Christmas Inspirations we have been sharing with you. Cottage Cutz just has so many adorable dies for the season, it's hard not to keep making projects with them.


I used the Boxwood Vine Wreath for the main image on my card. It's such an amazing die, that can really be used all year long. The boxwood branches are perfect greenery for any flower projects - you also get a banner, a bow, a 3-d flower - and then all of the Christmas goodies...!!! Oh, and I forgot to mention that this die set, also comes with 3 stamp sentiments. I love it!


Another really versatile die that I used was the Holiday Doily. This is perfect to add a circle element to your project, or maybe to frame it.


Friday, November 04, 2011

Poinsettia Pretty


Hi Everyone, it's Lori here and I want to show you one of our new holiday die sets...Ornate Poinsettia.  It's so beautiful!  

The holly leaves on the side of the sentiment are from the Christams Fawn and they add such a delicate touch.

The border is the Scallop Three Edger that has been doubled to make more of a bolder border. 


See you in a few days and keep on scrapping!

Hugs


Thursday, November 03, 2011

Non-Traditional Christmas Greeting

Good Morning Scrapping Cottage friends! 
Angelica here with one of my favorite non-traditional Christmas color combos - that's right - it's not red and green! 
I do love those gorgeous evergreens and holly berries, but isn't it fun to see bright blues and pinks, too?  With just a little bit of sparkle? 


The Ornate Holiday Tree is one of my favorite Cottage Cutz ever! It is so versatile and perfect for stenciling or just as it is! I used some of my most favorite specialty cardstock - American Crafts glitter paper to cut the tree. It has a fabulous sparkle, is a breeze to cut, and the glitter is completely encapsulated so there is absolutely no rough texture, it doesn't flake off - ever.

Here's a close up of the paper:


I used my iRock to rock those beautiful little ornament circles that punch out with the die. Using the size of the circles as my guide, I chose three different gem sizes and placed them inside the tree.


Hope you enjoyed today's inspiration - the holidays are fast approaching and this would be an easy and quick card to make for your friends and family this Christmas season! Thanks for coming by today!

Angelica

Wednesday, November 02, 2011

Snowman Angel Post-it Notebook

Hello everyone and Happy Tuesday to all! Today im sharing my Post-it Notebook made using the DARLING Cottage Cutz Christmas Die's.
On my post-it notebook i used these darling cottage cutz
 For my snowman i used all white silver lustre card stock, and then distressed with tim holtz distressed inks. I colored the star,gloves,scarf,and wreath with copics. for the Tree i used 2 different card stocks and just layered them. I love the leaves from the boxwood vine wreath cottage cutz and used it for a filler on the left side of my notebook.
The Scrapping Cottage has come out with soooo MANY DARLING releases and you can view them all HERE!! Im just loving them all, they are all sooo SWEET!!! Cant wait to share the others with you on my next post :)


Hope you have a lovely day!!! Hugs to all,
Cheryl

Tuesday, November 01, 2011

Celebrate the Season !

Hello from Sunny Singapore , everyone ! 

Today I'm featuring the Celebrate the Season die 
from our second release for October . 


Gotta love the swirls and flourishes of this design . 
I've added Red Glitter glue to my diecut cut
 from American Craft's Cranberry cardstock 
and embellished with a coupla pearls. 

Enjoy all the  adorable designs with our great 
 bundle offer for this release ! 


Sunday, October 30, 2011

Poinsettia Cluster . . .

 Hello all! I apologize. . have to dash out of town very quickly for work so I am posting just the center of my card so not to miss my day. I have used the Cottage Cutz Ornate Poinsettia die. This die is great on its own as a ornate doily type cutout. . .but even better when cut up and layered.
Here I have broken down the layers of my finished poinsettia. Cut the die as is, one cut with green card stock ( I used a sage green here). Than cut again with burgundy card stock. Cut all the holly and berries off the burgundy three cluster poinsettia card stock. ( you should only have the three Poinsettias). There are three dots on the die that are to be done in yellow card stock for the centers of the poinsettias, at this point glue the small and medium dot behind the small and medium poinsettia. Glue the three flower cluster on top of the green card stock. With two pieces of burgundy  2 1/2" x 2 1/2" card stock, cut two large flowers. Glue the two large burgundy poinsettias together with the large yellow center glue between them (Oreo style). Pop dot the large poinsettia onto the large poinsettia/leaves base.  (the reason you double the single large poinsettia is for strength). I highlighted the poinsettia in #G94 Red Copic and the holly and vines in R46 Green Copic Pen. I added Sakura clear star pen for glimmer and last added red crystals as berries.

When I return I will get it mounted to a card. . but I just wanted to get you started. This group of Poinsettias will mack a very elegant card.  . . off I go. . till next week.

Thank You   Barry  

Saturday, October 29, 2011

Christmas Tags

Today I am featuring the Mrs. Chef Mouse on a cute little baking tag. I always give away goodies at Christmastime and my CottageCutz dies are perfect for making tags.


Whether it's cards or tags there are lots of wonderful Christmas/Winter designs to choose from.
Hope you get some crafty time today - have a great weekend!
Kay