Tuesday, April 12, 2011

Filigree Sugar Egg

 Ok. . Yes. . you throw all the Cottage Cutz Easter Dies up into the air. . and the first two to hit you on your head . . . .you have to combine.   Ha! Ha!

Here I combined the Cottage Cutz Filigree Egg and The Sugar Egg Die. I used the Doodlebug Sugared card stock (really nice light sugar glitter paper) as the backing.

 I cut the light blue card stock with the Filigree Egg Die (polk-a all the confetti out), than placed it on the Sugar Egg die (on the base egg side), the key here is to tape the egg down slightly. It's the only way you can keep it centered  and be sure it will be even . . .until it has been cut.
 Poooo-ff ! You have a Filigree Window Sugar Egg!!!! 
Cut the base sugar egg from the suger paper, and the two Frames in a medium blue card stock . . all from the Sugar Egg Die. (in this case I also cut a second small frame for the center tulip panel)


That's a quick extra for today. . .Thank's . . . Barry

Easter Blessings

 Easter Blessings . . .This weeks card is made with the Cottage Cutz Sugar Egg Die. I kinda made a double card, It is a traditional horizontal card but the egg also opens up as a second card. I took a simple rope punch and double cut to get a trellis style edge and added the flowers from the egg die. The leafy base of the flowers has a slight curve for the egg so I greated a garland by waving the leafy base down the trellis and than added the flowers. That gives you another use for the flowers from the top of the egg.
 I used the pattern from the die which is the basic body of the egg to create a mini card. I folded my card stock (in this case I used pale green to stand out) as a card. I used the base egg pattern that I had cut to trace the egg onto the mini card. As you can see with the lower card, I put my pattern slightly over the edge so there was a fold left in the card. You really will never see it because you will still create the complete egg and attachto the base card. The yellow edge card I did not cut the center from the center of the egg card. I just put the stamped design I colored directly on top of the egg card and placed the finished egg over top. On the pink edged egg card I cut the center out of the base card and attached the stamped design inside the card and put an oval frame around it. This created a window in the egg . . so when you opened the card the stamped design would be inside the card.  

On my card I used foam dots to raise the egg off the base card so the stamped design would have a bit of depth without the window style.
Check out the Filigree Sugar Egg . . .coming up Next    Barry

Monday, April 11, 2011

Spring Bonnet Chick


Good morning friends!  I have a really cute die to showcase today.  I love this adorable Spring Bonnet Chick!  I also used the Filigree Egg.  I used Bazzill cardstock to cut the pieces.  I used yellow cardstock to cut the chick and copics to add some shading.  After cutting the egg I put it on a piece of white adhesive paper with the sticky part facing up.  I sprinkled it with glitter.  It looks much nicer than what I was able to capture in the photo.  The sentiment is from a Stampin Up set called Well Scripted.  I hope you  browse around the Scrapping Cottage store.  There are so many adorable dies including some new Peachy Keen dies available for pre-order.  Enjoy your day!

Hugs and smiles,
Janice

Sunday, April 10, 2011

You're eggsellent

Hello! For my card today I used the Hatching Bunny die. I cut it out in white cardstock and used only my Tim Holtz Distress inks and sponge blending tool to color it. I colored the egg with distress ink in worn lipstick and spritzed it with water from a mini mister to make it look dyed. I colored the bunny with distress ink in scattered straw. And I used tumbled glass to color the two blue parts.

Ok, that's my card for today. See you back here next Sunday. :)

Nikki


Saturday, April 09, 2011

Fun project idea

Today, I have a fun little project to share with you! I decided to create a small desk calendar from a 3.5x5 acrylic frame I had laying around. I realize that we are already into April, but better late then never, right?!

What better way to accent my little calendar pages than with my Cottage Cutz dies!! They are the perfect size to place right next to my stamped calendar. I thought the adorable little Spring Bonnet Chick would be perfect for my April page. Isn't she cute?!
For my May page, I was thinking about "May Flowers". Since my page base is only 3.5x5 I have a somewhat limited design space - which is part of what makes this little project so fun because it is so quick and easy to make the pages!!

I pulled out the Kissing Mice die because I love the big flowers and I thought they would be perfect for May. I also wanted to remind you that when you are looking at the Cottage Cutz shapes - always think about the individual parts and just the whole!! These dies are designed to be used together as well as separately!!
These little calendar pages are quick and simple to make. Don't feel like you have to spend a lot of time designing them! I created all of my bases from just regular white cardstock and then used scraps to decorate. (I love to find new ways of using my scrap pieces!!) The Cottage Cutz shape is what really makes it cute!!

I hope you liked my little project today! Have a great weekend and I'll see you back here next Saturday!!


Friday, April 08, 2011

Sugar Egg Viewmaster Card

Good morning!  Welcome to The Scrapping Cottage Blog!  I hope this fine Friday is treatin' ya well, and that you're looking forward to a wonderful weekend.  I have a fun and interactive card to share with you today that I made using the newly released Cottage Cutz Sugar Egg Die from The Scrapping Cottage, which includes three stamps.  Do any of you remember getting these sugar eggs in your Easter basket when you were a child?  I sure do, and I wasn't even sure if they made them anymore, but I Googled it, and, YES!!  They do still make sugar eggs.  Now you can make your own (the easy way) for all your Easter cards and scrapbook pages.  I thought that since there were three images to choose from to go inside the egg, it would be a good idea to make this into a Viewmaster card, and here's the result.  Just by spinning the exposed wheel on the right side of the card, you can change the scene inside the egg.  Pretty cute, huh?  All images were colored with Copics.
 Here's the sheep scene.
 The adorable bunny.
And the sweet as can be chick.

I hope you like and are inspired by my creation.  There are so many fun things you could do with this die and stamp set to create very special works of art.  As always, I wish you blessed and beautiful day, and of course some happy crafting!!!


Thursday, April 07, 2011

Baby B - and a mouse!

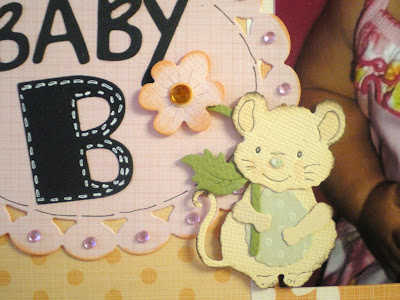
I love doing scrapbook pages. Especially when I have such precious subjects to work with, like my great-niece, Brielle. Isn't she the cutest little squeeze-box ever! I just want to squish her. These are pics from her 4 month photo shoot (boy was it hard to choose only a few for my page! LOL). She had her first birthday last month. Where does the time go?! Ok so on to the business at hand. Dies used for this page are the adorable little mouse, minus his big sunflower -- instead, I used one of the small flowers from the mushrooms and flowers die -- and the mushrooms and flowers die. And no girlie page would be complete without bling, so there's lots of it!


Thanks so much for looking! Have a fabulously crafty weekend. :)


Wednesday, April 06, 2011

Sugar Egg

Good morning! Today I'm featuring the CottageCutz Sugar Egg. I have received one of these sugar eggs once in my life. I had asked a guy to the Sadie Hawkins dance while I was in college.

I asked him with a cute little poem my mom and I wrote and I put it in a little Easter basket with some candy to ask him. I waited and waited for an answer and was getting pretty impatient when I finally received one of these Easter sugar eggs. As you looked inside the egg it had the words "yes" inside.

I used some glitter glue on the sugar egg to make it look sugary and then used a piece of white cardstock to stamp my image on instead of the cut out piece from the egg so I had room to put some pop dots between the layers to add dimension. This comes with 3 clear stamps - there's that option thing again :) Hope you have a great day! Kay

Tuesday, April 05, 2011

Basket Tags for Easter

 This weekend I had a great time doing a demo at the local Scrapbooking Store (Beach Scrapbooks). They are now ordering these great Cottage Cutz dies. They had just received their order of the New Easter dies. I helped them out with a little make-n-take. Each customer could play around and make a Easter basket tag. Above is the Rabbit with Umbrella die. The package showed the bunny done in the cinnamon color, so I wanted to stick with the same colors as the package. I used a peach card stock and highlighted the bunny in Gingerbread color ink with a sponge. He really came out cute. The coat was a bright yellow with highlight of a taxi cab color orange. This die was sooooo easy. . . it looks like a lot of parts . . but they go together perfect.

This tag has the most adorable mouse as you can see from the picture below, this little guy can be used by himself as well as the sunflower. Above I did him in a taupe color and below in white with highlights of pink. I can just think of all the Halloween and Christmas ideas for this guy. can you imagine that mouse with a black eye mask, cape and treat bag. WOW. The other thing is the die is set so you do not need to have the shirt on. . so if you want a nak-it mouse for a project . . there is a full body on the die. 
 Last I wanted to show you the Cottage Cutz Ornate Cross with last years Daffodils die. This was just a quickie to try the cross with the flowers. I layered the cross in White, Yellow and Burgundy card stock. . poking out various layers at a time. I added a few jewels and highlighted the white cross in yellow ink. The Rejoice verse was made on my Dymo on clear plastic and mounted on white card stock with yellow edge.
That's it for this week. It was a busy Saturday demo.   Till next week. . .   Thank You   Barry

Monday, April 04, 2011

Hello Sunshine!


Good morning everyone!  Today's card features this adorable Mouse With Sunflower die.  I love mice images!  I think the mice from the Easter 2011 release are cute as can be!  Have a look around the store when you have some free time.  Cottage Cutz dies are so cute and they have a new release of dies illustrated by the Peachy Queen, Kathy Jakopovich of Peachy Keen Stamps.  Have a great day!

Hugs and smiles,
Janice

Saturday, April 02, 2011

Look what hopped into my mailbox!!

New Easter dies from Cottage Cutz!! The only thing more fun than finding new Cottage Cutz dies in the mailbox is getting them out to play!

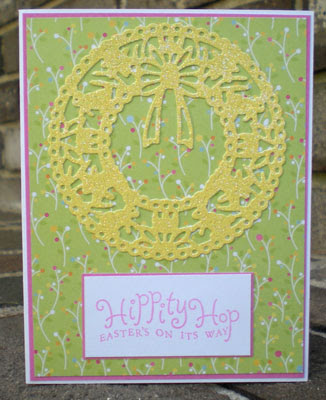
For this week's post, I created a fun card using the Ornate Spring Wreath. This shape could easily be used on both Easter and Spring themed projects. I chose to cut my wreath out of glitter cardstock to give it some extra sparkle! It cut just as well out of the glitter cardstock as it did out of the regular cardstock.


Friday, April 01, 2011

Chick Days

Good morning!  I hope this fine Friday is treatin' ya well!  I've got a card to share with you today that was inspired by one of my recent trips to town.  Around here, since we live in the country, a trip to go to any sort of store, is "a trip to town".  City folk always laugh at that statement, but when you live in the country, it is what it is, and we "go to town".  It is kinda funny when you think about it.  Anyway, the other day when I was "in town", I happened to notice that every farm store I passed (and there are a lot of them, BTW) had a banner out front that said "Chick Days".  Well, in the city, I'm sure that banner could have an entirely different meaning, but here in the country, that means these stores have live baby chicks for sale.  You can hear the cheeping and peeping as soon as you walk through the door, and those little chicks are so fuzzy and cute, which made me think of this Cottage Impressions stamp.  Chick days have arrived for this mother hen, too!!
I used a new paper stack from Kaiser Craft called Nan's Favourites Collection, and as well as the pretty patterned paper, it had the cute little die cut piece. that I put at the bottom of this card.  Hmmmm...  I wonder if our friends at The Scrapping Cottage could hook us up with some dies to cut fancy edges like that?  I'd LOVE to have some of those!!  This Hen and Chick's image was stamped with Memento tuxedo black ink and colored with my Copics, and the sentiment comes from Peachy Keen Stamps Sweetie Pie Peepers stamp set.  For embellishment, I used this pretty daffodil colored ribbon, and tie it with a cute little flower button.  

I'm so glad you could drop by today!!   I wish you a blessed and wonderful weekend and as always, happy stamping!


Thursday, March 31, 2011

Li'l Red

I love these photos my daughter took of grandgirl and scrappy buddy, Miss Grace, in her Halloween costume. Daughter, Cyndi, sewed the cape and Grace wore it proudly as she carried her basket trick or treating. :) For this page I've use Mrs. Gnome as Red to mimic Gracie's costume. Her face is stamped using one of the ghost faces from the Peachy Keen Halloween collaboration release, and her basket is -- are you ready? -- a pumpkin from the pick-up truck accessories! Isn't she adorable! For this embellishment, I used the flowers and mushrooms die, also from the Gnome release. I thought they were perfect for the red riding hood theme. My favorite thing is cutting shapes from pattern papers. I love the whimsical look it gives them with an unexpected pattern or color. I hope you enjoyed my layout today. Scrapbook pages are my favorite and it's been too long since my last one. :) Have a great weekend. I hope spring has made its way to your part of the country!


Wednesday, March 30, 2011

Flower Fun!

I finally got a chance to play with this Stitched Flower w/Button die. I love how they have these stitches around the flowers! Of course there are many options with this die as CottageCutz dies are always giving you choices.

I picked up this patterned paper a couple of weeks ago and it was perfect for this die. I made this card for my Mother-in-law who had her birthday last weekend. I always think I'm going to make more window cards but never seem to get around to it, so I was happy that I finally did it and was please with the results. Now if we can just get Mother Nature to give us some flowers. This is what the inside of the card looks like. Hope you have a great spring day! Kay