Thursday, March 25, 2010

The Finishing Touches

With Easter a little over a week away, I wanted to finish up my table decorations. If you remember a few weeks ago I created a center piece for my table using the New CottageCutz Easter dies, see my "Preparing for Easter" post. I only needed to add the finishing touches to my table by making some name place holders.

This is the CottageCutz die I am showcasing today.


I created the name place holders using wooden clothes pins. I painted the clothes pins white to match the wooden crate of the my center piece, then added a bit of brown ink to distress them. The clothes pins stand good with the jaws up, this way they can hold the name cards. I cut the CottageCutz Bunny, Girl die out of chipboard first and then added the colorful cardstock die cuts on top for added strength. I had some left over grass from the center piece, so I added a bit behind each CottageCutz Bunny. The final step was to create the name cards and slip them into the clothes pin jaws.


Here is my Easter table, all the decorations are done using the New CottageCutz Easter dies.


I hope everyone has a blessed Easter!
Karen

Wednesday, March 24, 2010

WATCH FOR IT WEDNESDAY #53

Welcome to Watch for It Wednesday!!! I saw this fun technique with Alcohol Inks and thought I would share it with you. You will need some alcohol inks, a small spray bottle, white flowers, and blending solution. Put some water in your mini mister. Add your favorite color of alcohol ink to make your desired color. Spray the white flower with the ink mixture.
After the flower is completely covered with the ink put the Blending solution in the middle of the flower. This will give your flower a tie-dyed look. My picture really doesn't do this technique justice. You should give it a try.
You can also use this technique on ribbon, glass, bottle caps and the pieces of your die cuts.
Happy Scrapping!!! Have fun.

Tuesday, March 23, 2010

It's Finally Spring!

Well, the calendar says it's Spring and it feels like it is here in Utah as well. Is there a more welcomed season than Spring after a long cold winter?

This CottageCutz Duck w/Umbrella die is perfect for those spring cards and layouts as well as Easter.

Here is a closeup of the Duck w/umbrella.


Monday, March 22, 2010

Easter Book

Happy Monday! Spring is in the air and Easter is coming quickly. I am working on making this little book for my parents for Easter. This is the 3rd page in my little book. I used the Cottage Cutz Duckling, just hatched and the flowers from the Cottage Cutz Spring Embellishments. The Duckling just hatched is a great addition to my layout and the die was s easy to use. Check back next week to see the completed book.

Friday, March 19, 2010

Spring is in the air!!

Working with these new Cottage Cutz dies from the Easter Release is really putting me into a Springtime mood! I thought this new Prima paper would be perfect with the Cottage Cutz butterfly. I also used the Cottage Cutz Mini Daisy to accent the corner of my photo mat.

Be sure to check out the newest March Spring Cottage Cutz release!

Thursday, March 18, 2010

Just Hangin' Out

Happy Thursday Everyone!

This is the CottageCutz die I am showcasing today.


I just had to figure out a way to use this adorable CottageCutz Frog w/ Branch die on a layout. I came up with this fun title and he was the perfect accent. I cut one complete CottageCutz Frog w/ Branch die to use with my title. Then I cut only the top half of another frog and tucked him behind my photo.


Have a blessed day.
Karen

Wednesday, March 17, 2010

Watch for it Wednesday #52

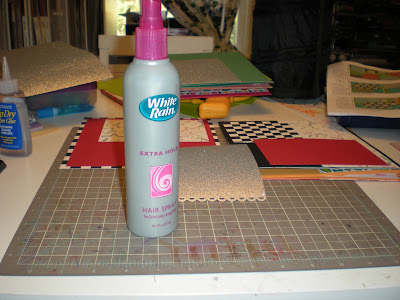
My Watch for it Wednesday post for today is a fun little tip you can use when working with glitter cardstock.

Do you love using glitter paper as much as I do? It is such a great and easy way to add some wonderful sparkle and bling to your projects. However, have you ever noticed that certain papers seem to "shed" glitter more than others?

Next time you are using some glitter paper, go in your bathroom and grab a can of hair spray.

Position your paper so that you have protected the area around it from over spray. Hold the can about 8 to 10 inches away from the paper and lightly spray over the piece of glitter paper in a sweeping motion being careful not to stop over any one area. You don't want to get too much spray on the paper or it will become too sticky and "gunked up".

After you have finished spraying, give it a few seconds to dry and then it will be ready to adhere to your project.


You may still lose a few specks of glitter if you really rub the paper, but otherwise, you should notice a big difference.

Hope you have fun trying this technique for yourself!

Come back tomorrow for another fabulous project from our very talented Karen!

Tuesday, March 16, 2010

Hoppy Easter Card

Isn't she cute??? I know I say this a lot but I can't help it. It never ceases to amaze me how cute these CottageCutz dies are, especially when I actually create something from them.
Today I'm featuring the Girl bunny.
I chose the paper I wanted to use and then simply made the details on her to go with my paper.


I used a dauber to apply some ink around the edges of my pieces and added a little paint to make the white in her eyes, on her nose and on the egg.
Think of all the pretty spring papers you can make this cute bunny go with by changing the colors in the egg, her bow and flower.


Monday, March 15, 2010

Easter Book Page 2


Happy Monday! Today I will be using the Cottage Cutz Truck w/Hay and the Spring Embellishments.This is the second page in my Easter mini Album. I used the truck die from the Cottage Cutz Autumn Release and put the eggs from the Spring embellishments in the bed of the truck. To enhance the flowers I added pearls to the center of my flowers.

These Cottage Cutz dies are so versatile. I love how you can use parts from different dies to create your own die.

Friday, March 12, 2010

Signs of Spring

Today, I am going to be showcasing the fabulous new Cottage Cutz Daffodils Die.
The Daffodils die was the first one on my list from the Cottage Cutz Spring Release. Fortunately, the family from whom we bought our current house loved blooming plants. In our backyard, there is a ring of daffodils planted around an old bird bath. My girls love these daffodils! I try to make a point to take pictures of the girls with the flowers each year. Luckily, we have a fantastic "crop" each year because there is nothing my girls love more than picking flowers!


To create my diecut, I ran the Daffodils die through my die cutter with white cardstock and then used my Copic markers to color each of the different pieces. I used "Buttercup Yellow" to color the daffodils petals and then I matched the green leaves to the greens of the striped fabric paper. These flowers piece together so quickly and easily. I can't wait to use it again to create even more unique daffodils.

I hope you have a fun and scrappy weekend!!

ETA - We finally had a little sun today, so I was able to get a better picture!

Thursday, March 11, 2010

Preparing for Easter

With Easter fast approaching, I wanted to get a jump start on creating some decorations for my home. What better way to make some adorable Easter creations than with the New Easter CottageCutz dies.

These are the CottageCutz dies I will be showcasing today.


I decided to start with making a center piece for my dining room table. I got the wooden crate, faux grass and sticks at Hobby Lobby. I painted the wooden sticks white to match the crate. All of the CottageCutz dies are glued on the sticks and stuck into floral foam. I added some ribbon for the finishing touch.


Close-up of the CottageCutz Mini Chick on outside of crate.


Close-up of all the CottageCutz dies in the grass.


Have a blessed Thursday Everyone!
Karen

Wednesday, March 10, 2010

Watch for it Wednesday #51

Good Morning Everyone!

Today I wanted to show you some fun ways to use your dies making projects with your children or grandchildren. These are fast and simple projects using ordinary items from around your house.

I will be showcasing dies from both the CottageCutz Valentine Release and the CottageCutz Easter release, but these projects would work great with any holiday or theme.

Here is what you will need.

Basic Brown Lunch Bags
Toilet Paper or Paper Towel roll
Cardstock
Deco Scissors
Adhesive
Ribbon
AND
Your favorite CottageCutz dies


Valentine Kids Create

***Brown Lunch Bag Valentine Treat Bag.
Fold over the top of the lunch bag, punch some holes and slip the ribbon through. Using the ribbon, add a tag. Decorate the front using the New CottageCutz Valentine dies.
***CottageCutz Heart Doily Lolly-Pop treat.
Cut the Heart Doily, remove all cut outs. Slip the Lolly-Pop through the two heart cut outs on the Doily. Slip the Ribbon through the swirls cut outs on either side of the Lolly-Pop and tie a bow.


Easter Kids Create

***Brown Lunch Bag Easter Basket.
Cut the lunch bag in half with Deco scissors. Using the Deco scissors again, cut a 1"x12" handle from cardstock and attach to bag. I also recommend cutting a piece of cardstock to place in the bottom of the treat bag to make it more sturdy. Decorate the front of the treat bag with the New CottageCutz Easter dies.
***CottageCutz Easter Egg Lolly-Pop treat.
Cut the Easter Egg. Punch two holes in the Egg. Slip the Lolly-Pop through the holes. Add a bow around the Lolly-Pop.
***Easter Egg Holders.
Cut 1" rings from either a paper towel or toilet paper roll. Cover the 1" rings with paper and add the New Mini CottageCutz Easter dies.

Have a great Wednesday!
Karen

Tuesday, March 09, 2010

Top of the Morning to ya!

If you celebrate St. Patrick's Day than this authentic looking CottageCutz Leprechaun is a must for your collection.
I cut him out of white textured cardstock and colored him in with my Copic markers and did a little outlining with my fine tip Zig pen.


I made this cute little tag with the CottageCutz mini Clover which will be perfect with a plate of cookies.


We'll see you back here tomorrow with a Watch for it Wednesday post from Karen.


Monday, March 08, 2010

Easter Book

Happy Monday! With Easter around the corner, I decide to design a mini album for the occasion. The front page of my mini album is acrylic. The Cottage Cutz Mushroom Trio is perfect for the front page.

Friday, March 05, 2010

Bunny Love

I think the Cottage Cutz Boy Bunny from the Easter Release is just the perfect Easter Bunny to add to any Spring or Easter project! Since the bunny in my pictures is white, I decided to make the Cottage Cutz Bunny white as well. I used a very light grey Copic marker around each of the white pieces to give them a little definition and then I changed the color of his clothing to coordinate with my papers. These are old Imaginisce papers but still some of my favorites when I am working on Spring and Easter layouts. Good thing I stocked up at the time!!

Remember, only 4 more days left to take advantage of introductory pre-order pricing on the newest Cottage Cutz March Spring release dies!!

Thursday, March 04, 2010

It's a Party!

A Froggie Park Party. I couldn't wait to get this adorable CottageCutz Frog w/ Branch die. I knew it would be perfect to use on the invitations and goodie bags for my sons 7Th birthday.

This is the CottageCutz die I am showcasing today.


I only added a bit of shading using ink to my frog. He was almost perfect as is.

This is a close-up of the invitations.


Here are the goodie bags and invitations.


I wanted to say "Thank You" to the Owner and DT of the Scrapping Cottage for giving me the opportunity to be a guest designer for 6 months. I feel so blessed!

Have a great Thursday everyone!
Karen

Wednesday, March 03, 2010

WATCH FOR IT WEDNESDAY #50

Today I'm going to show you how to make a really cute, but simple treat container.
If you've ever gotten a baked potato at a restaurant you may have a gotten some sour cream in a funky little container, well that's what I'm going to show you except this one contains a treat instead of sour cream.
Start out with a 5 1/2" x 4 1/4" piece of double sided patterned paper. I like to use a heavier weight paper myself.
Then apply some adhesive as shown.

Then make a cylinder using the edge with the adhesive to seal it up. Then take a corrugator and put a few crimps on the edge with the adhesive.
This leaves you with an open end to put your treats inside.

Leave some room at the top to seal the end. Then where the other strip of adhesive is seal together going the opposite way to form the sour cream container look.

Add the crimps with the corrugator again and whatever tag and ribbon you like and there you have it!

I used this adorable CottageCutz Mini Bunny for my tag. Since I have a real bunny rabbit this was a must have for me, it makes me smile when I see this cute bunny bum. Too cute!
The Scrapping Cottage is sure to have whatever Spring/Easter diecut you're looking for.


Monday, March 01, 2010

Thank Ewe

You can never go wrong with a sheep die because there are so many "ewe" sayings to use on your cards.
I made this "Thank Ewe" card with the CottageCutz Sheep w/flowers die.
I cut this die out with an thick ivory cardstock and colored in the bell and flowers with my Copics. For the hooves I used a dauber and black ink and sponged the color on, this gave them a more subtle black than just cutting them out in black. I used Antique Linen Distress ink to sponge around the sheep.

We hope you'll join us this month for all our fun projects using the CottageCutz Easter release.
Some other sentiments using this die:
Thinking of "Ewe"
"Ewe" are Loved
I Love "Ewe"
Happy Birthday to "Ewe"
We're excited to announce that Karen will be a part of our Design Team here at the CottageBlog and look forward to seeing more of her wonderful layouts and projects!
Welcome Karen!

FUN TAGS

HAPPY MONDAY!!! Here are a few fun tags using Cottage Cutz dies and Glimmer Mist. I used a different color of Glimmer Mist on each tag. When the tag is dry, you can add your favorite Cottage Cutz die. Now you have a perfect tag for any layout!This cute snowman with broom die is from the Christmas release.

And the adorable little fox from the camping release.

Spring Cottage Cutz Release!!

New Spring Cottage Cutz Dies have just been released!! Check them out!! There are several dies in this release that will go very nicely with dies from the Easter release that is shipping now!

Now is the time to take advantage of pre-order pricing on this newest release!!

Friday, February 26, 2010

Patio Picnic

I am getting so tired of this cold winter weather so what better way to warm up than by working on a bright springy layout! The new Cottage Cutz Butterflies from the Valentines Release are going to be must haves for all of your spring projects this year! This die is sooooooooooo cute and the butterflies are so easy and quick to put together! I love how I can customize the butterflies with the exact colors I want and the direction I need it to face!

This layout was inspired from PageMaps because as you know I love to play with sketches! So get out your Spring papers and get to scrapping!

Thursday, February 25, 2010

Home is...

where the Heart is.

I am sad to see February end. I have had so much fun working with these adorable CottageCutz Valentine dies! Of course, they are perfect for Valentine layouts or crafts but are adaptable enough to be used year round.

These are the CottageCutz dies I am showcasing today.


Both of the dies I am showcasing today are so versatile. These are the dies you will keep pulling out to use on your pages. They really add that extra something to your layout or project.

The CottageCutz Heart Doily can be cut in so many different ways to create so many different looks. I have used it here, only cutting the top, to create the scallops of lace. You could also only cut the bottom V of the heart, for a different lace effect.

The CottageCutz Lock and Key is a perfect embellishment to use on so many of your creations. Use them together or separately. Ideas for this die include, in titles(see Watch for it Wednesday #48) or cut only the heart die to use as an accent(see layout below) and finally the keys, a great die to have for a variety of different projects(see layout below).

**Click on image to expand for a better view.**


Have a wonderfully creative day!
Karen