Showing posts with label birthday. Show all posts

Friday, June 03, 2016

Birthday Party!

Hello everyone,

It's Donna here and I am featuring one of the new releases from May which is the "Pillow Box Plus". This is a great set, you get the pillow box die which is one piece, plus it comes with many different pieces to decorate the box.  There is a bee and ladybug, five petals and centers, four stems with leaves and an oval decorated die.  There are so many possibilities for this set.  I decided to decorate the pillow box with a birthday theme. I had the perfect festive paper for this project.  I have had this paper in my stash, so I am really happy the way the pillows came out.  Can you image having one of these sitting at each setting on the table?  I think it would look so nice!  I may have to make more of these for one of my grand baby's birthday parties this summer!


Here is a blue box with matching ribbon and twine.  I used the doily from the "Gift Tag Topper" and one of the "Party Hats" and added a rhinestone for this pillow box.

Here is a green box with matching ribbon and twine.  I used the doily from the "Gift Tag Topper" and one of the "Party Hats" and added a rhinestone for this pillow box.

Here is a orange box with matching ribbon and twine.  I used the dies from the "Gift Tag Topper" for this pillow box.

Here is a pink box with matching ribbon and twine.  I used the doily from the "Gift Tag Topper" and one of the "Party Hats" and added a rhinestone for this pillow box.


Here is how I put my box together.

The best part about this pillow box die is you can use a 6x6 piece of paper to cut your box out.  The score lines are very clear with just one cut.

I  scored the fold with my bone folder and used a piece of score tape to put my box together.

Here is what the doily and birthday looks like in the "Gift Tag Topper".


Thanks for taking the time to read my post, I hope you enjoyed viewing these lovely boxes.  Please leave me a comment on how you like them.  

Dies I used on my project:


Tuesday, April 12, 2016

Ship's porthole

Hi, Janja here!

Today I share with you another card made with the CottageCutz nautical dies.
Let's see how it is made.


For the card you need:
  • card base in brown color: 11.4 x 5.7" (29 x 14,5 cm), folded in half
  • white cardstock: 5.3 x 5.3" (13,5 x 13,5 cm)
  • wooden sheet
  • scraps of white and colored cardstock
  • transparent PVC foil
  • embossing folder
  • Distress inks: Antique Linen, Vintage Photo and Wild Honey
  • white pigment ink pad
  • white chalk paint, brush
  • gold and copper metallic paste
  • paper cutter
From wooden sheet we cut out 10 strips. They should be 5.1" (13 cm) long and 0.5" (1,2 cm) wide.
Paste them on a sheet of paper and cut it to size 4.9 x 4.9" (12,5 x 12,5 cm). I advise you to use glue and not double-sided tape. 
The whole area is shaded with the Distress ink Vintage Photo and a white pigment ink pad.
Finally it's painted with a white chalky paint.
When the color is still wet, pull with the finger on some places. This will remove color. Little smearing, but at the end, you will be satisfied with the shabby appearance of the wood. 


Now let's start with porthole.


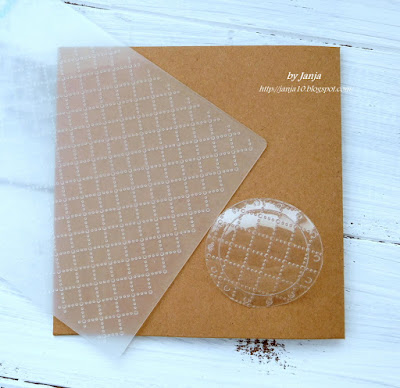
Prepare the cardstock cutouts. For the glass piece use PVC foil. I can't advise you which one is preferred. I always use the thicker one. 


Use embossing folder for pattern on the foil. 


Coat other cutouts with gold and copper metallic paste and glue them together with the foil.
 

The fence consists of two CottageCutz dies. Pillars and the rope around them are from the pelican die. Pillars are also cut out of a wooden sheet. 
For the rope between the pillars, use the rope corner die.
 
Seagull flew to the one of the pillars, while we stuck an anchor to another one. The inscription Happy Birthday is glued to the wooden background.
And don't forget on our April challenge - anything goes. You have time to share your projects with us till the end of the month. 
Two lucky winners will get the nice awards.
 
List of dies used:


I hope that you enjoy my company.

Janja

Wednesday, March 02, 2016

It's Your Day

 
Hello Cottage Cutz Fans! It's Mary Marsh here and I am so excited to be sharing my first post on the blog. I am starting off my term with a masculine birthday card. We all need cards for the guys in our lives and balloon cards are always a winner.
 
I am using the round mini balloon die for this sample. Looks like this die is out of stock right now, but check out this cute balloon variety die that would work as well. So let's get started with the details of how to make this card.
 
cardstock and patterned paper sizes:
red cardstock base measures 4 1/4" x 11" and scored at 5 1/2".
striped patterned paper layer is 4 1/8" x 5 3/8"
embossed yellow layer is 3 3/8" x 4 5/8"
dotted patterned paper is 3 1/8" x 4 3/8"
image panel is 1 7/8" x 3 1/8" and red layering panel is 2 1/8" x 3 3/8"
 
I used double sided tape to secure my panels. The dotted patterned paper is placed on an angle for some card interest. Before the image panel was secured, I added some red burlap ribbon and then some red and white bakers twine over that.
 
Made a mini bow from the same bakers twine and added a sequin center. Even though I am using ribbon on a masculine card, it's burlap and has a masculine appeal to it. Bakers twine is not feminine or frilly so that's ok also.
 
On the yellow embossed panel, I used a birthday words embossing folder.
 
For the image panel, I die cut the balloons in red, yellow and blue to match the colors in the patterned paper. I sponged the edges of the paper with the corresponding inks to give some depth. Stamped the "it's your day" sentiment and added some red sequins to complete my card.
 
I hope this card gave you some inspiration to make a masculine card using these super cute balloon dies. That's it for me for today. So until next time.............inky hugs!


Wednesday, September 28, 2011

Birthday Fun

I love birthdays. Whether my own, or our childrens, birthday are always full of color, surprise and CAKE!!! This sweet tooth sure loves a good piece of cake. Hi Everyone, Erika Taylor here today to share with you a little card I created using the Game Booth dies. This set of dies is so versatile and today I wanted to show you that you can use the game booth as a frame.

I used Pink Paislee Soiree papers and some Donna Salazar glitter to give this card a real girly feel. Then I added a dash more sparkle with Stickles. Hope you like it...


That is it for me today. Be sure to stop by my blog if you have some time as well. I'm having a little blog candy and there will be some great Cottage Cutz dies included.
Until next time

Toodles
Erika Taylor


Wednesday, May 11, 2011

Gotta Love Presents!

I love this CottageCutz Birthday release! From making cards to scrapbooks these dies will be sure to get used. I ran this Presents, Variety die through my Revolution in several different colors to match my papers and then started assembling them. I have lots of different presents for future cards or layouts. Striped ones, plain ones & polka dotted ones!


If you haven't checked out the birthday release then now is the time to do it - there are lots of fun and very useful dies that are must haves!

Have a great day!

Kay

Wednesday, May 04, 2011

Seize the Cake

One of my favorite things to eat is the cake my husband gets me each year for my birthday. Since I have made cakes and decorated them for years it's a real treat to get a bakery cake for my birthday with that yummy filling inside.


This CottageCutz Celebration Cake die is great for all those fun ocassions we get together with family and friends. I have said it many times before and I'll say it again...these dies are so versatile!


Here is my birthday cake card:


My daughter got married last October and her colors were aqua & orange with black and white accents. These colors are tough to find together but with this cake die I recreated the wedding cake for a future layout I'll do on her wedding cake.

All this cake is making me hungry! Too bad I'm on a sugar free diet right now :(
Have a good one!
Kay