Showing posts with label Vladka. Show all posts

Thursday, September 29, 2016

Wheat Stalks in Frames


Hi, Vladka here!

Today I'm using some dies from Autumn release. I love this time of the year, when nature is so generous with colors. This is my card:


Basics:

White card base: 4 1/4 x 6 inches (cut 4 1/4 x 12 inches, fold in half)
Additional piece of white cardstock and some red and kraft cardstock to cut out the die cuts 

Other Supplies:

CottageCutz Dies: Listed Below
Distress Ink:  Tea dye, Brushed Corduroy, Fossilized Amber
Other: acrylic block, Scissors, Paper trimmer, Sizzix machine, piece of acetate 

1. First let's do some smooshing on additional piece of paper to prepare the background.  Add some Tea Dye Ink on acrylic block and spritzed some water on it. Then take a piece of plastic acetate and gentle pressed it against the block to pick up some of the ink. Now, press the plastic on the paper to transfer the ink. This will give you a splotchy look. Put paper aside to dry or use heat gun to dry it:


2. Prepare all die cuts: Wheat Stalks cut out of white cardstock and bow cut out of the red cardstock, "Give thanks" cut out of the kraft cardstock and two second biggest Pierced Wide Rectangle Frames (one white and one cut out of the kraft cardstock):


3. Color wheat stalks gentle with Fossilized Amber distress ink first and then distress the edges with Tea dye and Brushed Corduroy distress inks:


4. Now glue piece of paper with smooshing on card base, then glue both rectangles and also all die cuts as shown on the photo.


5. To finish the card, flick some droplets of gold shimmer spray and let it dry. Card is now finished.


I hope you like it. Have fun creating. And don't forget, sixth CottageCutz challenge is waiting for you. You still have two days to participate. This time theme is HOLIDAY. You can linked your project here. And please, use only Scrapping Cottage dies.

Thursday, September 22, 2016

Elegant Deer

Hi, Vladka here!

I have another  Christmas card for you, this time with beautiful elegant Deer. So, let's take closer look to how I created it.


Basics:

Kraft cardstock for the card base: 4 1/4 x 6 inches (cut 4 1/4 x 12 inches, fold in half)
Additional piece of white and kraft cardstock and red cardstock for die cuts

Other Supplies:

CottageCutz Dies: Listed Below
Distress Ink:  Aged Mahogany, Peeled Paint, Forest Moss, Gathered Twigs, Brushed Corduroy
Other: Scissors, Paper trimmer, Sizzix machine, Scor-buddy, White watercolor in tube, piece of  dish sponge

1. First prepare the card base and use the biggest Cross-Stitched rectangle die and cut the rectangle out of white and kraft cardstock. With the scissors, cut of the white snow hill.


2. Put some white watercolor on the piece of dish sponge and drag gentle over the rectangle and card base. You can do the same later also on all die cuts.


3. Cut the Elegant Deer out of white cardstock and color it with brown distress ink.


4. Cut the Holly and Beries out of white cardstock and color ot with green distress ink. Cut also greeting out of red cardstock. You can apply some white paint also on these pieces.


Now put all pieces together as shown on my finished card!


I hope you like it. Have fun creating. And don't forget, sixth CottageCutz challenge is waiting for you. This time theme is HOLIDAY. You can linked your project here. And please, use only Scrapping Cottage dies.


Thursday, September 15, 2016

Shine wreath with greetings

Hi, Vladka here!

I have another CAS Christmas card for you. So, let's take closer look to how I created it.


Basics:

White cardstock for the card base: 5 x  inches (cut 5 x 10 inches, fold in half)
Additional piece of white and kraft cardstock and some white and red cardstock for die cuts

Other Supplies:

CottageCutz Dies: Listed Below
Distress Ink:  Aged Mahogany, Peeled Paint, Forest Moss
Other: perfect Pearls, Scissors, Paper trimmer, Sizzix machine, Scor-buddy, Water, spray bottle, red paint

1. First use the biggest Cross-Stitched Square die and cut the square out of white and kraft cardstock. In spray bottle, mixed also water with Perfect Pearls. Spray it on both squares (and also on card base). This will give some shine to the finished card.


2. Cut the Holiday Wreath out of white cardstock and color it with green distress ink. After that spray some previous prepared mixture on it and let it dry:


3. Apply some red paint on berries and give it a side to let it dry.


4. Cut also greeting out of red cardstock. Distress the edges with Aged Mahogany distress ink and also spray it with mixture of perfect pearls and water. Let it dry.


Now put all pieces together as shown on my finished card. Quick and easy :) It is hard to see all the shine here on the photo but in real live is beautiful.


I hope you like it. Have fun creating. And don't forget, sixth CottageCutz challenge is waiting for you. This time theme is HOLIDAY. You can linked your project here. And please, use only Scrapping Cottage dies.

Thursday, September 08, 2016

CottageCutz Challenge #6 - HOLIDAY

Hi, Vladka is here!

Thank you very much for all 33 great cards and projects you've made for Challenge #5. Two lucky winners will be announced at the end of this post. So, stay tuned.


And here is time to start new challenge. 
This time theme is HOLIDAY

So, create a card or on any other gift for a Holiday, such as Thanksgiving or Christmas... 

We all love to create holiday cards, don't we? So, grab your favorite Christmas or Thanksgiving dies and create something. But please, use ONLY CottageCutz dies and not any other dies. "Add your link" button is available under the list of used dies. If you are not familiar with this button, please check this post for more explanation.  Challenge will be closed on 30st of September!


So, before I announced the winers, I'm going to show you my project for today. Here is my card:


Basics:

White card base: 5 1/2 x 5 1/2 inches (cut 5 1/2 x 11 inches, fold in half)
Additional piece of white cardstock and some white and red cardstock to cut out the die cuts

Other Supplies:

CottageCutz Dies: Listed Below
Distress Ink: Tumbled Glass, Fired brick, Aged Mahogany, Gathered Twigs, Ground Espresso
Other: Scissors, Paper trimmer, Sizzix machine, Scor-buddy, White watercolor in tube, paint brush

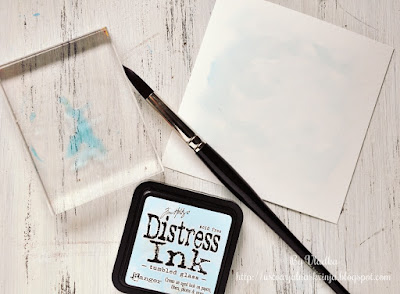
1. Apply some Tumbled glass distress ink on the acrylic block and add also some water. Mixed with the paint brush. Use large paint brush and apply color on the additional piece of paper. Let it dry or use heat gun to speed the process.


2. Mix small amount of white watercolor or acrylic paint with water and flick some droplets of the mixture on the previous colored surface. Let it dry.


3. Cut two Cardinals out of red cardstock and distress the edges with Aged mahogany distress ink. Now cut two more cardinals out of white cardstock and color the beaks and surface around it. Glue these on the top of the red Cardinals. Color also the branch and the Birdhouse with red and brown distress inks. Apply some white paint also on the branches and Birdhouse.


5. With Happy Holidays Notecard die, cut also the expression out of red cardstock. Use scissors to cut of just Happy Holidays part. Glue everything together as shown on the photo. Card is now finished.


-------------------------------------------------------------

And now go back to our challenge a little bit more. As I told you before, two lucky winners will be randomly chosen and will get gift certificate for Scrapping Cottage store.

First one will get gift certificate value of 50$...

... and second one in the value of 25$.

You have time till 30st of September to participate. 
Both winners will be announced in the same post as new challenge (for October) will begin.

All you need to do is take your CottageCutz dies and start creating! 
Please, use only CottageCutz dies!
Have fun and don´t forget to show us all your projects.

"Add your link" button is available under the list of used dies.

-------------------------------------------------------------

And of course we should not forget about the winners for the fifth challenge.

1st Gift certificate value of 50$ goes to Ana S Her card was linked under number 9:


2nd Gift Certificate value of 25$ goes to Mojca. Her card was linked under number 14:


Congratulations!

Please, contact Joanne at scrappingcottage@cox.net to claim your Gift Certificate.

This is it for today. All I want to show you before I left is the list of CottageCutz dies which I used on my project. Here they are:

Friday, August 26, 2016

Christmas card in classic colors


Hi, Vladka here!
On this card I used classic Christmas colors and I have to admit they are still my favorite. Are you interested in how I did it? Let me show you.. 


Basics:

Kraft cardstock for the card base: 4 1/4 x 6 inches (cut 4 1/4 x 12 inches, fold in half)
Additional piece of kraft cardstock and some white and red cardstock for die cuts 

Other Supplies:

CottageCutz Dies: Listed Below
Distress Ink:  Aged Mahogany, Peeled Paint, Forest Moss
Other: Scissors, Paper trimmer, Sizzix machine, Scor-buddy, Water, White watercolor in tube, piece of  dish sponge

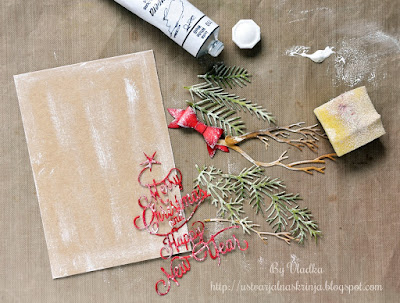
1. First cut the Spruce Stems and Winter Branches out of white cardstock and color it with green and brown distress inks:


2. Put some white watercolor on the piece of dish sponge and drag gentle over the additional piece of paper and all die cuts.


3. Arrange all stems and branches into the flower arrangement and glue all pieces together on the additional piece of paper.


4. With Build a Bow die, make smaller bow and glue it on the top of the arrangement. For finishing touch add also the Holiday Greetings Tree die cut. You can also add piece of brown fun foam between cardbase and additional piece of paper.


Card is now finished.


I hope you like it. Have fun creating. And don't forget, fifth CottageCutz challenge is waiting for you. This time theme is BIRTHDAY CARD. You can linked your project here. And please, use only Scrapping Cottage dies.