Showing posts with label Tropical Bouquet. Show all posts

Monday, August 14, 2023

Hello Crocodile

Hello crafty friends!

It's Kris here to share some Monday inspiration with you! 


For my card today, I combined 2 challenges from Splitcoast Stampers:

Our very own DT Leader here at CottageCutz, Mary Marsh, was the Color Hostess for CC960 and I LOVE this pretty combo, so I played along:


I actually substituted the Lost Lagoon with Just Jade (closest I had to it)

and then I also played with this week's sketch challenge -- turned vertically


I had the idea to make the front a split diagonal fold card, so the focal image is only attached to the upper left of card front.  INSIDE you get the upper left half of card to write or stamp your message ☺


Design Steps:

I started by cutting my top folding A2 card base (4-1/4" x 11" - scored at 5-1/2"

I then opened the card and cut diagonally from the top right corner (at score line) down to the bottom left corner.

I then cut (4) different patterned papers at 4" x 5-1/4" -- although I only used 3 of them.  I just couldn't decide which I wanted.  Then cut all of them in half diagonally.  

*Tip:  use the other halves to make a 2nd card!


I then cut the green patterned paper in half (line up the SHORT edge and cut at 2") as shown.


Next, I repeated that process with the pink/white/green striped pattern then attached all 3 pieces as shown below.


I then die cut the largest of the Nested Stitched Doily dies, and the Crocodile from white cardstock.

I die cut the Tropical Bouquet from Bubble Bath and Berry Burst cardstocks.

I die cut the Crocodile and [leaves from the] Safari Adventure Gang from Just Jade and Mossy Meadow cardstock.


I glued just half of the white doily circle to the top (left) of card front, and then popped the Croc in middle with foam dots.  This allowed me to tuck the flowers and leaves in under and around him (some I glued, some I popped up with more foam dots).  

I decided to die cut the Hello w/ Shadow from the Bubble Bath and Berry Burst and glued to left right corner (which is inside the card!  ☺


I would be done, however I was not following a tutorial on this, and noticed this style of card does not stand on it's own for displaying ... SO, I remedied that by adding a "kick stand" to the back of my card.

I used the left-over triangle piece from my card base, and trimmed it down to 2-3/4" x 3-1/2" and scored it at 3/4" as shown.


I should probably also tell you, that if you glue this now to the middle back of your card, it still won't stand well because the front is "top heavy" with all the die cuts.  SO... to remedy this, I turned the piece so the 3/4" score line is horizontally at the bottom, then I measured 1/2" in from the top right corner, placed a mark, then with scissors, I trimmed from the bottom right corner up to that 1/2" mark.  


I glued the tab to the back of card to that the bottom of tab is flush with bottom of card.  That slight angle allows the card to tilt back a li'l bit and counters the heaviness of card front.  ☺  Win-Win!!!


PRODUCTS USED:


I hope you enjoyed this tutorial!  I really enjoy working with the cute CottageCutz dies!  

For more inspiration and tutorials, see our YouTube channel here.  Happy Crafting!

~Kristine


Thursday, September 09, 2021

New Baby Boy

 Hello Scrapping Cottage Friends

We have a Big Labor Day Sale -- Click Here

SAVE up to 65% on CottageCutz  -- SAVE 50% on Slimline Dies -- SAVE 40% on Little Bluebird Designs

Sales Ends Friday, September 10th at 9pm Pacific Time 

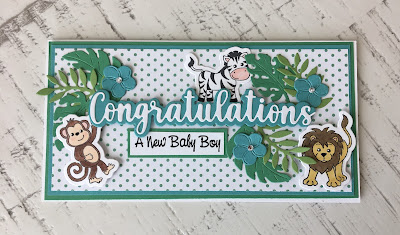
Today,  I am sharing a card featuring the Little Bluebird Stamps and our CottageCutz Sentiments with Shadows dies.  I was running low on my supply of new baby cards so I decided to stock up just in case a new little surprise comes along.


Design Steps:

1.  I am using a mini slimline white card base measuring 6 1/4 x 3 1/4.  Green layer of card stock 6 1/8 x 3 1/8, blue layer of card stock 6 x 3 and a polka dot layer 5 7/8 x 3 7/8.  I used our Congratulations with Shadow die to cut out the sentiment on white and blue

2.  Stamp your little animal images from the Safari Friends stamp set.  Color with the copics shown above and then us the coordinating dies to cut them out

3.  Using the Tropical Bouquet die cut out some leaves and flowers
4.  Glue the green layer to the card front, next glue the blue layer and finally glue the polka dot layer.  Pop up the Congratulation in the center of the card.  Stamp the sentiment and layer on green gluing flat to the card under Congratulations.  Next glue down the leaves
5.  Pop up the lion and the monkey as shown and glue the zebra down flat.  Add rhinestones to the flowers and your card front is done
6.  Stamp the inside of the card on a piece of white card stock 6 x 3 and add your extra leaves and little hippo

CottageCutz and Lil' Bluebird Stamps


Thanks so much for stopping by and don't forget to check out the huge Labor Day Sale it will be ending very soon!

Blessings and Take Care
Pam

Friday, July 23, 2021

Aloha Friday!

Aloha!  It's Jeanne today with a hello/thinking of you card with a tropical twist.  This card uses one of the new slimline dies.  This release is wonderful with a great selection of dies.  It features awesome background dies which can be on their own or to highlight dies that you already own!  I found this leafy background was the perfect backdrop for one of my favorite dies from last summer.  To make things even better, the new slimline release is on sale right now for a limited time!

I started this card by creating a blended background in several shades of green by using Distress Oxide inks and blending brushes.


Next I cut a panel using the Leafy Background Slimline die.  I edged the outside and several of the leaves with a darker green ink.

My flowers are from Tropical Bouquet and I used various colors of cardstock to cut them.  I inked the edges to get a bit of depth.

I cut the word Aloha from the Aloha & Ukulele die.  I cut one from gold foil and three from a dark brown cardstock.

To complete the background I adhered my leaves to a dark green panel cut from the largest of the Nested Rectangles Slimline from the first slimline release.  I stacked all the "aloha" words placing the gold foil on top.

I placed my flowers in the corners....

and my sentiment at an angle between them.  This card reminds me of the aloha shirts my husband has with the dark background, light foliage and bright flowers.  A reminder of the islands!

Dies used:


Thanks for visiting today.  I hope you have a fun and creative weekend!


Saturday, July 17, 2021

Toucan Celebrate Your Birthday!

Hello Scrapping Cottage friends! Thanks for taking the time to stop and visit with us today. It's Mary Marsh here bringing you the Saturday edition of the Blog.

IT'S NEW RELEASE TIME! We have a new collection of Slimline Designs. Your slimline cardmaking is going to get a lot easier. We have 20 new designs and they are on sale. You can get each individual die for a limited time 25% off. The dies have appeal for all styles of cardmaking. So check them out and make your selections.

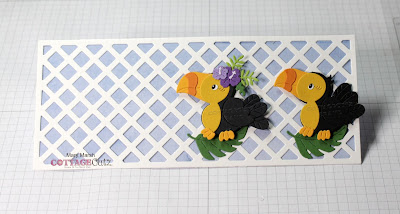
Today for your viewing pleasure, I am featuring the new Lattice Slimline die and paired that with the Toucan from our 2020 Beach & Tropical release. I created a birthday card for my daughter-in-law who celebrates in August.  I have plenty of time to make sure it arrives on time (LOL)! I am notorious for getting cards in the mail at the last minute! So let's get started with some details on how I created my card.

Design Steps:

I started my card by cutting the lattice in white cardstock. For the background I used sky blue designer paper. I am also using a white card base.

Card Base: 3 3/4" x 8 3/4""
Lattice: 3 1/2" x 8 1/2"
Blue Designer Paper: 3 3/8" x 8 3/8"

Next, I started building my outdoor scene. I cut the toucan with cardstock following the packaging colors. I also cut some extra greenery using the Tropical Bouquet die.
For my sentiment I used 3 different stamps and by masking and the help of my MISTI, I stamped on 3 lines in a grape ink. The banner is one of the extra dies that was included in the Windows Slimline die set. 
Now that all my elements are cut I am ready to start the card assembly. I attached the blue designer paper to the lattice with double sided tape. Then the toucans were attached with dimensional adhesive. I have them standing on a green tropical leaf.  
Next, I attached the banner sentiment and the two tropical leaves. 
The Birthday phrase is from the Fairytale Birthday die. I cut two for more dimension in a grape cardstock.
To finish off my card I attached the image panel to the white card base. I added some additional tropical greenery in the corner. I hope I have given you an idea for a way to use this new slimline lattice die with dies you already have in your collection. See you next Saturday. 

Dies I used to create card: