Showing posts with label Swinging Monkey. Show all posts

Friday, January 12, 2024

2 Swinging Monkey Valentines


Hi CottageCutz Friends,

Kris here with you today, sharing 2 Valentine's Day cards featuring the cute Swinging Monkey and the Valentine Phrase & More!.  The first one is a quick & easy valentine's card.  For my 2nd card, I made an interactive swinging card!

CARD #1


DESIGN STEPS:

I cut my A2 top folding card base in a dark pink, then I layered a piece of Doodlebug Design Hearts paper slightly smaller, 5-1/4" x 4".  

I die cut the largest Nested Wacky Stitched Rectangles from white c.s. and stamped half of a sentiment onto lower portion as shown, then mounted it onto card front. 

I also die cut the Swinging Monkey and the Valentine Phrase & More from white cardstock, and the hearts from  2 shades of pink.  I also foiled the 2nd half of my sentiment onto pink c.s.


I colored my monkey and assembled.  Then I cut off his hands so I could glue them on top of the hearts like he's actually holding them.  


I decided to hang him by his tail instead of his arm, so I glued the tail to tree limb and then onto the card.  I added some foam tape behind his body to pop him out a bit.  


Next, I popped up 2 hearts where his hands would be with foam tape, then glued his hands to the hearts.  I then glued the li'l hearts to the tree limbs and around. 


And lastly, I popped up the foiled sentiment with foam mounting tape and Voila!   How stinkin' CUTE is he??!!!  


CARD #2
(This one actually swings!)


DESIGN STEPS:

For this one, I started with a 5-1/2" square top folding card in light pink.  I stenciled on front to add a li'l interested, then stenciled hearts (from the Valentine Phrase & More cut outs) where the dotty lines intersect.

Next, I die cut the largest Stitched Rectangle set from the center of my card front (with the card open).


Next, I die cut a darker pink frame by nesting the largest Scalloped Rectangle and the 2nd largest  Stitched Rectangle set as shown


I glued the frame to the card front. 


I cut a piece of white c.s. to 5" square and cut 2 pieces, also 5" wide and die cut tops with the Grass Slimline dies.  Then I colored with distress oxide ink.


 I glued the monkey's body and arm to an acetate strip.  Then I punched a hole where his hand would be that was big enough to go around a tiny spinner disc (you could also stack 2 round mini foam dots on top of each other if you want) and position and glue it to the center of the inside of your card as shown below.  

*It helps to close the front of card for positioning.  


Then, with the acetate strip around the glued disc, I glued the tree limb to the top of disc (or dimensional dots). Then I glued his hand to the top of the tree limb where his arm is at and glued the hearts to the tree limb.

I then attached my sentiments to the front as shown. 


And lastly, I cut a piece of lime cardstock 5-1/2" x 3" and scored at 1/2", 1-1/2", 2-1/2" then mountain fold, valley fold, mountain fold it.  Burnish score lines, and add Scor Tape to the 2 outer flaps.


Attach the flaps to insides of card at the bottom. 


For the back, I cut a piece of white cardstock 5" square and mounted a piece of dark pink that was die cut with largest scalloped square die.  I then mounted the sentiment and have room to hand write on the white border.  ☺


Thanks so much for looking today!  I hope you get creative with your favorite CottageCutz dies and be sure to check out the Black Friday Release!!!  It's still on sale - individual dies are 30% OFF and has lots of versatile dies for Valentine's, Spring or Summer! 

~Kristine

Tuesday, March 12, 2019

Sincere thanks

Hi, Janja is here with you.
On the card that I share with you today, I used another die from Valentine's release. I replaced hearts with a bunch of flowers.


- CottageCutz dies: Swinging Monkey, Hedgehogs In Love (flowers), Spring Greenery, Circle Set
- white card base: 4.25" x 5.5" (10,8 x 14 cm), folded
- patterned paper: 3.75" x 5" (9,5 x 12,7 cm)
- brown card stock: 3.95" x 5.2 (10 x 13,2 cm)
- colored card stock
- colored ink pads
- double-sided adhesive tape, self-adhesive foam tape, glue

Cut out monkey and flowers. Emphasize cut outs with colored pads. Glue all the pieces together.


Make a card base from white a card stock. Trim selected patterned papers and cut the frame from the brown card stock.
Cut the round aperture in the middle, which is slightly larger than the inner edge of the frame.
Also cut out branch and greenery.


Stamp a sentiment and trim it with scissors.


First, attach the frame to the back of patterned paper. Attach branch and greenery and all adhere over the smaller patterned paper and brown card stock.


Fasten the monkey and banner on the background with a self-adhesive foam tape.


Have a nice day.
Janja


Thursday, February 14, 2019

Raining Hearts!

Good Morning Scrapping Cottage Friends!

Happy Valentine's Day to everyone!! It is Pam sharing with you on the blog today!

I am using one of our new spring release dies Spring Showers Bunny and giving it a twist for Valentine's Day.  Most all of our dies can be used in so many different ways if you just open up that imagination.  And when you do it gives you tons of fun options!


Design Steps:

 1.  Using the Spring Showers Bunny and card stock colors of your choice cut out the pieces
 2.  Use a variety of inks to shade the bunny if desired
 3.  Assemble the bunny and color in the eyes with black marker and add a little white dot with a gel pen
 4.  For the background cut a white piece of card stock 4 x 5 1/4 use a heart stencil and some light pink ink and sponge in the hearts
 5.  Use an A2 white card base and a piece of red card stock cut slightly smaller then the card base front
6.  Mount the heart stenciled piece to the red card stock.  Stamp the Happy Valentine's Day to the bottom.  Attach the black stitched ribbon and then pop up the bunny.  Use the Swinging Monkey Die to cut out all of the tiny red hearts and glue them as shown.  Your card is complete


CottageCutz Products


The online store is having an awesome sale on the Spring, Valentine and St. Patrick's Day Releases so make sure your do not miss out on the 25% savings going on right now!
Blessings
Pam

Friday, February 08, 2019

Ape for You Valentine

Happy Friday!  It's Jeanne posting today.  I have a quick Valentine's Day card for you today.
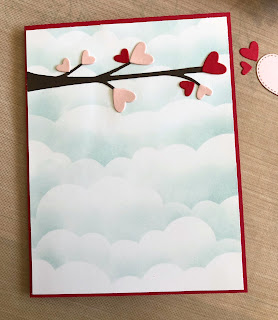
First, I stenciled the cloud background on a piece of card stock slightly larger than A2.
I used Soft Sky ink.
I cut the monkey from two shades of brown card stock and used a black pen to color the eyes.
I cut the hearts from both pink and red card stock and the branch from dark brown.
I cut the stenciled panel down to 5 3/8 x 4 1/8 inches and adhered it to an A2 red card base.  Then I glued the branch and hearts to the upper portion of the card.
I stamped the sentiment on the pink card stock and used the second smallest heart to cut it out.  Then I placed everything on the card base before gluing down.
While the branch, hearts and sentiment are all glued to the card, the monkey is popped up using foam.
Dies used:
http://www.scrappingcottage.com/cottagecutzswingingmonkey.aspx
http://www.scrappingcottage.com/cottagecutzstitchedheartsetbasics.aspx

Thanks for stopping by today!  There is a sale on the Valentine's Day release and the new Spring release, but it's for a limited time so stop by the online store today.

I hope you have a fun and creative weekend!