Showing posts with label Stitched Rectangle Slimline. Show all posts

Tuesday, January 31, 2023

Hello Slimline Card With Flower 1 New Release

Hello Cottage Cutz Friends!
Melinda here with you, and today I am sharing a pretty slimline card I created with the amazing new Flowers & More release from Cottage Cutz!
Okay, I don't say this too often, but this release is a MUST HAVE for your creative collection! Sooooo many fantastic dies in this new release! Here is my project for today!
I created this simple yet pretty card featuring the Flower 1 die from the new release! It is such a great sized die and very, very easy to put together.


Here's a closer look at the two flowers. I cut them both out in plain white cardstock. I then colored them in with my markers. 

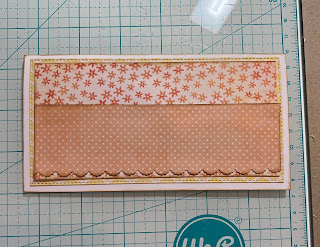
For the base of the card, I started with a piece of white cardstock measuring 7x8.5". I scored and folded it to make it a side folding card base measuring 3.5 x 8.5". I then cut a piece of pink cardstock for a mat. I cut that 1/8" inch smaller than the base. I then cut out the largest scallop stitched slimline die from that set and then two of the rectangle stitched slimline dies from that set all in white cardstock. I then cut two mats for the larger two bases. One in the patterned red paper and then in the same pink patterned paper. For the smallest stitched rectangle, I left it plain. I then layered all of them together adding foam tape under the scallop stitched mat and the second stitched rectangle mat to give them just a little lift. I then put the pretty flowers on the card and added some sequins. 

Here's a closer look at the bottom portion of my card. 
To finish off my card, I cut out the smallest double stitched oval die from that basic set and the word hello from the hello spring bunny cottage die from last spring's release. I cut both of them out in white cardstock and then used the same color red marker to color in my hello so that it would match my flower.

The card came together quickly and can be reproduced easily! Here is a look at the fabulous collection!

Flowers & More collection!

Grab it fast while you can get the entire bundle for one amazing low price!
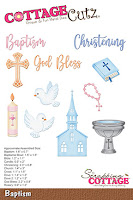


Dies I Used


Don't forget to head over to the Cottage Cutz You-Tube Channel where you can see some of our amazing design team members create some beautiful projects!


Well that about covers it for today! Until the next time, have a wonderfully craft-die day!
Melinda Beltran

Tuesday, February 08, 2022

Easter Sunday

Hello Friends

It is Pam filling in for Wendy today.  I am starting to make a few of my Easter cards to get a little ahead.  The New Release die I am using is Baptism.  It has several really nice pieces that can be used in a number of different cards such as Easter, Weddings, Baptism and Sympathy.


Design Steps:

1.  I am using a mini white slimline for a base 6 1/4 x 6 1/2 folded in half.  Using the second from the largest Stitched Rectangle Slimline die I was able to make the cuts work using yellow DP.  Cut orange flowered DP 5 1/2 x 2 3/4.  Last cut a piece of orange dotted DP 5 1/2 x 1 3/4 and use a border punch on the bottom of it
2.  Ink all of the edges of the white card base and the DP before you glue together.  Glue down the yellow to card base next the flowered DP and last the dotted DP as shown above
3.  Using the Baptism die cut out the pieces in brown wood DP, white, yellow DP, and black (black Bible and little orange flowers not pictured). Cut the squares from yellow DP with the 4th from the smallest Pierced Square die
4.  Glue the squares at a diagonal as shown above.  Pop up the church in the middle, glue down the Bibles and the Cross flat.  Add the little orange flowers cut with Sending Hugs Bear add little pearls to the inside of the flowers and glue down your sentiment

CottageCutz Dies


Don't forget to check out the new Spring Release.  It is perfect for a number of different projects!
We have more inspiration on our YouTube Channel check it out HERE
Thanks so much for stopping by!  And I will see you Thursday.

Blessings and Take Care
Pam


Friday, June 04, 2021

Hogs and Kisses

Happy Friday!  It's Jeanne today and IT IS NEW RELEASE TIME! The collection is called COUNTRY FARM! It has the most delightful dies.  Everything from Tractors to Chicks to Cows!  Each die is just full of awesome details and can be used for so many different occasions.  Today, I am using the Farm Pig Peeker as a gift card holder / card.

This little gal is adorable with her floral headpiece.

I first started by coloring her with Distress Oxide inks.  I used Copic markers for the smaller floral pieces. (There is a sneak peek here of a card I'll have later this month for you!)

 I cut my A2 base and pocket from a Co'Ordinations cardstock which gives a weathered look when sanded.  I wanted it to have an "old jeans" look.  The Pocket was cut from the Peeker Pocket die which is currently out of stock.

I traced the pocket onto a piece of light blue cardstock and cut it slightly smaller than the pocket.  I glued this to the back of the pocket.

The pig peeker is glued to the pocket NOT the card to make a gift card holder. 

The front view.

I added her flowers and glued the pocket to the card panel.  When adhering a gift card pocket I insert the card while gluing so I know that I have enough room for the card. If I don't, I have at times, glued the pocket piece so tightly to the card that I can't insert the gift card! 

I stamped the sentiment and used the smallest of the Stitched Rectangle Slimline dies to cut a banner.  The excess I trimmed with scissors.

Finally I added a small daisy in the corner to match the daisy in this little piggy's headdress.  This panel can be used alone as a gift card holder or as the front for an A2 card!

Dies used:


Thanks for visiting today!  Be sure to stop by the online store where the new Farm Realease is on sale for a limited time!

I hope you have a fun and creative weekend!


Thursday, April 29, 2021

Foxy and Friend Thank You

Hello Scrapping Cottage Friends

It is Pam creating with you on the blog today!

We have a new release that are complete must haves for your basic die collection.  It is a Slimline group with 9 different designs.  They are 25% off right now so don't miss out on this great addition to your essential must have dies.

My card today is a thank you for a special friend!  She loves being outdoors so I thought this card was perfect for her!

Design Steps:

1.  Use a Kraft slimline card base cut the front flap of the card in half and set aside.  Cut another piece of Kraft card stock 3 1/2 by 8 1/2.  Cut a tree designer piece of paper 6 x 3 1/2 and a green checked piece 3 1/2 x 2 1/2.
Glue the tree paper to the top of the piece of kraft card stock and the green checked to the bottom of the kraft card stock.  Use your Hills Slimline die (the one with one hill) cut the kraft card stock with the designer paper glued to it
2.  Get out your card base and glue the cut design paper to the front of the cards small flap
3.  Using the largest Stitched Rectangle Slimline die cut a piece of light blue card stock and glue it to the inside of the card
4.  Cut 2 Kraft circles using the Scalloped Stitched Circle die 3rd from the largest.  (one for the inside of the card and one for the front). Using the Spring Tea Party die cut out the fox using rust, black and cream card stock for the raccoon use black, grey and white card stock

5.  Using the Sloth die cut out the leaves using two shades of green.  Cut out the little sign using brown and the Bunny Gnome 3 die.  Before assembling the fox and raccoon shade with a variety of inks and then glue together
6.  For the front of the card glue down the circle leaving the edges without glue so you can tuck in the leaves.  Stamp the Thanks So Much onto the sign and edge with ink.  Pop up the fox and his sign with dimensional 
7.  For the inside glue a 1 x 6 inch strip of tree paper and right under it glue a 1 x 2 1/4 in strip of green checked.  Glue down your scalloped circle making sure it lines up with the front circle so it won't show when closed.  Stamp your sentiment and glue down the leaves and little raccoon
CottageCutz Products


Thanks so much for stopping by today!  I hope you find time to get crafty.  It is always so much fun to send a friend something made from the heart!
Blessings
Pam