Showing posts with label Stitched Heart Set. Show all posts

Wednesday, January 18, 2023

We Go Together Hot Cocoa Pocket Box Surprise Card

Hello Cottage Cutz Friends!
Melinda here with you, and today I am sharing a fun and colorful Valentine's day card with a little surprise. Here's a look at my finished project.

Here's a look at just the cover. It features images from the following die sets
Cookies & Cocoa
Santa Gnome w/Cookies
Snowmen Friends
Nested Scallop Rectangle Set
Stitched Heart Set
 I used my markers to color in the various pieces. The cute image was from my Doodlebug paper pack as was the patterned papers I used for the scallop rectangle mat and the two hearts. I also used my puffy paint for the showgirls' hat and pompom and some stickles for the whipped topping on my mugs.


To make this fun card with a surprise you will start with a 5.5 x 11 piece of cardstock. I used white for mine. I then scored it at 5.25 and 5.75.

When scored you should have a half inch seam or section in the middle. See photo below. You will score and fold both lines so your base will close.


To make the little pocket you will need to create a little box like the one I created in the photo below. 
The base measurement is 4.75 x 11
You will score your piece of cardstock along the 4.75 side at .5", 7/8", 3 7/8" and 4.25"
You will score along the 11" side at .75", 1 1/8", 5 7/8", and 6.25"
You will cut it according to the photo below.

Here's a template image to offer a little additional help.

Once you have scored and cut the box, you will assemble it. When put together, this is what the "top" side should look like.

It has a flap that folds on the top so you can easily put a packet of Hot Cocoa inside.

Here is a photo of the "backside". I left the extra flaps so that I could adhere all of it to the base. Doing this makes the sides more sturdy. When you assemble the box, it will make more sense. They are optional and you could choose to cut them off to make the sides "flush" with the sides and not wrap around to the back. Here you can see I just added a piece of tape to keep down those flaps and then added adhesive to the entire back. This makes sure the little pocket/box is going nowhere...lol!

I added a blue mat to the inside background and then adhered my pocket/box to the center. I then decorated the top with a mat of patterned paper, a decorative piece of corresponding patterned paper and then a little rectangle, heart and another little snowmen friend. For this one, I added the little Santa Gnomes boots to him. Super cute! The rectangle and heart are left blank so I can write a little note to the recipient.

Here is a side view of the inside of the card, opened up. This gives you a good idea of what the box attached will look like and how the cocoa packet will be accessed.


Here is one last look at the top

I think it turned out super cute and you can make these for co-workers, friends and loved ones for Valentine's day and have a lot of fun doing them!

Dies I Used


Cookies & Cocoa

Santa Gnome w/Cookies

Snowmen Friends


Nested Scallop Rectangle Set


Stitched Heart Set


Well that about covers it for today! Until the next time, have a wonderfully craft-die day!
Melinda Beltran

Saturday, January 14, 2023

Festive Elephant Valentine

Hello CottageCutz friends! Thanks for taking the time to stop and visit with us today. It's Mary Marsh here bringing you the Sunday edition of the Blog.

Hope you all had a great Christmas and holiday week. Now it's time to settle in for the winter months. It's a perfect time for cardmaking, scrapbooking and other crafting pursuits. I am onto my Valentine cards. This one I am sending off to my nice who loves elephants. 

For your viewing pleasure today, I am featuring the Festive Elephant die. It's from the Christmas Part 1 release. I like taking dies intended for one season and move them to a different holiday. It allows you to get more use out of your dies that way.

Card Details:  

I started my card this week with the layout. I saw this older sketch #838 on Splitcoaststampers using a slimline design and decided to use it for my card. Slimline cards are so popular now and add such great eye appeal.

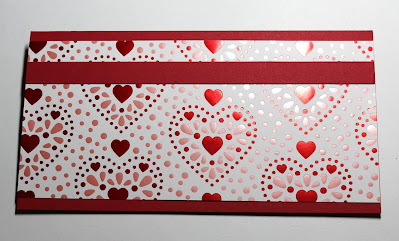
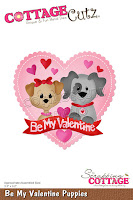
Then I chose my designer paper and card base colors. I really like this metallic heart paper from my Valentine collection for my card. I changed the circle image to a heart. It's from the 2019 "be my valentine puppies" die.
 
Red Card Base: 7 1/2" x 4"
Heart Designer Paper: 7 1/2" x 3 1/2"
Red Cardstock Strip (Element 3): 1/2" x 7 1/2"
Next, I cut the elephant image from 2 shades of gray cardstock. I sponged around the edges for more contrast. Instead of using the Christmas Tree, I cut a heart from the Stitched Heart Set.  
I stamped my sentiment in red ink on the heart. It is a one-line sentiment and I had to space it on the heart with my elephant. So I masked and with the help of my MISTI, I was able to stamp it vertically.
Now I am ready to start card assembly. I attached the designer paper and the red strip to the card base with double sided tape. I ended up having to recut my designer paper and the pattern is a bit different than this photo. 
For the elephant, I used dimensional adhesive to lift the image off the heart background. And, I used the same adhesive to attach the heart to the designer paper. I added some additional white and red hearts to finish off this card.
If you have this Festive Elephant die, I hope I have given you a way to use it for another season. If you would like to purchase this die, it's still available in the online store at 30% off. And you can get it in time to create Valentine cards. 

dies I used to create card:


Tuesday, January 10, 2023

Hey Sweet Heart Folded Flap Card

Happy Tuesday Cottage Cutz Friends!
Melinda here with you, and today I am sharing a fun and colorful Valentine's day card. Here's a look at my finished project. I used the sweet Mrs. Gingerbread Die as the focal image from this year's Christmas release.

Here is a look at my finished card. I started with a 5.5 x 5.5 white mat. I then used a pink cardstock mat and some yellow mini hearts patterned pattern.


Here's a closeup of the sweet little Mrs. Gingerbread die. I used some Doodlebug patterned paper for her hat and dress. I mounted her onto the 3rd pierced circle die from the set. I then used a smaller circle punch for the mat. I added a couple of hearts from my stash.

I used a scallop punch and some circles along with some hearts for the last part of my sentiment.

Here I used the Hey from the Berry Phrases Sentiment along with the Sweet as a Christmas Cookie die.


Here is the center slightly open. I used a small Velcro circle to help keep the flaps closed.

Here is a closeup of the inside. I used some of the heart stitched dies along with the I Love You 


How to do the center of the card
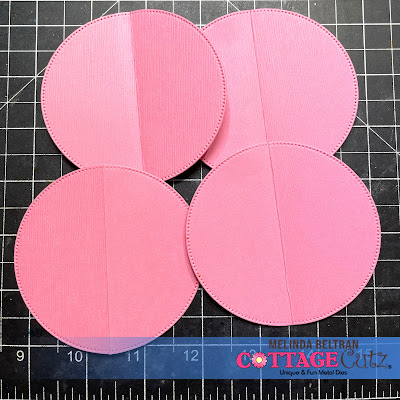
I used the largest Pierced Circle from the set and cut it out 4 times. I also cut a separate piece of white cardstock at 3.75 inches squared. I folded the circles in half.


Next I glued half of the circles to each side of the square. This is what it looks like in the photo above.

This is what the back of the card looks like once the 4 circles are attached. This photo is with the circles open.

This is what it looks like when the circle are closed.


I then used the next size circle down and used the pink cardstock for mats.

I then cut the circles in half and attached half on the front flaps and on the inside flaps. If you decide to put the mats on, make sure you leave a little room so they will close. I ultimately decided not to use the pink mats for the inside.

Dies I Used

Mrs. Gingerbread Gnome


I Love You


Berry Phrases


Sweet As A Christmas Cookie


Pierced Circle Set


Stitched Heart Set


Well that about covers it for today! Until the next time, have a wonderfully craft-die day!
Melinda Beltran

Tuesday, August 30, 2022

#1 All Star MVP Birthday Heart Stitched Card

Happy TuesDIE Cottage Cutz Friends!
Melinda here with you on on another sweet TuesDIE. Today I am sharing a fun card and very easy card I created featuring dies from the Baseball and Golf release.

Here's a look at my completed card. It is a standard A2 horizontal top folding card. I started with a white cardstock base. I then layered a piece of red cardstock onto the base and a piece of cute Doodlebug patterned paper to that. I used all 4 hearts from the Nested Stitched Heart die set. I cut them out in white cardstock and then colored them in with my markers. I used the stitches from the Baseball to create the stitches on the heart.

Here's a closer look at the Shadow Birthday and the cute All Star. You can also see some of the cute hearts.

Here's a closer look at the other hearts. I colored them all in with my various markers to match the patterned paper. I then layered the #1 and the MVP titles onto each other and then onto the card.  I love the way it turned out. Very simple yet super colorful and fun.

In case you missed it, last week I created a couple of quick videos showcasing more projects from this super cool set! Here are the links.


Head over to my YouTube Channel For a Quick Project Share and helpful tutorial for this cute set!

Be sure to check out my project share video on last week's set too!

The Dies I Used For This Project


Here's the entire release. Head over to the shop and check them all out!


Also, don't forget to head over to the CottageCutz YouTube channel and check out all of the amazing projects on there. Our video team is doing a wonderful job of filling the channel with all sorts of creative content! You don't want to miss it!


Well that about covers it for today! Until the next time, have a wonderfully craft-die day!
Melinda Beltran