Showing posts with label Stitched Circle Set. Show all posts

Saturday, March 21, 2020

Juggling Spring Bunny


Hello Scrapping Cottage friends! Thanks for taking the time to stop and visit with us today. It's Mary Marsh here bringing you the Saturday day edition of the Blog.

The new release of Spring dies are available in the online store and 25% off for a limited time. There are 27 new dies in the release and each one is cuter than the next. They are perfect for your Easter and Spring card making.

Today, I am featuring the new Juggling Spring Bunny and created another Easter card. With all that's happening in the world right now, I am going to send more cards this year. I think it will help brighten someone's spirits to receive some happy mail. So let's get started with some details on how I created my card. 

Design Steps:

This week I started my card with a sketch. As I have said so many times before, having a layout in mind at the start of my card is always a big boost for me. It jump starts my creative thought process. I love working with the sketches that are out there in the online world. That way I just choose the colors and designer paper and I am good to go.

I liked this week's sketch #793 from Splitcoaststampers. It is a bit different of a layout, but I thought my bunny would look cute sitting atop the half circle #3.
I wanted a fun background paper for the bunny and chose this one from my collection. I thought the pattern would be broken up enough with the 2 half circles of the sketch.

Rich Razzleberry Card Base: 41/4" x 5 1/2"
Designer Paper: 4 1/8" x 5 3/8"
Circle & Stitched Circle dies: 5 & 6th largest
Element 4 of sketch: 5/8" - used bermuda bay cardstock


Next, I cut the bunny and eggs in cardstock colors to match the designer paper. 
I decided to use a punny sentiment and stamped in rich razzleberry ink. I started card assembly using double sided tape as my adhesive.. 

I attached the bunny to the top semi-circle using double sided tape and the eggs are attached with glue dots. 
To complete my card I added some bermuda bay enamel dots. And I have another Easter card for the stash. 

Well that's it for me for this week. Hope you get some craft time in this weekend or even during the week if your job is considered non-essential and your required to stay at home. It's definitely a way to relax and take your mind off all the corona-virus stories. See you next Saturday!

dies I used to create card:


Wednesday, February 12, 2020

You Are My Honey

Hello! This is Sukie and today I'm sharing this adorable card for my design team post. My card was created with the Busy Bee die from the new release of Spring dies which are currently on sale.
This card was inspired by a selection of fun papers in my stash.  Once I selected my papers I went with a sweet card which can be used for Valentine's Day or as an anniversary card.
The Busy Bee die was used for the 2 bees and then I went with a few of the basic dies (Nested Stitched Scallop Rectangle, Nested Stitched Scallop Circle and Stitched Circle) for my card background.
In preparation of my card pieces, I stamped the sentiment inside the circle.  I also hand cut a little flag to use as an embellishment on my card.
I layered a solid black card base with the patterned paper background.  Next I added the 2 pieces cut with the Nested Stitched Scallop Rectangle die set on top.
The white circle was nested inside the scallop circle and the set of circles were adhered on my card base.
I popped up the bees on some foam dots for added dimension.  The two bees surrounded the sentiment circle and the flag was added as a finishing touch.
Here are the dies used on my card, available in the store:

Tuesday, November 05, 2019

Starry Night

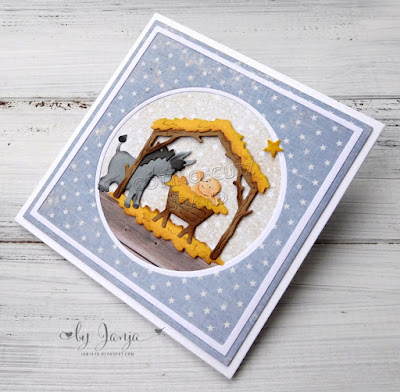
Hello Scrapping Cottage creative friends. Janja is here to share another Christmas card.


- Cottage Cutz dies: Nativity w/ Donkey, Stitched Circle Set, Circle Set
- blank card: 5.3 x 5.3" (13,5 x 13,5 cm), folded
- patterned paper: 5 x 5” (12,7 x 12,7 cm)
- colored cardstock
- colored ink pads
- glue, double-sided adhesive tape, self-adhesive foam pads

Cut individual pieces of the main motif from colored cardstock. Use color pads for more depth.


Trim selected patterned paper and cut a circle in the middle.
Now cut another circle in the middle of the white cardstock that is slightly smaller than the patterned paper.
Attach both parts together so that the openings fit nicely.


Trim a smaller square of patterned paper and paste it on the back.


Stick it all to the front of the blank card. Attach the main motif with self-adhesive pads.


To make the card look layered, and motif even more in the foreground, I added a white narrow frame. I cut it out with two square dies and glued it to the background.


Visit the online store to see the full range of Christmas dies.

Have a  nice day.
Janja


Saturday, October 26, 2019

Santa's Workshop

Hello Scrapping Cottage friends! Thanks for taking the time to stop and visit with us today. It's Mary Marsh here bringing you the Saturday edition of the Blog. 

We have the new release of Christmas Part 2 in the online store and they are all in stock and available for delivery. There are 34 new designs in this release. 

This release has something for everyone. So if you prefer a more religious tone to your cards- we have you covered. If you like a more whimsical design featuring Santa, reindeer, gnomes, moose or even a hot chocolate theme you will find some really cute dies.

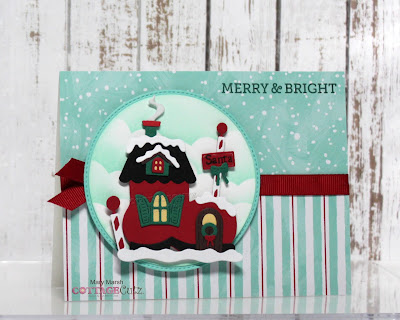
I actually do a combo of religious and whimsical for my Christmas cards. Today, for your viewing pleasure, I am going whimsical with the new Santa's Workshop die. So let's get started with some details on how I created this card.  

Step 1: I had somewhat of a layout in mind. So I selected my designer papers. I was looking for something bright and festive and I think I found it in these papers. I like the mix of dots and stripes.
White Card Base: 5 1/2" x 4 1/4"
Snowy Designer Paper: 5 1/2" x 2 1/8"
Striped Designer Paper: 5 1/2" x 2 1/8"
I cut Santa's Workshop with a combo of Christmas red and green cardstocks. I stuck pretty much to the packaging colors. I stamped the Santa sentiment on the light post.  Even though there are several pieces to this die, it came together quickly, And, if you were to cut the pieces in white then color it would even be faster.
Step 2: I am ready to start the card assembly. Since I was using ribbon and I didn't want it to show on the inside of the card, I cut another pieces of white cardstock 5 1/2" x 4 1/4". I taped the designer paper to this layer and then wrapped the ribbon. I then attached it to my white card base. It really doesn't add much weight so no issues on mailing.
I wanted the Santa Workshop image on a circle. I used the 2nd largest die from the Circle Set and 2nd largest Stitched Circle dies. I sponged some clouds using a cloud stencil on the white circle in cracked pistachio ink. This color coordinated with my coastal cabana cardstock and designer paper.
I attached the Santa Workshop image using dimensional adhesive.
I attached this image panel to the card base with dimensional adhesive. I cut 2 small tufts of red ribbon and added them to the side. Just for a little card interest.

I wanted a sentiment on the card and my original thought was to stamp on a flag banner. But it just didn't fit this card. So I stamped directly on the designer paper using a spruce ink.
Well that's it for me for this card post. I hope I have given you a bit of inspiration on a way to use this new die. See you next Saturday!

dies I used to create card:


Tuesday, October 01, 2019

Peeking Santa and Rudolph

Hi! Janja is here to share with you my first cards for the upcoming Christmas season.


- CottageCutz dies: Peeking Santa & Reindeer, Snowglobe w/ Fawn, Circle Set, Stitched Circle Set, Double-Stitched Rectangle Set
- white card base: 5.3 x 5.3" (13,5 x 13,5 cm), folded
- patterned paper: 4.7 x 4.7" (12 x 12 cm)
- golden paper: 4.9 x 4.9" (12,4 x 12,4 cm)
- colored cardstock
- embossing folder - lumber and softly falling
- colored ink pads
- glossy accents
- double-sided adhesive tape, self-adhesive foam pads, glue

To start cut Santa Claus and reindeer out of colored cardstock. Also cut the bottom of the snow globe. I used brown cardstock and embossed it with an embossing folder - lumber.
Before we assemble all the pieces into a whole, additionally color them with colored ink pads, to obtain depth.


Trim the pattern paper and cut the circle with a die.


Attach the patterned paper with double-sided adhesive tape to the golden paper. Now cut out the circle again into the golden paper. Use a slightly smaller circle die.


For a snowy background, I used an embossing folder - softly falling.


Stamp a sentiment.


Now it's time to finish both cards.


Have a nice day.
Janja