Showing posts with label St. Patrick's Day Phrase. Show all posts

Thursday, March 10, 2022

St. Patrick's Day Peeker

 Hello Friends,

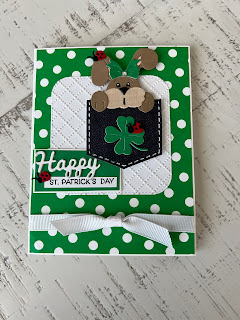
I have one more St. Patrick's Day card to share with you today!  I am using two dies the Peeker Bunny w/Pocket and the St. Patrick's Day Phrase and More.  

The Spring Release has so many adorable dies so don't forget to check it out!


Design Steps:

1.  Use the Peeker Bunny w/Pocket and cut out the pieces in brown, tan, green, black, pink, red and Denim DP.  For the clover use the St. Patrick's Day Phrases die and green card stock.  Assemble the pieces and enhance the stitching with a white gel pen.  I used a black and white gel pen for the eyes and a black gel pen for the mouth
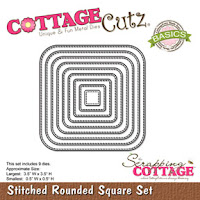
2.  Use an A2 white card base, cut a green dotted DP 4 1/8 x 5 3/8.  Use the Stitched Rounded Square die second from the largest cut on white and run through an embossing folder
3.  Before you attach the green dotted DP to the front of the card add a square knotted ribbon
4.  Glue down the rounded embossed white square to the center of the card just above the ribbon
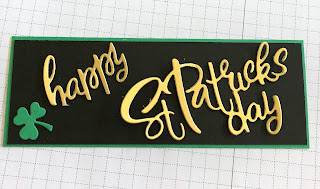
5.  Use the Happy Expressions die and cut out 3 of the happy pieces.  Glue the pieces together and then glue flat to a piece of green card stock 2 1/8 x 1 1/8.  Stamp the St. Patrick's Day in black and glue it as shown above.  Mount the green rectangle onto a pieces of white 2 1/4 x 1/4
6.  Pop the bunny onto the front of the card.  Glue the sentiment to the left of the bunny as shown below. (I decided to move the bunny up just a little) I made 2 more of the ladybugs and glued one to the ear and one to the sentiment as shown below.  Add a rhinestone to the bow and some glossy accents to the nose and your card is complete

CottageCutz Products


We have more inspiration on our YouTube Channel check it out HERE
Thanks so much for stopping by!  And I will see you next Thursday.

Blessings and Take Care


Friday, March 01, 2019

Happy St Patrick's Day - Again!

Happy Friday!   It's Jeanne posting today with another St. Patrick's Day card.  This one use the St. Patrick's Day Phrase and More and the St. Patrick's Day Cupcake dies.
I wanted to do something a bit different so I went for a stand-up easel card.
I started with an 8 1/2 x 5 1/5 inch piece of green card stock scored in the middle.
On the bottom section I very lightly drew a line across it at the 2 1/8 inch mark (halfway between the score line and the bottom).  The line should be erased after die cutting.
I placed the third largest stitched circle die equal distance from each side with the pencil line halfway up and down (centered on my pencil line).  I did not measure - I just eyeballed it.  Then I ran it through my Big Shot using a small plate I have.
This cuts out just half the circle.  I then scored each side from the circle to the edge.
When you fold, it gives you the easel.
Next I cut my pieces from gold, green, black and white.
And I assembled them.
I cut three panels from green, black and patterned paper.  The green is 5 1/2 x 2 1/8 inches.  The others are 1/8 inch smaller in both directions.
I added the black panel on top of the green.  I also had to snip the Happy St Patrick's Day apart to fit on my panel.
And finally I put it all together.  Although the card looks a little complicated, it is actually quite easy.

Dies:
http://www.scrappingcottage.com/cottagecutzstpatricksdayphraseandmore.aspx

http://www.scrappingcottage.com/cottagecutzstpatricksdaycupcake.aspx

http://www.scrappingcottage.com/cottagecutzstitchedcirclesetbasics.aspx

Thanks for stopping by today.  I hope you have a fun and creative weekend!

Thursday, January 24, 2019

Lucky Cupcake!

Hi Friends!

It is Pam creating with you today.  And I have some great news for you!! We are have a 25% off sale on our new Valentine's and St. Patrick's Day dies.  I can't wait for you to see them.  They are just so adorable you are going to want the whole collection.

Today, I am using the St. Patrick's Day Cupcake.  We also have a cupcake for Valentine's Day.  Both of them make fantastic cards or fun embellishments for a baked gift.


Design Steps:


1.  Use an A2 size white card base.  Score at 2 1/8 then flip the card over and score at 2 1/8 again.  This will give you a gate fold card
2.  Cut 2 strips of green card stock at 2 x 5 1/4 and 2 DP strips at 1 3/4 x 5.  Glue them together
3.  Glue the panels to the front of the card

4.  Open the card and cut a piece of light green card stock 5 1/4 x 4.  Glue to the center of the inside
5.  Using the St. Patrick's Day Phrase & More die cut out the sentiment.  Using the St. Patrick's Day Cupcake die cut out extra clovers and coins.  Glue them to the inside as shown and shadow with matching ink
6.  Using the St. Patrick's Day Cupcake die cut out the pieces for the cupcake.  I used green, yellow, black, and brown card stock
7.  Cut out a white circle using the 3rd from the largest Cross-Stitched Circle die.  Add shading to all of the pieces using coordinating ink colors
8.  Assemble the pieces after you have finished shading
9.  Use the 2nd from the smallest Cross-Stitched Circle die to cut the back layer for the sentiment
10.  Cut a 11 x 1 1/2 strip of green then layer a piece of embossed white card stock 4 1/4 x 1 on the middle section.  Wrap the strip around the card to form a band and tape or glue the back closed.  Glue the circle to the middle of the band and pop on the cupcake.  Add the sentiment as shown and your card is complete

CottageCutz Products