Showing posts with label Square Set. Show all posts

Tuesday, January 23, 2018

To My Love

Hi, Janja here!

This is my first post in the new year. Let's start with love.
I prepared two Valentines cards, and combined on them several dies from various releases.


Supplies:
- CottageCutz dies: Baby Dolls, Baby Doll Girl Clothes, Love Postage, Love Bow & Arrow, English Rose Corner, Square Set, Nested Stitched Scallop Square Set
- red card base: 4.25 x 5.5" (10,7 x 13,9 cm)
- white scalloped edge card base: 5 x 5" (12,7 x 12,7 cm)
- white card stock: 3.74 x 5" (9,5 x 12,6 cm)
- red card stock: 4 x 4" (10 x 10 cm)
- wite and colored card stock
- self adhesive pads, double-sided adhesive tape
- Distress ink pad - Tattered Rose
- Memento ink pad - London Fog

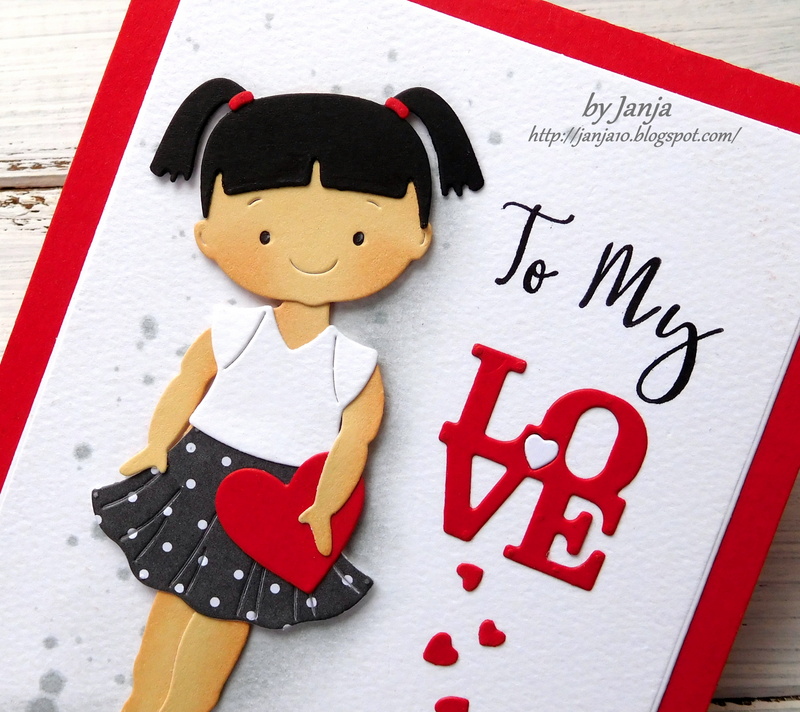
Prepare a red card base, and stamp an inscription on a white card stock.


Cut the word love and a couple of hearts.


With two dies cut all the pieces we need to form a girl. Use socks for the shoes, and shorten them with scissors.
When assembling, slightly change the position of arms and legs.


Spray gray dots on a white card stock, and fasten a girl with self-adhesive pads. For more depth, add a gray color with a makeup brush. These brushes are very useful for such things, especially if the subject is slightly raised from the substrate.


Completed card.


The second card is made with English Rose Corner die. Cut three times. On the backside of a white piece attach adhesive tape, and insert an individual pieces.


From a white card stock cut a square and a frame with the largest die from both sets. Add an inscription.


Complete the card.


Enjoy and have fun while creating.


Saturday, December 02, 2017

Joy Nativity in a Z-Fold Card

Hello Scrapping Cottage friends! Thanks for taking the time to stop and visit today. It's Mary Marsh here bringing you the Saturday edition of the Blog. Hope you were able to jump in on some of the huge savings with our Black Friday sale that was held on the online store.

Today, I am back to Christmas cards. The time is getting shorter and I need to finish up my cards for this year. That is my plan for this weekend. For this post, I decided to make a Z-Fold card and feature the Joy Nativity and Angel Trio dies. So lets get started with some details on this card.

Step 1: this week I started my card with the fancy fold I wanted to use. I like the Z-Fold and thought it would work well with the dies I wanted to showcase. This fold makes a very nice card presentation and is not difficult at all to make.

Dark Brown Card Base: 5 1/2" x 8 1/2"
Step 2: Cut 2 pieces of patterned paper- one is 3" x 5 1/2" and the other is 1 1/4" x 5 1/2".
Attach the 3" piece to the cardstock between the scored lines.
Turn the card over and line-up the 1 1/4" patterned paper to the corner of the card.
Used my bone folder and reinforced the scores that I made on the cardstock. I folded back the score line on the 1 1 /4" panel and now I have my Z-Fold card.
 
 
Step 3: I created the front panel for my card. I used one of the angels from the Angel Trio die and on the square panels I used the Stitched Square (4th largest) and the Square Set (3rd largest) dies.
Assembled the square panels and attached the angel with dimensional adhesive.
I used doubled sided tape and attached the panel to the 1 1/4" panel.
Step 4: Now onto the inside of the card. I used the Joy Nativity die for the inside panel. I also used another of the angels from the Angel Trio die.
Attached the pieces to the card inside with glue dots and Ranger Multi medium matte adhesive. After I attached the kneeling angel I decide to add a few pine sprays to ground the image. I also added some stars to this panel. I used the stars from the Snowglobe Friends die.
I also added stars to the front image panel to complete my card. That's it for me for this week. I hope I have given you an additional idea for a Christmas card. Especially if you bought these dies when the big sale was going on. See you next Saturday!
 
 
Dies I used to create card:


Tuesday, October 17, 2017

Birds

Hi, Janja here!
We are already in the middle of October, and it's time for my monthly post on the Scrapping Cottage blog.
Before starting to create with the new Christmas dies, I would like to show you two stamps from the new release of CottageCutz - Birds.


Supplies:
- CottageCutz stamps and dies: Sparrow on Post, Robin & Baby, Nested Stitched Scallop Square Set, Square Set, Circle Set (8th die from the middle), Stitched Circle Set (7th die from the middle)
- brown card base: 4.1 x 5.4" (9,5 x 12,7 cm), folded
- white card base: 5.3 x 5.3" (13,5 x 13,5 cm), folded
- white natural paper: 3.8 x 5" (9,6 x 12,7 cm)
- red cardstock: 4 x 5.2" (10 x 13,2 cm)
- patterned paper: 5 x 5" (12,6 x 12,6 cm)
- watercolor paper
- watercolor brushes
- red satin ribbon
- string
- glue, double-sided adhesive tape, self-adhesive foam pads
- Distress ink pads: Spiced Marmalade, Worn Lipstick, Barn Door, Aged Mahogany, Broken China, Twisted Citron, Peeled Paint, Vintage Photo, Hickory Smoke, Black Soot

Stamp both birds on a watercolor paper and color them.
For coloring I always use Distress ink pads, watercolor brushes and water. I used a white ink pen for finishing.


Stamp only branch with flowers one more time on a watercolor paper.


When we finish with coloring, stamp the sentiment.


Cut out two frames from patterned paper and white cardstock with two largest dies from the sets. Glue them to each other.


With the matching die cut out a bird. For a trunk in the background, use the die - Grass, Trees & Vines
Add a string at the bottom.


For a second card, cut out round holes in the middle of natural paper and brown cardstock. Apply a few light blue drops on a white natural paper with a brush. 
Both papers are glued together. 
Attach the red ribbon with the Dior Bow at the bottom. 


Now everything is ready to assemble the card. 


Thank you for coming over. Have a lovely day!