Showing posts with label Snowy Tree. Show all posts

Wednesday, November 02, 2016

Let it snow

Hi, Janja here!

Thank you very much for all 34 beautiful cards and projects you've made for Challenge #7. Two lucky winners will be announced at the end of this post. 
So, stay tuned.

We have entered into the penultimate month of the year. Snow has not yet surprised us, and therefore I took care today for thick snow cover.


For the card we need:
- white card base: 5.3 x 5.3" (13,5 x 13,5 cm), folded
- patterned paper: 5 x 5" (12,7 x 12,7 cm)
- white and color cardstock
- Distress ink: Iced Spruce, Mowed Lawn, Tumbled Glass

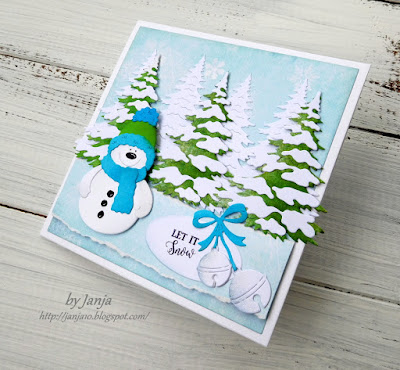
Trim patterned paper and white cardstock for the card base. Also prepare a strip of patterned paper. Tear it with hands.
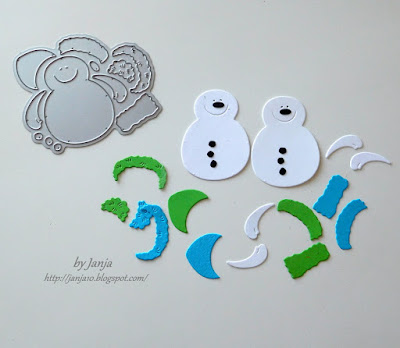
From white cardstock cut out jingle bells and oval with the 2nd die from oval set. Stamp "Let it snow".


Even today will not go without snowy trees. Shadow some of them with Distress ink and paste a snow. The other are left white.


Cut out adorable snowman with a winter snowman die.


On the background first attach white spruces. Put snow-covered spruces on them with self-adhesive foam pads. Attach the tape from patterned paper and put a snowman with jingle bells on it.
Apply glitter on the jingle bells and snow-cowered spruces.


---------------------------------------------------------------------------
And now is time to see who the two lucky winners are.
 
1st Gift certificate value of 50$ goes to Kaleidoscope Creations. Her card was linked under number 16:

2nd Gift Certificate value of 25$ goes to Just Jill. Her card was linked under number 10:

Congratulations!

Please, contact Joanne at scrappingcottage@cox.net 
to claim your Gift Certificate. 
---------------------------------------------------------------------------------

Thank you for coming over and have a great day.


Tuesday, October 25, 2016

Snowy landscape

Hi, Janja here!

Today I share with you another card created with CottageCutz Christmas dies. In the forefront of snowy landscape I placed a fox.


For the card we need:
- craft card base: 4.5 x 6" (11,5 x 15 cm), folded
- light blue paper: 4 x 5-3" (10 x 13,5 cm)
- white and colored cardstock
- Distress ink: Rusty Hinge, Evergreen Bough, Iced Spruce, Vintage Photo, Walnut Stain
- white pigment ink

On light blue background stamp some spruce trees. From white cardstock cut out four stitched ovals (the 7th die from the center) and winter cabin border.


Shadow edges with Distress ink Walnut Stain, and while still wet gently spread them with white pigment ink.


Cut out birch trees with the birch trees and deer die. With Distress ink Walnut Stain strongly emphasize the right edges.


Also prepare a few white cutouts with the snowy tree die. They are treated the same way as ovals.
Cut out the fox from color cardstocks.


"Brr, it's cold outside today", said the fox and put on a scarf  :).


On the right bottom corner stamp warm wishes and start assembling the card. Use a glue and self-adhesive foam pads.


Completed card.


You still have time to share your projects with us on
challenge #7 - fall

Thank you for coming over and have a great day.


Tuesday, October 11, 2016

Halloween

Hi, Janja here!

Halloween marks the last night of October. Since this spooky night is almost around the corner, I decided to do a Halloween card. During the autumn release of CottageCutz dies, I chose the werewolf die.


For the card we need:
- white card base: 4.3 x 5.5" (11 x 14 cm), folded
- white cardstock: 3.9 x 5.2" (10 x 13,2 cm)
- black cardstock
- Distress ink: Stormy Sky, Black Soot
- white color
- masking paper

From masking paper cut out mists with scissors and with the 4th die from the circle set, cut out a circle. Paste them on a white cardstock.


Coat the entire surface with a roller and Distress ink Stormy Sky. After work remove the masking paper. With a white color and a brush repair mists on places where the color went to masking paper. At the end shadow edges with Distress ink Black Soot, stamp bare trees and a flock of birds.
Cut out the werewolf from black cardstock and four spruces with the snowy tree die.


On ready background fasten cutouts.


And a bookmark with a witchy ghost.


Prepare cutouts from color cardstocks with the dies: witchy ghost, spiderweb and witch brooms & hat.


With the die fancy bookmark cut out only the upper part, the rest cut out with scissors.
 

Attach cutouts to the bookmark, insert a string and add wooden beads. 
Cheerful reading.


And don't forget on our challenge #7 - fall
You have time to share your projects with us till the end of the month. 

Enjoy and have fun. 


Tuesday, August 16, 2016

Deer on a glade

Hi, Janja here!

Calm early morning silence. On a small glade, surrounded by birch trees and snow-capped spruces, deer briefly stop on a morning walk.
These and similar scenes can be created on cards, with the new CottageCutz Christmas dies.


For the card we need:
- white scalloped card base: 5.3 x 5.3" (13,5 x 13,5 cm), folded
- brown cardstock: 4.7 x 4.7" (12 x 12 cm)
- patterned paper: 4.5 x 4.5" (11,5 x 11,5 cm)
- white and brown cardstock
- Distress ink: Iced Spruce, Tumbled Glass, Scattered Straw, Vintage Photo, Shabby Shutters, Moved Lawn, Peeled Paint

Cut out birch trees and deer with the die birch trees & deer.


Shadow blue paper and cut out several spruce trees with snowy tree die. Do not discard white cardstock from which we cut the snow. It will be used as a stencil for shading. 


Paste a snow in spruces. Place stencil from white cardstock on the snow-covered spruces and shadow them. 


Apply glitter with a clear glitter marker.


Under the light, I caught a gleam glitter.


When putting a card together, gradually shadow the background with Distress inks, to create depth.


With a green marker emphasize the edge between the snow and the green part of spruces. At the lower and upper part of the background apply white paint with a finger.


I hope you've enjoyed this card. Thanks for stopping by.

I would like to remind you on our CottageCutz challenge #5 - birthday card. Join us.