Showing posts with label Route 66 Road Signs. Show all posts

Wednesday, March 25, 2020

Make a Splash

Hello!  This is Sukie and today I'm sharing this adorable card for my design team post. I have another sweet die set to showcase on this card from the new Spring die release.
The Splish Splash Duckling was shaded with my Oxide Inks and tucked inside the oversized tub.  I also cut out a sign from the Route 66 Road Signs die set for the sentiment.  The circle is from the Nested Stitched Scallop Circle Set.
I selected a cheery background for featuring the duck at the focal point of my card.  I trimmed down the road sign, stamped it with a fun sentiment and layered the 2 pieces.
To build my card, I placed the scallop circle die cut in the center of my card.  The sweet duck was centered inside the circle.
Next, the water splashes and bubbles were clustered around the duck for a whimsical look on my card.
The layered sentiment sign was adhered on the bottom of the card for a final finishing touch.
Here are the die sets used on my card, available in the store:


Wednesday, February 19, 2020

Happy Birthday

Hello!  This is Sukie and today I'm sharing a birthday card created with the new Spring dies.  In my family we have several birthdays over the next few months so I converted the sweet Carrot Farmer Truck to a farm truck loaded with flowers from the new Spring Blooms die set.
I found some bright and cheery papers in my stash and used them to create my card base that coordinated perfectly.
Next, I cut out the truck and added the flowers to the back.  I used the Route 66 sign pieces for the sentiment and for an embellishment. The card panel is from the Stitched Rectangle set and the circle is from the Circle set.
The card panel and circle were adhered on top of my card base.  The truck was nestled inside the circle.
My first embellishment was placed at the top of the panel leaving enough room for the sentiment arrow.
Once I added the arrow, a set of coordinating enamel dots were placed vertically along the edge of the card panel.  The embellishments were the perfect finishing accents on this fun and festive card.
Here are the dies used on my card, available in the store:

Friday, June 22, 2018

Road Trip

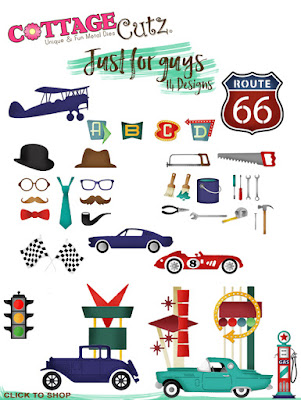
Happy Friday everyone!  It's Jeanne today and my cards uses some great dies from the new "Just for Guys" release.  (Although these really aren't just for guys - this would make a great card for anyone going on a road trip!)
The card features the letters from the Retro Alphabet set.  I cut them all out of white cardstock to begin.
Some of the backgrounds were similar but the nice  thing about this set is that you can mix and match the backgrounds for the letters!
I colored the backgrounds and letters using Copic markers to match the colors in the patterned paper I was planning to use.
Next I cut the background pieces from the Route 66 Road Signs set using vanilla cardstock.  I left these uncolored.
I cut a panel slightly smaller than 4/14 x 5 1/2 inches.
I adhered all my elements to the panel with some hanging off.  I used scissors to trim these and then glued the panel to a top fold A2 card base.
I love the retro look of these dies.  Great for men (or women)!

We have a number of sales going on in the store today, including the new release which is Just for Guys!!! It has 14 wonderful dies for the awesome men in our lives! It's on sale for 25% off!  The other sale we have going on is our ANNIVERSARY SALE WITH UP TO 50% off most of the dies in the store!  So please check out the online sales!

Dies used today:
http://www.scrappingcottage.com/cottagecutzretroalphabet.aspx

http://www.scrappingcottage.com/cottagecutzroute66roadsigns.aspx


Thanks for stopping by today.  Have a creative weekend!

Thursday, June 21, 2018

Route 66!

Hello Cottage Cutz Fans!

It is Pam sharing with you today on the blog!

We have a number of sales going on in the store today!  Including the new release which is Just for Guys!!! It has 14 wonderful dies for the awesome men in our lives! Can you believe they are on sale for 25% off!  So please check out the online sales!


The other sale we have going on is our ANNIVERSARY SALE WITH UP TO 50% off most of the dies in the store!

Now onto the project for today!  I used some fun designer paper and our new Route 66 Road Sign die!
Designer Steps:
 1.  Cut all of the pieces out of white card stock using the Route 66 Road Sign die
 2.  Color the pieces using your markers
 3.  Cut a white Double Stitched Rectangle and pop the Route 66 sign on top of it.  Cut to 1/4 x 5 1/4 inch red strips
4. Use an A2 white card base cut a slightly smaller piece of red card stock and then a piece of DP 5 1/4 x 4.  Glue all of the piece to the front of the white card base

 5.  Add the red strips and the Route 66 panel


6.  Color the additional road signs with your markers. Stamp the arrow with Roadtrip
Cottage Cutz Products


Thanks so much for stopping by and the sales end soon so don't miss out on these fabulous discounts!
Blessings
Pam