Showing posts with label Potting Shed. Show all posts

Friday, June 26, 2020

Card for a Friend Far Away

Happy Friday!  It's Jeanne today with a card for a friend who lives in another state.  This uses the beautiful Potting Shed die from the Gardening release.
I wanted a soft, shaded look and I find I can achieve this by cutting the elements in white and then coloring them with various inks.
I used Distress Oxide Vintage Photo and Ground Espresso for the shed, door and roof.  For the rest of the elements I used dye ink.
I wanted just a little bit of green shading and blue sky behind my shed and decided to use ink blending.  I started with an A2 card base in white and laid the negative from the shed cut about where I wanted to place my shed.
I lightly drew the outline on the card in pencil so I would know where to begin blending.
If you have never ink blended before, you should know that wherever you initially touch your brush or sponge usually gives you a very harsh and dark spot.  A good way to avoid this is to start off of your paper or lay  down a piece of paper over your work.  But  here I can start inside the pencil outline I drew because I know it will be covered up by the shed.
I stamped my sentiment on a 3/4 inch wide piece of card stock and picked out coordinating washi tape.
I added the herbs, wreath and flowers to the shed and the washi tape about 1/4 inch from the bottom of  the card.
Using foam tape I adhered the sentiment to the card.
I love the soft feel of this card for my friend who is far away.

Dies used:
http://www.scrappingcottage.com/cottagecutzpottingshed.aspx


Thanks for visiting today.  I hope you have a fun and creative weekend!

Thursday, June 25, 2020

Mr. Bear

Hello Scrapping Cottage Friends!

It is Pam creating with you today!

As we enter the first few weeks of summer it is fun to see all of the plants and flowers in full bloom.  That also brings the honey bee.  We have some fruit trees in the backyard and they still have a few blooms and the little bees love them! That is my inspiration for this card!
Background Photo by Nikhil kumar on Unsplash

Design Steps:
 1.  Cut the pieces out of a variety of colored card stock using the Garden BearPotted PlantsFlower Power Tomte and Potting Shed dies.  Shade the pieces and assemble with a fine tip glue
 2.  Use a piece of white card stock 3 3/4 x 5 and shade in some blue ink for the sky
 3.  Glue your pieces onto the blue shaded background

4.  I decided I need a bit of green at the bottom to ground my scene so I added it using a blender brush just as I did the sky.  Next layer onto a piece of black card stock


5.  I then added the extra pots and the little sign to complete the scene


6. Here is a good trick if you don't have any paper to match your scene.  I used the same ink that I colored the flowers with and brushed it onto the edges of a piece of white card stock 4 x 5 1/4.  Glue the edged panel to a white A2 card

7.  Mount the bear panel to the purple edged panel.  Stamp Hello to the little sign, add sparkle to the bees wings and black dots to the flower centers and your card is complete

CottageCutz Products


Thanks so much for stopping by and Happy Summer!!

Blessings and See You Next Thursday!
Pam


Tuesday, June 16, 2020

Beach Huts

Hi Janja here with you. Welcome to the blog today.
In the beginning, I intended to prepare a greeting card on the topic of gardening.
However, since summer is almost here, I changed my mind and turned the garden shed into a beach hut.


- CottageCutz dies: Potting Shed, Puppy in Garden Cart (parasol), Fairytale Castle (flags), Camping Trailer (flags garland), Seagull (sand dunes)
- blank card: 5 7/8" x 5 7/8" (15 x 15 cm)
- white cardstock: 5 1/2" x 5 1/2" (14 x 14 cm)
- patterned papers
- different colors of brush markers
- different colors of ink pads
- glue, double-sided adhesive tape, self-adhesive foam pads

Cut the beach huts out of striped papers. Also cut out three parasols.


Use white cardstock for the background. Shade it with different colors of ink pads. For a sandy beach, use a stamp or simply add dots with a marker.


Now attach all the elements to the prepared background with glue and self-adhesive foam pads as shown. Attach the parasols to small sand dunes.


Thank you for stopping by.
Janja


Monday, June 01, 2020

Father's Day Potting Shed


Hello Scrapping Cottage friends! Thanks for taking the time to stop and visit with us today. It's Mary Marsh here bringing you the Monday edition of the Blog. 

For my card today, I am featuring the new Potting Shed die. I created a Father's Day card for my hubby. He is an avid gardener and has a potting shed, so I thought this image would be perfect for him.

I hosted the color challenge #793 on Splitcoaststampers, and the colors I chose worked great for the potting shed image. For this challenge you can use neutrals and that includes dark green, so that was in my favor as well. 
blueberry bushel, balmy blue, lovely lipstick
I cut the potting shed in the challenge colors plus neutral shades of brown, gray and green. I sponged the flower pot and the watering can with the same color ink as the cardstock to get a deeper shade of blue. Used a cloud stencil for the clouds and lightly sponged the dark green ink for the grass.

I used the stitched sun, clouds & umbrella die for my cloud and stamped the sentiment in blueberry ink. Finished off this card with a few epoxy hearts. That's it for me for this post. See you again on Saturday!
   
dies I used to create card:


Tuesday, May 19, 2020

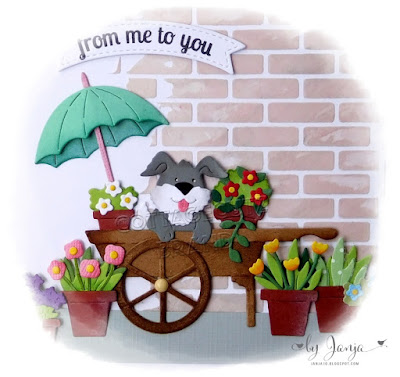
Puppy in a Garden Cart

Hi Janja here. Welcome to the blog.
Today, I want to share with you a card with a cute puppy in a garden cart.


- CottageCutz dies: Puppy in Garden Cart, Potting Shed (potted plants), Retro Tag Toppers
- blank card: 5 5/16 x 5 5/16" (13,5 x 13,5 cm), folded
- white cardstock: 4 3/4 x 4 3/4" (12 x 12 cm)
- grey paper strip: 4 3/4 x 5/8 " (12 x 1,6 cm)
- different colors of cardstock
- different colors of ink pads
- brick wall stencil
- white texture paste
- spatula
- enamel dot
- glue, double-sided adhesive tape, self-adhesive foam pads

I used different colors of cardstock for all the cutouts and colored the edges with slightly darker ink pads.
You can also use white cardstock and then color all the cutouts with any color media.


Cut a square out of white cardstock. Then apply a white paste, stained with grey and red ink, over the brick wall stencil and let it dry.


Cut a banner out of white cardstock and stamp a sentiment.


Add a grey strip to the bottom edge of the brick wall.
Complete the card.


Thank you for stopping by.
Janja