Showing posts with label Nested Stitched Scallop Rectangle Set. Show all posts

Wednesday, January 08, 2020

Holiday Wishes & Gingerbread Kisses

Hello!  This is Sukie and today I'm sharing this sweet card. I have one last card to share from the Christmas holiday created with the adorable gingerbread couple from the Gingerbread Baking Set.
The couple was die cut in card stock along with 4 frames: Stitched Wide Rectangle, Nested Stitched Scallop Rectangle, Stitched Rectangle and the Rectangle set.
The sentiment is from the Scrappy Moms (retired) Winter Wishes stamp set.  I punched holes on each side of the sentiment tag and tied it some Candy Cane Trendy Twine.
The frames were layered together and adhered to the card base. The different sized frames nested inside one another perfectly.
The first gingerbread was angled a bit and placed in the left hand corner of my card directly under the sentiment.
The second gingerbread was adhered directly opposite of the first which completed this festive card.
Here are the die sets used on my card available in the store:


Tuesday, August 13, 2019

Let’s Celebrate With a Cake

Hi, Janja is here with you.
Today I have two simple birthday cards with a cake for you. Let's see how they look in different color combinations.


- CottageCutz dies: Mad Hatter Cake, Nested Stitched Scallop Rectangle Set, Rectangle Set, Build An Easter Egg (bow), Stitched Wide Rectangle Frame Set
- card base: 4.48 x 5.66" (11,4 x 14,4 cm), folded
- colored cardstock
- colored ink pads
- self-adhesive foam pads, glue
- white craft foam

First, cut out all the pieces for the cake from colored cardstock. Assemble and paste them together.


Prepare the card base and cut two rectangles out of beige and kraft cardstock - 4.21 x 5.47" (10,7 x 13,9 cm).
Cut out the red ribbon with the largest die from the Stitched Wide Rectangle Frame set.
Use the largest die from both basic sets for the frame.


Apply glue to the back of the frame and paste it to the rectangle. Create an extra dimension with craft foam.


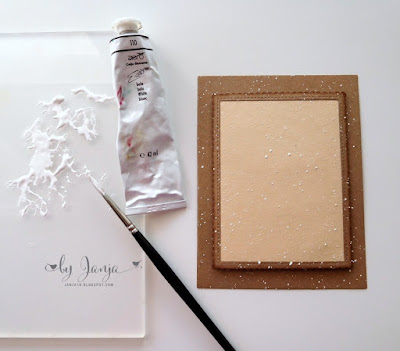
Now spray the background with white paint. Use a brush.


Once all the elements are ready, assemble the card.


Have a nice day.
Janja


Tuesday, February 26, 2019

Coffee time

Hi, Janja is here with you.
Today I have prepared a card for coffee lovers.


- CottageCutz dies: Love Latte & Donut, Rectangle Set, Nested Stitched Scallop Rectangle Set
- card base: 4.3" x 5.3 "(11 x 13.5 cm), folded
- patterned paper
- colored card stock
- colored ink pads
- embossing powder - white
- double-sided adhesive tape, foam tape, glue

Cut out cups and donuts from colored card stock. Emphasize the edges with ink pads. Paste all the pieces together.

Stamp a sentiment with a VersaMark ink on a brown card stock. Apply white powder and heat emboss. At the end cut the sentiment.


Prepare a card base. Cut three rectangles. Paste them on the front of the card with a double-sided adhesive tape.


Attach cups and donuts with foam tape to the background.


Finished card.


I would like to invite you to the online store. The new Spring dies are on sale for 25% off. 

Have a nice day.
Janja


Wednesday, December 19, 2018

Warm Wishes Layout

Hello! This is Sukie with my guest designer post.  Today I'm sharing a single page 12x12 layout.  I used several Cottage Cutz dies on this page.
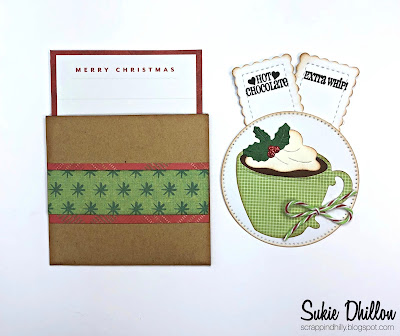
The patterned paper was the inspiration for the die cut cuts on my layout page.  I cut all of the drinks from the Cottage Cutz Coffee & Cocoa Warm Wishes and Sweet Christmas die sets.  Everything was inked on the edges for added dimension.  The mug from the Sweet Christmas set was layered on top of a circle cut from the Pierced Circle set.
I created a pocket and tucked in an ephemera die cut card.  A couple of tags cut from the Cottage Cutz Nested Stitched Scallop Rectangle set were stamped with sentiments from the My Creative Time "Do the Cocoa Motion" stamp set.  A small bow in Christmas Mint Trendy Twine was adhered to the mug.
The title and drinks were layered on a piece of paper to act as a shelf. I added a second layer of paper underneath for a pop of color.
Some Stickles were used to accent the holly berries and the candy cane for a sparkly finish.  The Stickles coordinate perfectly with the strip of red glitter paper on the base of my layout page.
To fill up some of the space at the top of my page, I layered the title at an angle above the 4x4 photo mat.
The journaling pocket was layered with the mug and the sentiment tags were tucked insides.  A few adhesive gems were sprinkled amongst the drinks.
Here are the dies used on my layout page available in the shop:

Tuesday, December 18, 2018

Cards with pets

Hi, Janja is here.
Christmas is almost here and we all probably ended up with our Christmas cards.
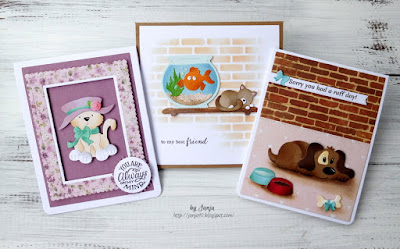
Today, I prepared three cards with some new dies from Pets release.


- white card base: 4.25 x 5.35" (10,7 x 13,9 cm), folded
- kraft card base: 5.3 x 5.3" (13,5 x 13,5 cm), folded
- colored card stock
- different ink pads
- plastic stencil: brick wall
- double-sided sticky tape, double-sided foam tape, foam pads, glue
- glossy accents


Start this card by cutting a fish, bowl and cat. 
I used colored card stock. For greater depth, I used different ink pads. On the picture is missing a shelf that I cut out later.


Use a plastic stencil brick wall for the background.
Cut the background to size 5 x 5" (12,7 x 12,7 cm). Paste it with a double-sided sticky tape to the card base. Stamp a sentiment. 
Attach the fish bowl and cat to the shelf with foam pads. 
Use glossy accents for air bubbles.


-------------------

Cut out all the pieces with the die - Rufus The Hound. I used the die - Fireplace with Accessories for small bows.


Cut two patterned papers of this size: 4 x 5.2" (10 x 13,2 cm) and 4 x 2.9" (10 x 7,3 cm). I printed the sentiment in Word. 


For the final touch, draw a shadow around the dog with a brush. Apply a glossy accents to the water in a bowl.


------------------------

Cut out and assemble Miss Kitty. 


Prepare background and two frames. Cut out two circles and stamp a sentiment. Attach frame and Miss Kitty to card base as shown using double-sided foam tape. 
Finally, add a little pearl to the flower.


Have a nice day.