Showing posts with label Lift Flaps Stitched Rectangle Slimline. Show all posts

Tuesday, May 11, 2021

Show Time

Hi!

It's Anja here for my Throwback Tuesday post. I have a lot of Circus dies I haven't had the opurtunity to try so I decided to use this and combined it with slimline dies. This is the final result.

For this card I used:

- Cottage Cutz dies (Circus Train Animals, Circus Signs, Lift Flaps Stitched Rectangle Slimline, Windows Slimline, Hills Slimline),

- Distress Inks,

- white card base (10x21 cm),

-patterned paper for background (9,5x21 cm) and die cuts,

- red card stock for background (8,5x21 cm),

- white card stock for die cuts,

- scissors,

- paper glue. 


First I cut and colored all three animals and the signs. Then I die cut the lift flaps from patterned paper. I also used one of the hills dies to put inside of the flap lifts for the ground. I also trimmed patterned and red card stock for the background. When I had all the pieces ready I glued it on the card base. Last I added the animals in all three windows. And my card was done.


And that's all from me for today. Have a nice week and see you again on Sunday. 

Anja Z.


Cottage Cutz dies I used:


Friday, April 30, 2021

Interactive Slimline Birthday Card

Happy Friday!  It's Jeanne today and I have a fun, interactive card featuring the new Slimline dies and dies from the Safari release. Both releases are on sale right now for a limited time at the online store.  The interactive part of this card are the peeking windows from the Lift Flap Slimline die that allow for a surprise.  In fact, this card does not even open up - the "inside" of the card is under the windows!

To start, I cut a lion, zebra and baby gorilla along with leaves and sentiment from the Safari release dies.  I cut oval Windows Slimline die set and stamped my sentiment on that.

I set this all aside to construct the card itself. 

After picking some safari themed paper I adhered it to a light weight cardstock using a self adhesive sheet.  I wanted to use this for my flaps but the paper was too thin and had a pattern on the back.  By adhering these together it gives the flaps a bit of weight and a solid back side.

Using the largest Nested Rectangle I cut a card base from brown cardstock.  Since this card doesn't open like a traditional card, this IS my card - it will not be glued to side or top opening base.  I used the third largest rectangle to cut a white panel for underneath my window flaps.  This rectangle is just slightly smaller than the Lift Flap panel.

Using coordinating paper, I cut two 2 1/2 inch squares for behind my top and bottom windows and glued those to the white panel.  To get them in place I drew very light pencil lines where the window opening would be.  I also used this to place my "Happy Birthday" sentiment.  I used a slightly off-kilter sentiment so if it weren't lined up perfectly, it wouldn't matter.

I stacked the panels and glued them to the card base.

When gluing the elements to the flaps take care not to overlap the hinge side.  You can have elements hang off the outer edges and the windows will still open.  

The lion is popped up using foam dots.

The other two animals are glued to the the top and bottom inside windows. 

Finally, I added some bronze "photo corners" to my flaps panel.

I hope you've enjoyed my card today.  Interactive cards are always delightful to give (and receive.)  These Lift Flaps can be adapted to any theme to make your card extra fun!

Dies Used:


 Thanks for stopping by!  I hope you have a fun and creative weekend!


Monday, April 19, 2021

Flock of Flamingos

Happy Monday!  It's Jeanne today starting off the week with a card perfect for family or friends.  I love the new Slimline dies since the give so many great design opportunities.

My card today uses the new dies with a few flamingos from the Tropical release.  I thought this flock looked like the plastic ones you see on lawns and they make me smile.

I used the largest of the Stitched Rectangles as my base.  After picking three coordinating green patterned papers, I used the Stitched Rectangles and the Hills Slimline to create a landscape for my flamingos.  The Hills are wonderful - they vary from a gentle slope to quite hilly giving you a variety of options!

My birds are cut from colored cardstock and I used Distress Oxide ink and a blending brush to create my sky.  The Lift Flaps Stitched Slimline has several design element dies and I used the cloud one here.  It was the perfect size for my sentiment!


This card is the perfect way to say "I'm so very happy to have you in my life!"

Dies used:


Thanks for visiting today!  I hope you have a wonderful week!


Saturday, April 10, 2021

Mom's Slimline Lift Flap Card

Hello Scrapping Cottage friends! Thanks for taking the time to stop and visit with us today. It's Mary Marsh here bringing you the Saturday edition of the Blog. 

We have a brand new release of dies in the online store. Your slimline cardmaking is going to get a lot easier. We have 9 Slimline designs and they are on sale at a great price. You can get the entire bundle for under a $100 or each individual die is 25% off.  

And we are also having a sale to celebrate 19 years in business. You can save up to 60% on select dies. The sale runs through April 12. So check out the online store now for the best selections. 

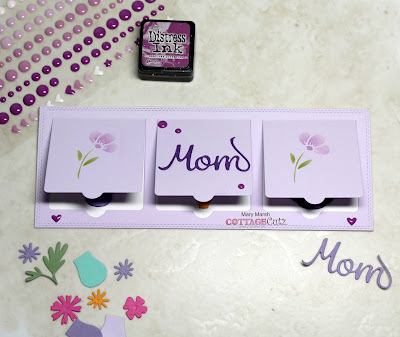
Today for your viewing pleasure, I created a Mother's Day card.  I am featuring the new Lift Flaps Stitched Rectangle Slimline die. It is a 5 piece die set. 

Since we are having a sale on most dies, I thought I would select one to use with the Lifts Flaps die.  I used the Flowers for Mom die from an older Mother's Day release. And, and it's currently on sale for 40% off.  

So let's get started with some details of how I created my card. 

Design Steps:

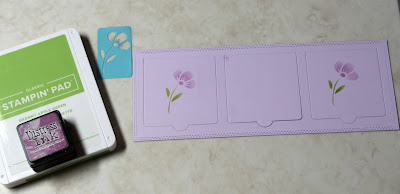
I started off by cutting my light purple cardstock with the double stitched rectangle die that is included in this set. I use a Big Shot machine and you do need the extended platform for the slimline dies. 
Next, I laid the lift flaps die on the rectangle I just cut, Secured it with tape and ran it back through the Big Shot. 
I didn't want the flaps to be empty so I decided to stencil some flowers on the 2 end flaps. This stencil was so small and even though I covered the edges, I did manage to get a bit of the violet ink in the corner. Not to worry because  I was going to use enamel dots, and it will cover it.
 
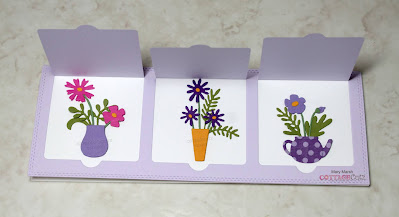
Now I am ready to cut the bouquets of flowers that will go under the flap. I used different colors of cardstock for the vases, teapot, flowers and leaves. 
 
I adhered the vases under the flaps with a combo of double sided tape and Ranger multi medium matte adhesive. 
I adhered the image panel to a white card base. Finished base size is 8" x  3". I cut my card stock at 8" x 6" and then scored at the 3" mark. 

To finish off my card I added the "Mom" phrase cut in a grape cardstock. It's from the 2018 Mom w/heart die. I scattered a couple of grape hearts and a few enamel dots. 

That's it for me for this post. I will be back on Monday with another card using these new Slimline basic dies.

dies I used to create card: