Showing posts with label Kris Breach. Show all posts

Friday, March 15, 2024

Mr. Snuggles Split Front Card

Happy Friday Friends!

Kris here to share some coffee-themed inspiration with you.  Today kicks off the Spring/Summer Coffee Loving Cardmakers Blog Hop, so I was inspired to make a coffee-themed card using some 'new-to-me' CottageCutz dies that were perfect for this.  I made a fun fold card that is so super simple... let me show you! ☺


To create the split, you start with an A2 landscape card, then make 2 cuts to the front of card, up to the score line.  Adding a supporting cross bar that connects the front 2 side flaps, helps to hold them together as you open the card.  


The middle section inside (which is also the middle of the front of your card) serves to hide your stamped or hand written message.  ☺  It's so simple, but adds a fun unexpected feature.


DIE CUTS:

Kraft cardstock:

White cardstock:
Coffee & Donuts (donuts and steam)
Cookies & Cocoa (just the hearts)
Warm & Cozy Cocoa (just the marshmallows & cocoa oval)

PAPER TRIMMER CUTS:

 Teal Cardstock:
Cut card base at 5-1/2" x 8-1/2" and score at 4-1/4"

Kraft Cardstock:
2-13/16" x 4-1/16" 
(2) 1-1/16" x 4-1/16"
1-1/4" x 5-7/16"

White Cardstock:
2-5/8" x 3-7/8"
1-1/16" x 5-1/4"
(2) 1-1/16" x 4-1/16"

Designer Paper (coffee cups):
2-5/8" x 3-7/8"
(2)  7/8" x 3-7/8"

Designer Paper (Teal Plaid):
(2) 7/8" x 3-7/8"
7/8" x 5-1/16"

DESIGN STEPS:

• With 5-1/2" edge along top of trimmer, cut just down to the score line at 1-1/4" and 4-1/4"


• Attach your coffee print papers to their brown mats.  
• Attach the larger one to the middle section of card front
• Attach the skinny ones to the inside side panels so there's equal border around.


• Attach white message piece to the inside center.


• Attach plaid papers to the white mats, and attach to the front side panels as shown.


• Attach the longer plaid piece to the white mat, then onto the brown kraft piece.  

• Add adhesive ONLY to the side ends that will be overlapping the 2 side columns (don't attach to the center panel that has cups on it. 


• Add color and shading to your die cuts and assemble.

*Tip:  For the croissant, I angled the ends of the "marshmallows" and colored like a croissant.  For the plate, I added some lines to the cocoa oval.

 **Optional:  I added glossy glaze to my bear's eyes and nose, and the donut icings.  The photo below shows before it dried, so it's a li'l opaque here.  When it dries, it is transparent ☺


• I added foam tape to the lower part of bear and cup and attached them to the cross bar on front of card.


Grab some fun COFFEE or COCOA dies and join in the fun!!


Thank you for visiting today! 
I hope you are inspired to get crafty with your favorite CottageCutz dies!

~Kristine


Head over to Cottage Cutz and do a little shopping today!

Get Social With Cottage Cutz

Friday, March 01, 2024

Hippity Hoppity Easter Express

Happy Friday friends!

It's Kris sharing with you today. It's the first day of March, which means there's  30 more days til Easter!  I have a few more Easter cards to make and today's turned out super cute, in my humble opinion. ☺  This slimline features the Bunny Express Engine and Bunny Express Carrot Cars along with the Spring Sentiments from the Spring 2022 release.  


Design Steps:

My card base is 4" x 9" (folded).  My next layer (SU! Berry Burst) is cut at 3-3/4" x 8-3/4" (I actually cut it 1/16" shy of those figures, but if you don't like working in 16th inches, you can easily round up to 3/4")

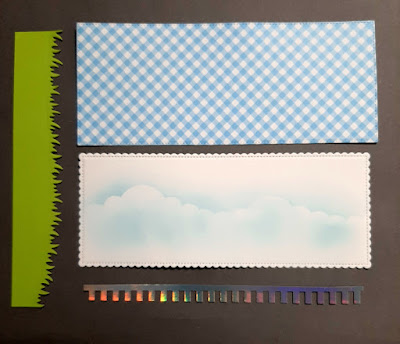
Next, I die cut a piece of blue/white gingham paper (Divinity Designs Polka Dots & Gingham)  using the largest of the Nested Stitched Rectangles Slimline set.  And for my main focal panel, I die cut a piece of white cardstock using the largest of the Scalloped Stitched Rectangles Slimline set.  I then sponged some clouds with Tumbled Glass Distress Oxide ink. 

I cut a piece of (SU! Granny Apple Green) at 1-1/2" x 7-15/16" and I die cut the top with a die from the Grass Slimline set. 

I die cut a piece of iridescent cardstock using the Picket Fence Slimline die and then trimmed it as shown in the photo below to look like train tracks. 


I layered all those pieces onto my card base.

Next, I die cut all of my Easter elements from white cardstock and colored with Copic markers and then I assembled them.  I popped the train onto the track with foam dots and I glued the sentiment to the top.  


I love the font and how the ending letters include bunny ears! 


Thanks so much for looking today!  I hope you are inspired to create something CUTE with your favorite CottageCutz dies ☺

~Kristine


Head over to Cottage Cutz and do a little shopping today!

Get Social With Cottage Cutz

Friday, February 23, 2024

Magical Unicorn Dreams Shaker

Hello friends,

Kris here to share some Friday inspiration with you.  I've created a fun Unicorn Shaker card that is perfect for a young girl.  The inside says "Birthday Wishes"


DESIGN STEPS:

I die cut the Flying Unicorn and the Rainbow with Clouds from white cardstock and colored with Copics.


Next, I cut (2) pieces of white cardstock at 4-1/4" x 5-1/2".  From one of those, I die cut the largest Double Stitched Rectangle die from the middle, creating a frame for our card front. 


From the Double Stitched Rectangle that was cut out, I die cut one of the Clouds Slimline dies.


On the other A2 piece of cardstock,  I ink blended Distress Oxide inks over the whole background, then repeated it onto the frame.    


I used Scor Tape to adhere a piece of acetate to the backside of frame, and also to the backside of the clouds border for the front.  Before removing the tape backings, I inset the clouds and glued the rainbow so the ends are tucked under the clouds. 


Once I got my clouds adhered on the front, I flipped it over to the back and added 1/8" foam strips around the opening, then added my shaker elements.  I then placed my ink blended layer (back of shaker) upside-down onto the foam strips.


I die cut "Magical" from the Magical Unicorn Dreams die from lavender c.s. and adhered to bottom of clouds, then I popped up the unicorn with foam strips.  

I cut a white A2 top folding card base and attached my shaker to the front and done!  


Head over to Cottage Cutz and do a little shopping today!

Get Social With Cottage Cutz


Thank you so much for joining me today! 
 I hope you are inspired to get crafty with your favorite CottageCutz dies!  

~Kristine