Showing posts with label Hills Slimline. Show all posts

Saturday, November 18, 2023

Autumn friends Celebrate Thanksgiving

Hello CottageCutz friends! Thanks for taking the time to stop and visit with us today. It's Mary Marsh here bringing you the Saturday edition of the Blog.

It's new release time!!! We have our Christmas 2023 release in the online store that has 40 designs. It's an old-fashioned Christmas theme. You can pick up the individual dies at 30% off for a limited time.

We also have a new Fall 2023 release in the online store with 15 designs. You can also pick up these individual dies at 30% off for a limited time.

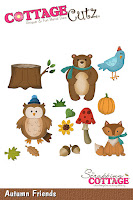
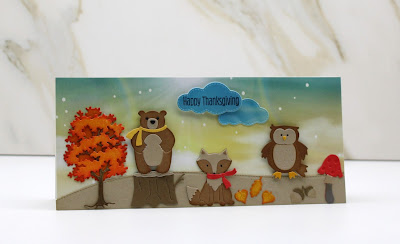
Today for your viewing pleasure, I am featuring the new Autumn Friends and the Fall Tree dies. I created a slimline Thanksgiving card for a family that has 2 young boys. I thought the whimsical style would be a perfect card for them. So, let's get started with some details of how I created my card. 

Design Steps:

I started my card this week with the colors. I used the colors from the Splitcoaststampers color challenge #974. We were to use poppy parade, crushed curry, pecan pie and crumb cake for the color combination. Optional was anything goes. I chose the addition of blue for this part. 
poppy parade, crushed curry, pecan pie, crumb cake 
I cut the Autumn Friends images in the challenge colors plus a few allowed neutrals. 

For the Fall Tree, I wanted the look of the trees we see in PA in the Fall season.  So, I cut in white cardstock and blended barn door and fossilized amber distress inks to get a beautiful Fall color. I colored the 3 leaves with the same inks. These inks are a match for the Stampin'Up colors. 
Next, I chose this pattern of designer paper for the card background. I liked the blue sky and the sun rays. It's from a pack called "heavenly skies" (Divinity Designs) and they are sized for a slimline card at 6" x 9".  
I cut a white card base 4" x 9" and the designer paper is also 4" x 9" to cover the white card front. 
 I attached the designer paper to the card base. And cut a slope in the crumb cake shade using the Hills Slimline die. They are both attached with double sided tape. 
I attached my images with clear drying glue except for the Bear & Owl. I used dimensional adhesive to have lifted slightly off the card base. 
To complete the card, I cut a couple of clouds using the Stitched Sun, Clouds & Umbrella die. I cut them from the leftover designer paper.  Stamped my Happy Thanksgiving sentiment and attached to the card base. 
That's it for me for this week. See you next Saturday. Happy Thanksgiving to all our American friends. 

Reminder: Marla has a new video and a giveaway on the CottageCutz YouTube channel. Click here.


Thursday, November 16, 2023

Christmas Carolers


 Hello Friends 

Our new Christmas Release is available at a wonderful 30% off.  This collection has over 40 different dies.   It has everything you will need for your holiday paper crafting. Make sure to stop by the online store and check out all the fantastic new designs!

Today, I am using 3 of the new dies: CarolersVintage Gate and Vintage Lamp Post.   I am using a slimline card design to show off all these wonderful dies.


Design Steps:

1.  Using the Carolers die cut out the pieces in the following card stock colors: red, green, tan, brown, blue, black, flesh, and yellow gold.  For the Vintage Lamp Post die cut out the following colors of card stock: gray, yellow, green, red, white and yellow gold.  I used a copic marker on the faces to add a little more color and some blush.  Assemble the pieces with a fine tip glue.  Color in the eyes with a fine black marker and then a white dot with a Sakura Gelly Roll pen
2.  The base is a white 3 1/2 x 8 1/2 slimline.  Cut a piece of snowy DP 3 1/4 x 8 1/4, use the Hills Slimline die to cut the snow in white and finally cut the Vintage Gate in black

3.  Glue the DP blue snowy background to the white card base next add the gate and then the snow

4.  Glue the Vintage Lamps to either side of the gate as shown above
5.  Add the caroler and your sentiment and your card is complete


We have more inspiration on our YouTube Channel check it out HERE

Thanks so much for stopping by!  And I will see you next Thursday.

Blessings and Take Care


Friday, October 27, 2023

Watercolored Fall Tree


Happy Fall Y'all 😊


Kris here sharing some Friday inspiration with you!   My card today features the Fall Tree from the new New Fall Release!  All the individual dies from this release are still 30% OFF for a limited time and there are 15 beautiful Fall designs!

I joined Mary & Pam in the Color Challenge CC971 at SplitcoastStampers this week which is...

Pretty Peacock
Crushed Curry
Cajun Craze
The dessert option is TEXTURE.


(All dies I used are linked at the end of this post)

DESIGN STEPS:

I started with an A2 top folding card and since I was out of the Curry c.s., I used Daffodil Delight and ink blended some wild honey Distress Oxide ink to get the deeper curry color. 


For the background of my focal image I wanted to incorporate some texture so I used some thick watercolor paper and die cut the Leafy Background Slimline die and mounted it on a piece of 3-1/4" x 4-1/4" watercolor paper.  


I then turned it over and cut off the excess.


I adhered this to the middle of my card front.


Next, I die cut the Fall Tree and leaves from the Autumn Ladder from watercolor cardstock.

(I also die cut the wheelbarrow thinking I'd put it at the bottom of my card with leaves in it, but it ended up being pretty large compared to my tree, so I eliminated it.)

I die cut a piece of Mossy Meadow c.s. with one of the Hills Slimline dies and another piece I die cut with one of the Grass Slimline dies. I cut both to 3-1/4" wide and mounted the hill on top of the grass blades and adhered to card front.


I watercolored the tree and leaves with Crackling Campfire, Carved Pumpkin, Wild Honey and Vintage Photo Distress Oxide inks and set aside to dry.

Next, I created a frame from the Pretty Peacock c.s. by layering the 2nd largest Wacky Stitched Rectangle Die inside the largest Scalloped Rectangle Die and die cutting it.


I added foam strips to back of frame and adhered to card front.


I adhered my tree and leaves onto card front.

For my sentiment, I used this pretty teal watercolor Deco Foil to foil my sentiment onto the Cajun Craze cardstock.  To do this, I printed my sentiment on the Cajun c.s. using a laser printer, then added my foil on top and ran it thru my Minc (like a laminator, but made for foiling).


Here are the results up close:  
I love how it incorporated the peacock, yellow and green ☺


and done!


  I hope you are inspired to get crafty with your favorite CottageCutz dies!  

More inspiration and tutorials on our YouTube channel here. 

♡  ♡  ♡

~Kris


Thursday, September 28, 2023

New Release Christmas 2023!

Hello Friends 

It is Pam sharing with you today!

It is time to show off our new RELEASE!  It is called Christmas 2023 just in time for you to get started on making all those wonderful holiday cards and scrapbooks! 

The new dies are in the online store.  There are 40 designs many with a very vintage look.  You can order the entire release at 50% off.  Or you can get the individual dies at 30% off.  This special offer is for a limited time only.

To display some of these beautiful new dies I designed a side step card (shown below).  The card features 4 of the new release dies: Clock TowerPine Tree SlimPine Tree Full, and Vintage Horse and Sleigh.


Design Steps: If you would like to see a video this link will take you to Splitcoaststamper side step tutorial.  HERE

1.  Line up the short side of the card stock at 3 inches on a paper cutter.  Start at 1 inch and cut all the way to 6 1/2 inches

2.  Score the 2 1/2 wide section of the card at 4 1/4 inches

3.  Score the 3 inch wide section at 1 inch, 2 inches, 3 1/4 inches, 4 1/2 inches and 6 1/2 inches

4.  Fold the score line on the 2 1.2 side at the 4 1/4 mountain style

5.  On the other side fold the first score line mountain, then valley, mountain, valley, mountain.  It will look like the picture above

6.  To decorate the side step card cut 3 strips of white 5 1/2 x 1 1/4, 3 x 1 1/2 and 3 x 2 1/4. Die cut all of the top of the pieces using the Hills Slimline die.  Cut a piece of DP 2 1/2 x 4 1/4

7.  Glue the pieces to the side step card as shown above

8.  Using the Clock TowerPine Tree SlimPine Tree Full and the Vintage Horse and Sleigh cut out the following colors of card stock: red, dark brown, brown, light brown, black, silver, white, yellow, and green.  Assemble the pieces with a fine tip glue.  As shown below

9.  Places the finished pieces on the card as shown below and add your sentiment


We have more inspiration on our YouTube Channel check it out HERE

Thanks so much for stopping by!  And I will see you next Thursday.

Blessings and Take Care