Showing posts with label Happy Birthday w/Shadow. Show all posts

Monday, March 06, 2023

Floating Sentiment Shadowbox

Happy Monday CottageCutz friends!

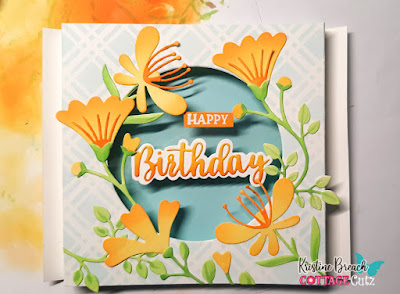
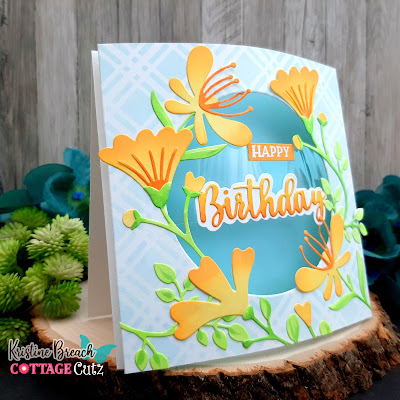
Kris here sharing with you today.  I have a Floating Sentiment Shadowbox type of card.  I've used Flower 1, Flower 6, and Flower 7 from the newest Flowers & More Release.


This style is very easy to make, but if you'd like to watch a video, Jennifer McGuire recently shared this one and I was inspired to try it for my card this week. ☺

Design Steps:

1.  I cut a white card base at 5" x 10" and scored at 5 inches.  

2.  I cut another piece of white cardstock at 5" x 7" and scored along the 7" side at 1/2" and 1" on both ends.  Accordion folded them and burnished.

3.  I stenciled a background with the Plaid stencil from the Daisy Stencil set (La-La Land Crafts) with Tumbled Glass Distress Oxide ink.


4.  I die cut a circle from the center of that piece using the 2nd largest Pierced Circle set.


5.  Next, I die cut my flowers from white cardstock and added Distress Oxide ink in Squeezed Lemonade, Wild Honey, Carved Pumpkin, Twisted Citron, and then I added some shading to the leaves with a Copic marker. 

6.  I then placed them around the opening and glued them down.


7.  I stamped & embossed my "Happy" sentiment and die cut the "Birthday" from the Happy Birthday w/ Shadow die.  

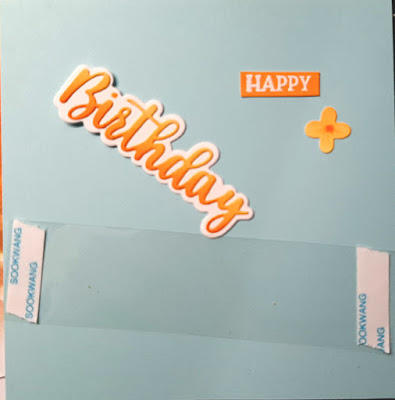
8.  I cut a strip of window sheet about 4-3/4' x 1-1/2" and added Scor Tape to each end.


9.  I then taped the window sheet to the back of my flower layer, in the center.


10.  I attached my sentiment pieces to the front of the window sheet.  I ended up cutting off one of the limbs from the stem on the left so it didn't cover up my sentiment too much. 

11.  I then tried out different colors of cardstock as my backdrop for my flowers and decided on this light teal color.  I cut it to 3-7/8" x 4-7/8" and set it aside.  *This is not attached to the front floral panel.


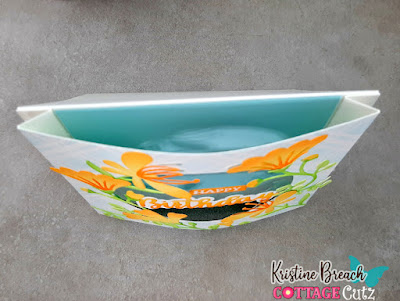
12.  I added Scor Tape to the 1/2" scored flaps of the flower panel piece and lined them up with the side edges of my card front.  I love how it causes the front panel to dome out!

13.  I then added glue to the backside of my blue panel and inserted it between my front floral panel and the card front so that the 4-7/8" is vertical.  


Done!


PRODUCT I USED:


Thanks for taking a peek!  I hope you are inspired to get creative with your favorite CottageCutz dies!

~Kristine


Saturday, February 18, 2023

Corner Tuck Fun Fold Birthday

Hello CottageCutz friends! Thanks for taking the time to stop and visit with us today. It's Mary Marsh here bringing you the Saturday edition of the Blog.

We have a brand-new release of dies in the online store. It's our Flowers & More release. The individual dies are currently on sale for 30% off. This release has what we are calling "simple cuts". Meaning not as many pieces to put together so they assemble quickly.

We are also having a huge President's Day sale with savings from 40% to 70% on selected CottageCutz dies. Shop early before anything sells out. The sale will run through Friday, February 24th. 

For today I am showing two of the dies that is on sale. The Party Cake die is currently 50% off and the Happy Birthday w/Shadow die is 40% off.  I created a corner tuck fun fold card. It's a new to me fold that I saw Linh make on a recent YouTube video. Click here to see her card. 

Design Steps:
1. Start with cardstock measuring 4 1/4" x 11"

2. Cut cardstock to 4-1/4" x 8" Score the 8" side at 5-1/2" to create the base of the fun fold card. Leftover panel can be used for the image panel. I decided not to use this color panel on my card.
3. Cut a 2-3/8" x 4 1/8" piece of designer paper and adhere it to the front flap on the card base.  Cut a 5-3/8" x 4 1/8" piece of white card stock and adhered it to the inside of the card.
4. Cut a 2" x 2" piece of the same designer paper and cut the square in half on a diagonal. This is what you tuck the image panel into.
5. Add a bit of liquid glue to the top and right edges of patterned paper. Adhere it to the upper right corner of the white card stock piece on the inside of the card.
6. For my image panel, I cut a piece of granny apple green cardstock at 3 1/4" x 4 1/4". I used designer paper that has the granny apple green as a gradient and cut it at 3 1/8" x 4 1/8".

I cut the cake image and birthday phrase in colors that are in the designer paper.  Stamped the sentiment in chocolate chip ink.  
7. I attached the image panel to the front flap of the card base. You will be adhering the card stock directly onto the designer paper piece. I only added adhesive to the section that comes in contact with the flap of the card base. Once this panel is secured, you lift up on the right side of the card stock and tuck it under the corner piece.

To finish off the image panel, I added some "cake confetti". It's part of the Party Cake die.
Here is a photo of the card untucked from the corner.
Well, that's it for me for this post. See you next Saturday.

Reminder: Our YouTube Channel has a new video from Jen Hartsgrove. There is a giveaway for being a subscriber, liking the video and leaving a comment. Click here.

dies I used to create card:


Tuesday, September 06, 2022

Easy Birthday Card

Happy TuesDIE Cottage Cutz Friends!
Melinda here with you on another Terrific TuesDIE. Today I am sharing a fun and very easy card I created featuring dies that are part of the Great Labor Day Sale Happening Now!

Here's a look at my completed card. This is a shot of the outside and the inside.


Here is what it looks like when closed. It is a standard A2 side folding card. 

The base of the card is a piece of Kraft cardstock cut at 5.5 x 8.5. It is folded to make it a 4.25 x 5.5 size. I then cut two pieces of patterned paper at 4 x 5.25. I mounted them on to each side of the inside of the card. 

Next I cut a piece of Kraft cardstock to 1.75 x 8.5. I then folded it in half and then folded those two halves in half again. This made four equal panels. I then made sure the folds were valley, mountain and valley. I then cut a piece of patterned paper to 1 5/8 x 4. I folded that in half with a mountain fold. Once I did this, i adhered the patterned paper to the center of the Kraft paper strip. Mountain on mountain.


I then applied adhesive to the backs of the two end squares. I adhered one side down roughly in the center and about a half inch from the edge. I then held the folded squares down and closed the card. I burnished the card onto the square with the adhesive so that upon opening back up, it would be solidly adhered to the opposite flap.

I opened it back up and then decorated the flap. I added a scallop, eyelet stitched square from the die set to each end. To their centers I added a piece of matching paper and then a pretty butterfly from the Kayla butterfly die. To the center two squares, I added a smaller square in Kraft cardstock with two hearts from the Stitched heart die set.

Here is another photo of the card opened.

Here is a closer look at the front of the card opened. I added a mat of patterned paper and then two hearts, one white and one Kraft from the stitched heart set. I added another butterfly. For the butterflies, I started with plain white cardstock (actually one was Kraft cardstock) and then colored them with my markers to give them that gradient colored look. I adhered the butterfly to the center of the heart. I die cut the happy birthday in white cardstock and then used my markers to color them as well. For the happy, I just angled it around the heart as I adhered it. For the dot of the "I", I used some stickles.

Here is one last look at the finished card. This is a real easy and quick way to add a little extra something to your cards with minimal extra effort. Plus the sky is the limit on the sizing and style options for this. It is a real easy go to!


Don't forget to head over to the CottageCutz YouTube channel and check out all of the amazing projects on there. Our video team is doing a wonderful job of filling the channel with all sorts of creative content! You don't want to miss it!

Nested Stitched Eyelet Square Set

Stitched Heart Set

Happy Birthday W Shadow


Don't forget about the great Labor Day Sale Happening now!
Sale ends Thursday, September 8, 2022 at 9:00 PM Pacific Time.
Shop Now For Best Selection!!!!


Well that about covers it for today! Until the next time, have a wonderfully craft-die day!
Melinda Beltran


Sunday, September 04, 2022

Labor Day SALE and a Bday Box Card

Happy Labor Day Weekend friends!  Kris here with a Birthday Box Card that I made for my daughter who loves cows and she was so excited to get this!  Before I get to it, I want to remind y'all of the BIG LABOR DAY SALE!! Up to 65% OFF so many dies -  Sale ends Thursday, September 8, 2022 at 9:00 PM Pacific Time so HURRY OVER and save!!!  

Also - be sure to check out our NEW CHRISTMAS RELEASE which is also on SALE!

I purchased these adorable Country Farm Cows at last year's Labor Day Sale & right now ALL of the dies I have used on my card today are 40-60% OFF (except the balloon on the back as it's retired.)  I have listed and linked all the products I've used on my card at the end of this post! ☺


This next one is of the BACK of my card - empty space to write a personal message.

And yes it does fold flat to fit into an envelope! 


Design Steps:

1.  I cut a white rectangle using the largest die from the Nested Wacky Stitched Rectangles - then stenciled some clouds with Tumbled Glass Distress Oxide ink.  *Optional:  I then cut off 5/8" from the bottom of my rectangle to fit the size card I was wanting to make, but it's not necessary.


2.  I cut a piece of blue cardstock at 3-1/4" x 4-7/8" and mounted my cloud layer on top.  *If you didn't want to cut the bottom off of your cloud layer in step #1, then you would cut your blue piece at 3-3/4" x 4-7/8" ☺


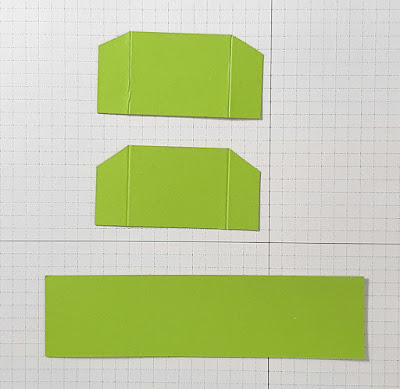
3.  I cut (2) pieces of green at 2-1/2" x 1-1/4" - then scored 1/2" from each end and mitered the top of flaps.  These are my side pieces.

4.  I cut a piece of green for the front of box at 1-1/4" x 5"


5.  I cut a couple different colors of green (can be all one shade) into strips at 5-3/4" x 1-1/2" and scored 3/8" in from each end.  These are the inside "shelves" that we will attach our cows to later. 


6.  I then used various dies from the Hills Slimline set to cut the very tops off of each shelf piece.  


7.  I then cut the side flaps down along the score line as shown below:


8.  Next, with my 2 side pieces, I glued the left flap to the bottom left edge of my cloud piece, and the right flap to the bottom right edge of same piece as shown below.


* For the next few steps, we're not going to do anything with that right flap.  Just going to work on the left side.

9.  I added glue to the left flap of my side piece and attached the left side of my front piece.


10.  Decide which hill you want to be furthest back and add glue just to the left flap and bump it up to the score line of your side piece as shown below, making sure the flap is below the top edge of your side piece.


11.  Fold that hill over to the right and add glue to just the left flap of your middle hill.  Then attach it up to the scored line of the back hill as shown below.


12.  Fold that hill over to the right and repeat for the front hill.


13.  Add glue to ALL 3 tabs on the hills fold your right side piece over onto them.

14.  Add glue to the flap of your right side piece and attach your front panel onto it.


15. Die cut a fence using the Farm Fence Slimline die.  Add glue to the back leaving the top horizontal beam w/out glue as it will be sticking above your green front piece a li'l bit.  Attach to the front panel. 


16.  Die cut, color and piece together Savanna trees, Country Farm Cows, and Happy Birthday w/ Shadow.


17.  I added glue just to the lower portion of my sentiment and attached it to the top of my card base as shown below.

18.  I attached my die cuts to the various hills as shown.


19.  For the back of card, I cut a white piece as in step 1, cutting off 5/8" from bottom.  Then I cut a piece of green cardstock cutting the top with a Hills die and the bottom portion with the same Nested Wacky Stitched Rectangle die.  I also cut a cute balloon and done!

Here are the Products I Used:


THANK YOU for taking time to visit today!  I hope I inspired you to make a box card with your favorite CotageCutz dies!  

I'll be back tomorrow with a card from the NEW CHRISTMAS RELEASE!

~Kristine