Showing posts with label Gardening Tomte. Show all posts

Saturday, May 29, 2021

Patriotic Gnomes

Hello Scrapping Cottage friends! Thanks for taking the time to stop and visit with us today. It's Mary Marsh here bringing you the Saturday edition of the Blog.

We have a brand new release of Country Farm dies. They are on a great limited time sale. You can get the entire release of 16 new designs for under $120. That's a savings of 60%. The individual dies are on sale at 25% off. The DT will begin showing samples with these dies next week. 
 
We are also having a Memorial Day sale. You can get some great savings of up to 70% until June 2. So now is the time to get your wish list out and pick up some new dies. The release of Slimline dies are still on sale at the online store. They just make your slimline cardmaking so much easier. There are  9 Slimline designs and they are on a 25% off sale. 

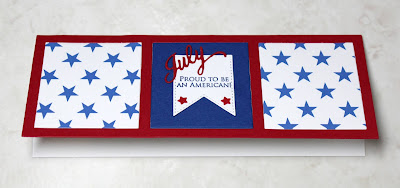
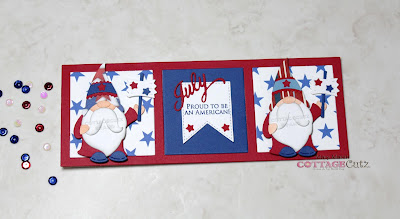
Since this is a holiday weekend,  I am featuring a patriotic card in the slimline design. I focused on a July 4th theme since that's a big celebration for the US. I used the Flower Power Tomte dies from our 2020 Gardening release collection and dressed them in patriotic colors. I also used the Windows Slimline die.  

I decorate my home in a patriotic theme that I leave in place until mid-August. So this card will be part of my decorations. So let's get started with some details on how I created my card. 

Design Steps: 
I started the card off by selecting my designer paper. I wanted a patriotic theme but nothing that would overpower the gnome images. My patriotic paper is limited and I didn't want to make a run to my local Michael's store so I looked online for something that I could download for free. Yay- I found some on Pinterest. And it printed out nicely as well.
 
So I cut the windows slimline once from the designer paper and then again in a red and blue cardstock. My card base is white and measures 6" x 8" and scored at 3". It's the same size as the window frame. 
Next, I cut the gnome images in red, white and blue cardstock. I didn't want them both to be exactly alike so I cut their hats in different designer papers and cut the hat bands in two shades of blue cardstock.
For the center panel, I decided to make that a solid color. I used the banner that comes with this slimline die and stamped my sentiment in blue ink. The July phrase is part of the Calendar Months die from our Valentine 2017 release, but is currently out of stock. The stars are from the Circus Ringmaster die. 
Now that all my elements are cut I am ready to start card assembly. I attached the red window frame to the white card base with glue dots. Then I attached the inlaid panels with double sided tape.
To finish off my card, I added my patriotic gnomes and secured them with dimensional adhesive. I decided to use the garden flags that come with the die. In the red, white and blue I think they look like flags that you would wave at a parade. 
Well, that's it for me for this post. See you next Saturday. Have a great holiday weekend.

dies I used to create card: 


Sunday, June 07, 2020

Welcome To The Tomte Garden

Hi!

It's Anja here. For today's post I made a lovely scene, using the new Tomte dies. I combined both and this is the final result.


For this card I used:
- Cottage Cutz dies (Flower Power Tomte, Gardening Tomte, Hollow Tree w/ Forest Friends),
- Distress Inks,
- white card base (10,5x15 cm),
- silver pigment ink,
- black pen,
- white pen,
- plastic stencil (clouds),
- brush,
- paper glue.

First I cut and colored both tomtes and all the other accessories.


Next I colored the tree and the mushrooms. I used white pen for the mushrooms.


I didn't have a sentiment stamp to fit the wooden sign. So I wrote on it with a black pen.


Last I did the background. I used the technique I like the most. Clouds with a plastic stencil and green Distress Ink for the grassy ground.


Then I just added tomtes, the tree and all the other small pieces and my card was done.


That's all from me for today. Have a nice Sunday and see you again next week.

Anja Z.


Cottage Cutz dies I used for this card:


Saturday, May 16, 2020

A Gardening Tomte

Hello Scrapping Cottage friends! Thanks for taking the time to stop and visit with us today. It's Mary Marsh here bringing you the Saturday edition of the Blog. 

We have a brand new release of dies in the online store. This one is garden themed and has 19 new designs. These new dies are perfect for Father's Day, birthdays, thank you, or even a thinking of you card for the person who loves to garden. 

For my card today, I am featuring the new Gardening Tomte and created a thinking of you card for a friend. So let's get started with some details on how I created my card.

Design Steps:

I started my card with the colors and used the color challenge #790 on Splitcoaststampers. I thought this color trio would work well for my outdoor garden scene. Plus you can add neutral shades and with this challenge dark green is considered a neutral shade. So that helped with the grass I would need for my scene.   
flirty flamingo, crushed curry, rich razzleberry

The outdoor scene was easily created with my landscape themed designer paper. The clouds and sky were a good match for the crushed curry color. The sky goes from the light to dark shades of this color. I decided to go with a square card this week because I didn't want to lose a lot of the designer paper. 
Crushed curry card base: 5 1/2" square
Designer paper layer: 5 1/4" square

Next, I cut all the images in the challenge colors + a few neutrals. To get the varying shades of crushed curry in the flower pot and the gnome's hat. I used a crushed curry designer paper that again went from light to dark. The images are attached to the designer paper layer with a combo of glue dots, double sided tape and multi medium matte. 
I stamped my hello sentiment in a cloud cut in crushed curry cardstock and used rich razzleberry ink. The cloud die is an older one from CottageCutz - clouds and sun die. I used the 2nd largest cloud on my card. 
Attached that to image panel with dimensional adhesive. The image panel is secured with double sided tape. I added a few flirty flamingo enamel dots to complete the card. 
Well, that's it for me for this week. I hope I have given you an idea for a way to use this new die. Designer papers can give you a big assist with your design. See you next Saturday!

dies I used to create card:


Tuesday, May 12, 2020

To brighten your day

Hi Janja here. Welcome to the blog today.
As much as I love creating my cards with lots of cutouts, it’s fun to take a step back occasionally and create a simple card.


- CottageCutz die Gardening Tomte
- blank card: 4 ¼ x 5 ½" (10,8 x 14 cm), folded
- white cardstock: 3 1/2 x 4 13/16" (8,9 x 12,2 cm)
- different colors of cardstock
- different colors of ink pads
- white ink pen
- glue, double-sided adhesive tape

Start by die-cutting all the pieces for the main image out from different colors of cardstock. For greater depth, use ink pads that are slightly darker than the cardstock.


Then cut out a rectangle from white cardstock.
To add a little more depth to the overall look, leave the die in place and shade around the bottom with a grey ink pad and blender brush. You will get white unshaded edges at the bottom.
I printed this cute quote later on the top.


Trim the selected patterned paper to the size of a blank card. Stick it on the front of the card.


Completed card.


Thank you for stopping by.
Janja

Wednesday, April 29, 2020

Hello Sunshine

Hello!  This is Sukie and today I'm sharing this card for my design team post.  I'm delighted with the new Cottage Cutz Gardening die release.  All of the blooms in this release are perfect for those springtime creations.
I used the Gardening Tomte and the Flower Power Tomte die sets for my card.  All of the flowers inspired the bright and cheery color combination for my die cuts.
I chose a neutral background for my card base to offset all of the colors and patterns I incorporated into my die cuts.  A tiny stamped sentiment on a hand cut flag was perfect for my card.
Once I put together my card base, I adhered the die cut elements one-by-one creating the whimsical scene.
The flowers were placed on the two edges of my card.  The tiny birdhouse was nestled in the center. The little gardening elements are so cute and work great as embellishments on my card.
The sentiment flag was placed in the upper left corner of my card as the final finishing accent.
 Here are the die sets used on my card, available in the store:
Thanks so much for stopping by!  Have a nice day!

Friday, April 24, 2020

New Release - Bloom Where You are Planted!

Happy Friday Cottage Cutz fans!  It's Jeanne today with a clean and simple card featuring dies from the beautiful new Gardening release.  All the dies are wonderful, but I fell in love with the Puppy in Garden Cart die as soon as I saw it! This little guy poking through the flowers is adorable.
To begin the card I picked a floral patterned paper so I could match some colors to use on my card.  I cut a white panel 4.25 x 5.5 inches and a strip of the floral paper .5 x 6 inches for the right side.  I glued the strip to the panel and snipped off the excess paper.
I then cut my pieces from matching colors of cardstock using the Puppy with Garden Cart die and the watering can from the Gardening Tomte die.
I cut a lot of flowers!  Before assembling the cart and flower pots I used Distress Oxide ink in Vintage Photo to edge the cart, pots and greenery.
I used Basic Grey ink to edge and shade the dog, then I assembled him.
Next, I cut my sentiment and a few flowers using the Garden Phrases die.  I thought this particular sentiment worked perfectly with this little pup!
I assembled everything flat on the panel.  When I added the watering can I used a foam dot to pop it up from the card.
I added a few matching sequins near the lower pots and a very thin strip of solid pink cardstock next to the floral panel to finish everything off.  I glued the panel to an A2 card base.

These dies are on sale for a very LIMITED time so be sure to stop by the online store!  They are all wonderful!

Dies used:
http://www.scrappingcottage.com/cottagecutzpuppyingardencart.aspx

http://www.scrappingcottage.com/cottagecutzgardenphrases.aspx
http://www.scrappingcottage.com/cottagecutzgardeningtomte.aspx

Thanks for stopping by!  I hope you have a relaxing and creative weekend!