Showing posts with label Fence & Grass. Show all posts

Saturday, May 20, 2023

Lemonade Tiered Tray Sign

Hello crafty friends,
Melinda here with you today. For my project today, I am sharing a cute sign I created with a lemon theme for my tiered tray decorations. Here is my sign.
My little sign is the perfect topper for the top tier of my tray. I used a variety of super cute dies from CottageCutz.com to create my sign. I have always liked this saying, so I decided to use it.


Here is a view of my sign. For my base I used a scallop stitched rectangle die. I cut it from white cardstock. I then used some diagonal plaid paper I created for a mat.
 I then set out to create all the cute lemon slices, the Lemonade title and more.  
For the upper portion, I used a scallop oval from white cardstock. For the mat, I used some wood paper I created and cut out a double stitched oval. 


Here's a closer look at the top portion. I printed out the "When Life Hands You" sign. I attached it to the top portion of the lemonade stand sign in black cardstock. 
I cut out the word Lemon from black cardstock. I cut the word Stand in black as well. I used the "S" from stand to make the word plural.

For this lower section, I cut out a white fence for the base. I then cut out the leaves and lemon slices all in white cardstock. I then used my markers to color in my lemon slices and my branches. I assembled my slices and then layered them onto my piece with the branches. I also cut and assembled the cute little glass and pitcher from the lemonade stand. I also cut out the word Lemonade in black and white. I layered the black title onto a couple of layers of the white title and offset them to create a pseudo shadow layer. I did this so that it would stand out a little more from the fence and branches. I also printed out the word "make" and trimmed it out. I added it to my piece and used a cute little gem for an extra touch.  I lastly scattered some sequins for a little extra bling.

Here is one last look at my sign. I think it turned out super super cute and it is the perfect touch to my tiered tray decor.


I hope you are inspired to create your own cute little signs with some fun lemony themed projects. 

Don't forget to also check out the Cottage Cutz YouTube Channel for some great crafty videos!

Well that about covers it for today! Until the next time, have a wonderfully crafty day!


Saturday, May 13, 2023

Mother's Day Scene

Hello CottageCutz friends! Thanks for taking the time to stop and visit with us today. It's Mary Marsh here bringing you the Sunday edition of the Blog.

Our Easter -Spring release is still available in the online store with 17 new designs. There is something for every card maker with faith-based dies, beautiful floral images, whimsical with bunnies and frogs and several lovely birds and butterflies.

You will be able to take the images beyond the Easter or Spring season. And for a limited time, you can get individual dies at 30% off

Today for your viewing pleasure, I am using the Pond w/Cattails & Lily Pad + the Fence & Grass dies. I created a Mother's Day card for my next-door neighbor. She has 2 little ones so I thought she might like this outdoor scene. 

Design Steps:

I started my card this week with my background. I had this card base in my stash. It's a loose watercolor marsh scene. I thought it would work for my card idea that involved a water scene.
I cut the fence from a papaya shade of cardstock. It coordinates with one of the colors on the card base. 
For the mama duck & ducklings I used some older dies. I cut the smaller duckling from the Mama Duck & Ducklings for the Mama duck. I used the bird from the Birdhouse & Vine die for the little ducklings. Added the arch sun for a corner embellishment and some cattails for behind the fence. 
Now that all my card elements are cut, I am ready to start assembly. I split the fence to make a pathway into the marshy area. I decided to add another rock and grass tuft to the left side of my card after I took this photo.  
Next, I stamped my Mother's Day sentiment with the help of my MISTI.  
To finish off my card, I secured the ducks to the water area, the corner arched sun and a couple of dragonflies. 
That's it for me for this post. I want to wish all of you Mom's & Grandmom's a very happy Mother's Day. See you next Saturday.

Reminder: We have a couple of Design Team openings. Check out this post for all the details.

We also have a new video and giveaway up on the CottageCutz YouTube channel from Marla Harris.  Click here.

Dies I used to create card:


Saturday, April 29, 2023

Mother's Day Easel Card and Treat Box

Hello CottageCutz friends! Thanks for taking the time to stop and visit with us today. It's Mary Marsh here bringing you the Saturday edition of the Blog.

We have a brand-new Easter release with 17 new designs available in the online store. There is something for every card maker with faith-based dies, beautiful floral images, whimsical with bunnies and frogs and several lovely birds and butterflies.

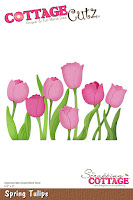
You will be able to take the images beyond the Easter or Spring season. And for a limited time you can get individual dies at 30% off. Today for your viewing pleasure I am using the new Spring Tulips die and I created an easel card with a treat box. It's a new fun fold design type for me and I really like how it turned out.  

I plan on giving this to one of my friends for Mother's Day. So let's get started on some details of how I created my card. There are lots of photos and details so you can create your own. 

Design Steps:
I used a card base from my stash and cut off  ½" on the solid part of the base. Then I scored at 2-3/4", 5-1/2" (is already scored), 6-1/2" and 7-1/2". If you're using other designer paper or card base, once you cut off the 1/2" your 2nd score line would be at 3 3/4".
I used Scor-Tape on the dotted end of the card base and then folded on all the score lines. The small tab gets taped to the inside to form a box shape.
Easel Card Assembly: 
I used a curry shade of cardstock measuring 10" x 2 1/4" and scored at 2 1/2" and 5". I used double sided tape and attached to the top of the box. 
Then a 2nd piece of the curry cardstock (5" x 2 1/2") that will be for the image panel. I attached this to the easel panel with double sided tape to the bottom half of the panel only.
Inside Drawer Box:
Yellow cardstock measuring 9" x 6 1/8" and scored at 3/4" x 1 3/4" on all 4 sides.  
Then you are going to cut the shorter ends only to form tabs. Cut the first 2 squares off each corner. Then cut the 1st square in the 2nd row. On the 2nd square in the 2nd row you will cut at an angle to form tabs. Add Scor Tape to the panels as shown in this photo. 
Peel the backing from the tape on the short sides first and fold over each tab on the score lines towards the inside. Next remove the backing from the long sides and fold these over the angled tabs. The box will look like this photo when folded. 

Decorating the image panel:
I cut a piece of white cardstock 4 7/8" x 2 3/8". This panel is decorated with the Spring Tulips in a grape cardstock. I also used the Fence & Grass die on this panel.  I cut the fence in white for a background but I didn't want it prominent. Stamped a Mother's Day sentiment.
To make a stop for the easel, I used a banner from my stash and stamped a sentiment in grape ink. This is secured with dimensional adhesive. This is the easel image standing up. I used the celebrate with shadow die and added another tulip and greenery.
This is a photo showing the box with the chocolate kisses inside.
Whew! This was a long post but I hope I have given you an idea for a Mother's Day card and treat box. See you next Saturday.
Reminder: We have a new video up on the CottageCutz YouTube channel from Linh Van. It's a cute shaker card. Click here. 

Dies I used to create card:


Thursday, March 16, 2023

Easter Wishes

 Hello Scrapping Cottage Friends

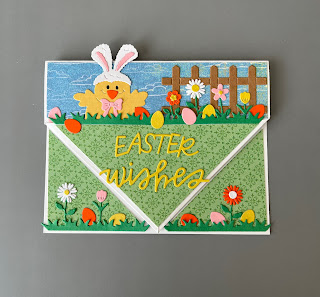
I hope you are all doing well.  I am in Arizona and the temperature is starting to heat up!  We will be close to 80 this week.  So I am in the mood to start my spring card which includes Easter.  I am doing a card with a fun fold for this weeks demo.  I used two of the new release dies Little Flowers and Fence & Grass.  I also added some older dies to create the Easter Theme.


Design Steps:

1.  Using the following dies Fence & Grass, Little FlowersHatching Bunny ChickMr. Peter Rabbit (for the eggs) cut them out in these card stock colors: pink, yellow, orange, green. white, and brown.  Assemble the chick ad flowers 
2.  Here is a link for the video I used to create the white card base by Dini at SplitCoast Stampers  
  • Cut a 3 1/2 square out of green DP then cut it on the diagonal one of the pieces will be for the center flap 
  • The other piece of left over DP you will cut in half for the sides of the flap
  • Cut a strip of cloud DP 5 1/4 x 1 3/8
3.  Tape the two center flaps pieces together and then glue on the green triangle.  This creates a little pocket.  Glue the side green triangles and the blue strip across the top
4.  Start to decorate the top of the card sliding the pieces down into the pocket.  Cut the Easter Wishes on yellow card stock and glue to the flap.  After you have decorated the card front you can either leave the little pocket at the top open to slide in a gift card or glue it shut which is what I did
5.  Stamp the inside of the card and decorate with additional flowers.  Add a small velcro dot to the tip of the flap and your card is complete

CottageCutz Products


We have more inspiration on our YouTube Channel check it out HERE

Thanks so much for stopping by!  And I will see you next Thursday.

Blessings and Take Care