Showing posts with label Easter. Show all posts

Friday, April 03, 2020

Daffodils and Easter Eggs

Hello Scrapping Cottage friends! Thanks for taking the time to stop and visit with us today. It's Mary Marsh here bringing you the Friday edition of the Blog. Hope you are doing ok in the midst of the pandemic. It's a great time to make some cards. I find it so relaxing being able to create and have my mind off all that's going on.

The new release of Spring dies are available in the online store and 25% off for a limited time. There are 27 new dies in the release and each one is cuter than the next. They are perfect for your Easter and Spring card making. 

Today, I am featuring the new Spring Daffodils & Eggs die to create another Easter card. I love Daffodils and they are now in bloom all over my neighborhood. Such a pretty welcome sight after the winter season. So let's get started on some details of how I crated this card. 

Design Steps:

This week I am using the Splitcoaststampers sketch #795 for my card layout. As I have said so many times before, having a layout in mind at the start of my card is always a big boost for me. It jump starts my creative thought process. I love working with the sketches that are out there in the online world. That way I just choose the colors and designer paper and I am good to go.


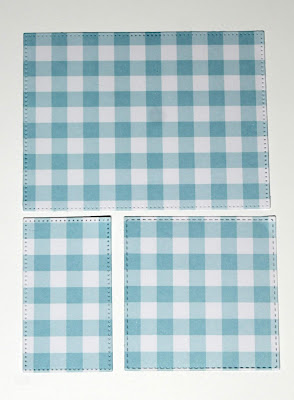
I looked for some spring like designer paper in my collection and found this pretty gingham paper. I coordinated the paper with matching cardstock. My thought was one sheet of designer paper and cut it in 3 pieces for layer 2,3 and 4 of the sketch.

Blue card base: 4" x 5 1/2"
Gingham designer paper: 4 1/8" x 5 3/8"

For layer 2 & 3:  I used the Pierced Rectangle set- the 2nd & 7th largest dies. 
Layer 4: I used the Stitched Square set - the 6th largest die.
 
Next, I die cut the Spring Daffodils & Eggs using the packaging colors and selected similar colors of cardstock. 
Now that my card elements are cut, I am ready to start card assembly. I attached the panels to the card base for my first step. 
 
Then I started with my image panel. I stamped my sentiment first using a grape ink. I thought an angled sentiment would work well. I used my MISTI for placement. Because it's a clear stamp and they usually require a second inking. 

For the image panel. I again used the same size (7th largest) Pierced Rectangle die and cut layer 5 of the sketch in white cardstock. I used a combination of glue dots and Ranger multi matte adhesive. 
 
The image panel was attached to the card base using dimensional adhesive. I wanted it lifted slightly off the designer paper. I added some yellow enamel dots for added interest. 

Well, that's it for me for this post. If you haven't been over to the online store, check it out. We are having a home crafting days sale. Since most of us are under a stay at home order, we need something to keep our minds occupied with happy things. Card making is one of those hobbies that brings such joy.

See you next Saturday. Stay safe!

dies I used to create card:


Saturday, March 07, 2020

Spring Cottage Easter Card

Hello Scrapping Cottage friends! Thanks for taking the time to stop and visit with us today. It's Mary Marsh here bringing you the Saturday day edition of the Blog.

The new release of Spring dies  are available in the online store and 25% off for a limited time. There are 27 new dies in the release and each one is cuter than the next. They are perfect for your Easter and Spring card making.

Today, I am featuring the new Spring Cottage die to create an Easter card. So let's get started on some details of how I created my card.

Design Steps:

I started this card by cutting all the Cottage pieces. I used different colors of cardstock and just stuck fairly close to the colors shown on the die packaging. They are such pretty Spring colors. For the oval house shape, I did cut that in white cardstock and then used squeezed lemonade distress ink and sponged lightly.
Next, I chose my card colors. I found a small watercolored designer paper that I decided to use for the cottage background. I liked the light shades of blue. I cut it using the largest of the Stitched Scallop Rectangle set. I selected a medium purple cardstock for a layering panel  and the card base is a light purple.

Light purple card base: 4 1/4" x 5 1/4"
Medium Purple Layering Panel: 3 3/4" x 4 3/4"
Designer Paper Layer: 3 1/2" x 4 1/2"

Stamped the sentiment with a dark purple ink directly on the designer paper panel.

Now that all the card elements are ready, I can start the card assembly. I attached the Spring Cottage using double sided tape.
Then I adhered this panel to the light purple layering panel and again I used double sided tape.
I finished up my card by attaching the panels to the light purple card base. I decided not to add any sequins or enamel dots because I thought there was enough going on with the card. They are my favorite embellishment so it was hard not to add something extra.
Well, that's it for me for this week. I hope I have given you an idea for a way to use this cute die.
It doesn't have to only be for Easter though. You could use this for a Spring birthday or a get well card.
Remember, the new dies are on sale for 25% off. See you next Saturday!


Dies I used to create card:


Sunday, February 23, 2020

DT Samples - Spring Day 1

Hello Scrapping Cottage friends! Happy Sunday to you! Thanks for taking the time to stop and visit today. We are sampling DT cards using dies from the new Spring dies

They are in the online store and 25% off for a limited time. There are 27 new dies in the release and each one is cuter than the next. They will be perfect for your Easter and Spring card making. We thought you might like to have some new and creative ideas for your Easter or Spring cards using these new dies. So let's get started with the cards for today.

Card 1: Our first card today is from Anja Zurga. She used the new Spring Blooms die to create this beautiful wreath. It could be used for Easter, Get Well, Birthday or Thinking of you cards.   

She embossed her "you are wonderful" sentiment first and then used the smooching technique to create the colorful background. Basically that technique is laying ink on your mat, spraying a bit of water and then smoosh your cardstock into the ink. 

To help with the layout of the flowers, she used the wide pierced circle frame set. She cut the circle and arranged the flowers on top. You get exact results every time! 
The flowers are all colored with various distress inks. This is a perfect card to welcome Easter or Spring.
 
Card 2: Our next sample for today is from Sukie Dhillon. She is featuring the new Easter Egg Hunt die and created a fun and whimsical Easter card. 

Her landscape came together beautifully with some soft inking of the die cuts.  Her background designer paper compliments this outdoor scene so well. 

The sweet bunnies were nestled on the Spring Grass die cut.  A few extra tulips were sprinkled on the grass as embellishments.  

She added a couple of bows to the bunnies as a fun element.  Her scene was finished off with the sun and clouds from the new Spring Frogs set.  

Well, that's our samples for today. I hope the team has given you some fresh ideas on ways to use these new Spring dies. We will be back again on Tuesday with more samples from the team. And, if you are thinking of getting any of these new dies, they are on sale for a limited time in the online store

dies used to create cards:


Saturday, April 06, 2019

Big Bunny Hug (new die)


Hello Scrapping Cottage friends! Thanks for taking the time to stop and visit with us today. It's Mary Marsh here bringing you the Saturday edition of the Blog.

If you haven't seen the 36 new Spring dies, take a peek at them in the online store. You definitely won't be disappointed.There are a variety of designs so perfect for Easter or Spring card making. 

For my card today I am using the new Spring Potted Bunnies die. This is such a cute die and would be great for an Easter card for your special little one. So let's get started with some details on how I created my card. 

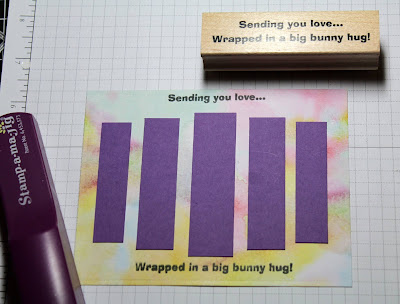
Step 1: As I have said so many times before, having a layout in mind at the card start is always a big boost for me and jump starts my creative thought process. I love working with the sketches that are out there in the online world. That way I can just choose the card colors and designer paper and I am good to go. I liked this unique sketch #743 on Splitcoaststampers. I thought the potted bunnies would look so cute across the rectangle panels. 
I used a watercolor look designer paper for the background and paired that with a grape cardstock base. I cut the rectangle panels (element 2) in the same grape cardstock in graduated sizes. I started off with smaller panels but once I cut the bunnies I realized they needed to be just a bit wider and longer. The sizes below are the ones I ended up using. 

Grape Cardstock Base: 5 1/2" x 4 1/4"
Designer Paper Panel: 5 3/8" x 4 1/8"
Rectangle panels: 5/8" x 2 1/2", 3/4" x 2 3/4", 7/8" x 3"

Next I moved onto cutting the bunnies. I used cardstock that I thought matched the designer paper. The bunny pots are cut in coastal cabana, highland heather and daffodil delight cardstocks. The bunnies are a naturals white. It has a pale gray hue to it so I like using it for bunny images. 

Step 2: Now that the card elements are cut, I am ready to start card assembly. I first attached the rectangle panels with double sided tape. 
I wanted to stamp a sentiment at the top and bottom of this image panel. I settled on this one because it worked nicely as a split sentiment. I used my Stamp-a-Ma-Jig for help in stamping as well as placement. 

I attached the bunny images with dimensional adhesive. I didn't want them flush against the rectangle panels. It also allowed the rectangles to be seen a bit more. 
The image panel was attached to the card base with double sided tape. To finish it off I scattered a few light green enamel glitter dots. And, that completes my sample for this week. 
I hope I have given you an idea for a way to use this new die. There is still time to order it and have it in time for Easter card making. See you next Saturday with a sample of our new Magical Fantasy release. They are currently on sale at 25% off. Also, check out the big anniversary sale. You can get some real deals on CottageCutz dies up to 70% off retail. 

die I used to create card: 


Saturday, March 23, 2019

He is Risen Cross (new die)


Hello Scrapping Cottage friends! Thanks for taking the time to stop and visit with us today. It's Mary Marsh here bringing you the Saturday edition of the Blog.

We have a new release of 36 Spring dies in the online store. There are a variety of designs so perfect for Easter or Spring card making. Take a look in the store you definitely won't be disappointed.
For my card today I am using the new He is Risen Cross die.  There is such detail in the cross itself and it also comes with the He is Risen phraseSo let's get started with some details on how I created my card. 

Step 1: Having a layout in mind at the card start is always a big boost for me. I love working with the sketches that are out there in the online world. That way I can just choose the card colors and designer paper and I am good to go. I liked this week's sketch #741 on Splitcoaststampers because of the layers. I thought it could be bumped up a notch with the addition of designer paper, ribbon and a creative idea for element #3.

I looked through my designer papers to get one that would provide a nice background for the cross image but not overwhelm it. I settled on this one that I have had since 2013. I liked the colors in the paper and knew it would work well for an Easter card. 
Pistachio green card base: 4 1/4" x 5 1/2"
Indigo layering panel: 4 1/8" x 5 3/8"
Designer Paper layer: 3 3/8" x 4 5/8"

I cut the cross and the Risen phrase in the indigo cardstock. I layered it on the 4th largest Oval Set die.
I wanted the words "He is" on the oval. So I masked off the stamp that I wanted to use and inked just those words in Indigo ink. 
 Step 2: Now that all the elements are cut I am ready to start card assembly. I attached the cross to the oval with dimensional adhesive. I wanted it lifted slightly from the background. 
I decided to use some ribbon for element 5 of the sketch. I first used a pistachio green and layered indigo. I thought it was to much of the same color so I went with a purple satin instead. It gave it just the touch of color I was looking for.  
I cut the Risen Phrase in Indigo card stock 2x and used Ranger multi matte medium to secure it to the designer paper background. I wanted it to stand out a bit more because of the pattern in the paper. 
 To finish off my card, I attached the panel to the pistachio card base with double sided tape. I scattered a few indigo enamel dots and that completed this card. I hope I have given you an idea for a new way to use this detailed cross die. See you next Saturday!!!


dies I used to create card: