Showing posts with label CottageCutz stitched circle set. Show all posts

Friday, July 02, 2021

Udderly Amazing

Happy Friday!  It's Jeanne today with a slimline card featuring some cows from the fun, new Country Farm release.  I used several of the slimline dies and the Country Farm Cows.

I started with this sketch from Splitcoaststampers.  When I saw the sketch I knew these cows would be perfect.

To start I cut the cows from white cardstock and colored using Distress Oxide inks.

These are the colors I used for the cows.  For my black I colored the cardstock with a black Copic marker.

I cut the base rectangle from the largest of the Nested Stitched Rectangles.  I used the third largest Rectangle and cut two - one from green and one from white.  I used the Clouds Slimline to create a stencil and stenciled the clouds on the white rectangle.  Using the Grass Slimline I cut the grass and glued it to the cloud panel.

For the sketch I needed to cut the cloud panel.  I wanted my stitched lines to be on the inside under the sentiment circle, so I cut 5 1/2 inches from the right.

Then I switched the two sides so my long side was on the left and the stitching in the middle.

I added the cows to the left side....

and heat embossed my sentiment in white on a red circle.

Be sure to visit the online store where there is huge July 4th sale going on right now.  Lot's of great dies are on sale including the Country Farm release.  And there is a NEW release of slimline dies that feature wonderful and unique designs!

Products used:


Thanks for visiting today.  I hope you have a fun and creative weekend!


Monday, June 21, 2021

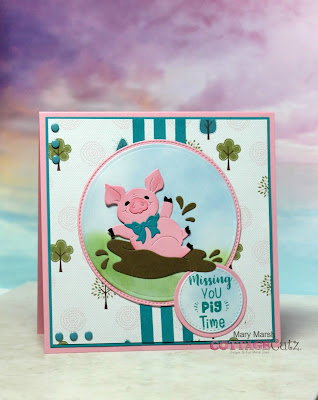
Missing you "pig" time

Hello Scrapping Cottage friends! Thanks for taking the time to stop and visit with us today. It's Mary Marsh here bringing you the Monday edition of the Blog.

IT'S NEW RELEASE TIME! The collection is called COUNTRY FARM! It has the most delightful dies from Tractors to Cowboy Chicks! Each die is just full of awesome details and can be used for so many different occasions. All of the new dies are on sale at 25% off.

Today for your viewing pleasure, I am featuring the new Playful Piggies die and I created a missing you card to send to my precious little granddaughter. She loves pigs and will definitely like this card. I thought we might get to see them this summer but I am not sure at this point. They live in California and I am in Pennsylvania. 

My card started with the layout. I found this sketch online and thought it would work well for the image I am using. The designer paper is 5" square, the teal layering panel is 5 1/8" and the pink cardstock is 5 3/8" square. 

I had this designer paper in my collection. I liked the trees with the farm image piggy. 
I cut teal cardstock for the 3 background strips. They are 1/4" x 5".  I used teal enamel dots on the left side and bottom of the designer paper. The punny sentiment is stamped in teal ink. My granddaughter will laugh at this once her Mom explains it to her. 
  
That's my card for today. I will be back on Saturday with another sample from this new Country Farm release. 

dies I used to create card:


Tuesday, May 18, 2021

A Cupcake for Your Birthday

It's time for another Throwback Tuesday!  It's Jeanne here today and I have a fun birthday card fusing a die from the 2019 Birthday release combined with the new Slimline dies.  These new dies are a great way to give variety to your card layouts!

I started with a card sketch from Splitcoatstampers that I rotated 90 degrees.  Card sketches are a great way to save time when creating.  Sometime I use them exactly, and other times they are a great starting point.

Next I chose papers and ribbon to get my colors.  The fun thing about this little mouse is that by changing up the colors you can make it more for a younger or older recipient, male or female.  I wanted mine to be very bright for a child so I went with this rainbow stripe paper.

I stamped my sentiment on a strip cut with the smallest of the Nested Stitched Rectangle Slimline dies.  Further contributing to the throwback theme I found some small old wooden alphabet stamps.  These worked perfectly to make the "Happy Birthday" sentiment.  I placed my die on my cardstock and drew a light pencil line around the outside edge.   I stamped my sentiment before cutting it out so I could adjust the placement and make sure it was centered.  Stamping at random angles adds to the casual, happy feel and is more forgiving than if I had tried to line up all the stamps!

My background paper is cut using the largest of the Nested Stitched Rectangle Slimline dies and I used the Stitched Circle and Nested Stitched Scallop Circle dies to give focus to my mouse.  She is cut from scraps and popped up using foam dots.

I love some bling, so I added some rhinestones to the final card.  Be sure to visit the online store where the new Slimline Release is on sale for a limited time!

Dies used:


Thanks for stopping by today.  Have a wonderful rest of the week!


Saturday, February 27, 2021

Happy Bee-Day

Hello Scrapping Cottage friends! Thanks for taking the time to stop and visit with us today. It's Mary Marsh here bringing you the Saturday edition of the Blog. 

We have a brand new release of dies in the online store. It's our Spring Release with 22 new designs. Everything you need to create Spring, Easter, Birthday, Mother's Day, Father's Day, Thinking of you cards and so much more. 

The Design Team has started showing samples using these new dies. So if you haven't seen them check here, here, here and here

They are currently on a great sale at 60% off, if you buy the entire bundle or 25% off individual dies. There is also a big Spring sale going on with up to 60% off select dies. This ends tomorrow night at 9:00 pm PST so hurry to make your selections today. 

Today for your viewing pleasure, I am featuring the new Mouse w/Flower Cart die. I created a birthday card for my friend's March 20 birthday. It's the first day of Spring so I thought I would give her some Spring flowers (paper that is).

I decided not to use the flower cart for this card. I wanted a playful look with the mouse and bees. So let's get started with some details on how I created this card.

Design Steps:
I already had my colors selected for this card. It's a little sneak peak of the upcoming color challenge on Splitcoaststampers. So I decided to feature this new Mouse die and then I needed a layout. I found this one online. I loved all the layers so I went with it.
Since the colors were pre-determined, I looked for designer paper for the background layer. I chose this striped pattern. The 3 squares are cut from a bright pink cardstock using the 4th smallest die from the Square set
Then for the center layer I decided to emboss some white cardstock. 
For the circle I used the 4th largest die from the Stitched Circle set. I stenciled some clouds and grass for added interest. Then I stamped my birthday sentiment. 
Next, I cut my mouse, flowers and bees images using various colors of cardstock. 
Now that my elements are all prepared, I am ready to start card assembly. I attached the striped layer to the card base using double sided tape;
...then the embossed panel and the squares. 
I added the circle and the flower pots using double sided tape. Then for my mouse image I used dimensional adhesive. For the bees I rolled some glue dots to lift them off the background slightly.  

And that completes my card. I hope I have given you an use for a way to use this new die.  See you next Saturday. 

dies I used to create card: 


Saturday, February 06, 2021

Big Top Father's Day


Hello Scrapping Cottage friends! Thanks for taking the time to stop and visit with us today. It's Mary Marsh here bringing you the Monday edition of the Blog.

We have a brand new release of dies in the online store. It's our Circus release with 16 new designs. They are currently on sale at 25% off individual dies. The Safari release dies are also on sale at 25% off individual dies. This was our Black Friday release.

The Circus dies are so cute for Birthday, Valentine, Thinking of You or even Father's Day cards. Just let your creativity soar. The DT has been showing some great ideas & techniques for ways to use these dies. So if you missed any check back on the Blog. 

Today for your viewing pleasure, I am featuring the new Circus Tent die and I created a Father's Day card. I had a sentiment that I thought would work well with this image. I make several cards for this holiday so you can never get started to soon especially when an idea hits. 
So let's get started with some details on how I created my card.

Design Steps:
Since I knew what die I was going to use, I looked through my designer papers for papers that had more of a masculine vibe. Striped paper always seems to work for me. I found this blue diagonal striped paper.
white card base: 4 1/4" x 5 1/2"
designer paper: 4 1/8" x 5 3/8"
Then I cut the tent in cardstock colors that would coordinate with the background paper.  
For the image panel, I used the 2nd largest Stitched Rectangle die. Cut in white cardstock and stenciled in some clouds and grass. Looks like this die is sold out. I cut and stenciled before I realized that but you could use the 2nd largest Double Stitched Rectangle die. 
Next, I attached the Circus Tent to the background with dimensional adhesive. I held off the the tent stakes because I wanted the image on the designer paper first for placement. 
Attached the image panel to card base again using dimensional adhesive and also the tent stakes with Ranger multi medium matte. 
 I stamped my sentiments at this point. For the Dad phrase I used the 3rd largest circle from the Circle Set.  I layered this with the 3rd largest stitched circle die.  I masked off the part of the stamp I didn't want to use. 
  
Stamped the next phrase on a flag with the blue ink that coordinates with the designer paper and tent. 
Secured these to the card base with double sided tape and my card is complete. I will stamp a Father's Day sentiment on the inside once I decide who will get this card. I hope I have given you another idea for an alternative way to use these dies. See you next Saturday!

dies I used to create card: