Showing posts with label Cottage Cutz Stitched Rectangle. Show all posts

Saturday, June 19, 2021

Welcome Baby

Hello Scrapping Cottage friends! Thanks for taking the time to stop and visit with us today. It's Mary Marsh here bringing you the Saturday edition of the Blog.

IT'S NEW RELEASE TIME! The collection is called COUNTRY FARM! It has the most delightful dies from Tractors to Cowboy Chicks! Each die is just full of awesome details and can be used for so many different occasions. All of the new dies are on sale at 25% off.

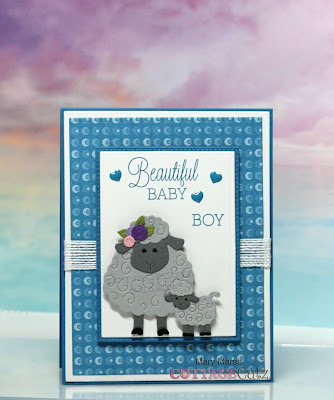
Today for your viewing pleasure, I am featuring the new Curly Sheep & Lamb die and created a card to welcome a new baby boy. A young couple from church just had their 3rd baby and I want to send them a card. So let's get started with some details on how I created my card.

Design Steps:
I started my card this week by picking the colors. I wanted to use some colors that are typical boy colors. I found this cute designer paper in a royal blue and decided to go with it. I decided to add some ribbon and went with this white flax ribbon. 

Blue Card Base: 4 1/4" x 5 1/2"
White Layering Panel: 4" 1/8" x 5 3/8"
Designer Paper Layer: 3 7/8" x 5 1/4"
White image panel: 2 3/4" x 3 3/4"
Blue Image Layering Panel: 2 7/8" x 3 7/8"  
Next, I cut my sweet Mama sheep and Baby lamb dies. They are so, so cute. I just love how they turned out.
Then I stamped my "beautiful baby boy" sentiment on the white cardstock die cut image panel. I used the 3rd largest die from the rectangle set and stamped in the royal blue ink to match the cardstock and designer paper panels. 
Now that my card elements are prepared, I am ready to start card assembly. I attached the sheep & lamb image with dimensional adhesive. Then the blue layering panel that was cut with the 2nd largest Stitched Rectangle die was attached with double sided tape to the image. 
I attached the designer paper to the white layering panel and the white flax ribbon with double sided tape. I used a foam adhesive sheet to attach the image panel. I wanted that lifted slightly off the designer paper. 
To finish off my card, I attached the panels to the card base and scattered a few royal blue hearts. I am happy with how the card turned out and I think my friends will like it as well. I hope I have given you an idea of how to use this new die. I will be back on Tuesday with another sample using these new dies. 

Dies I used to create card:


Friday, May 28, 2021

Brighter Day

Happy Friday!  It's Jeanne today with a fun friendship card.  I loved this little squirrel in a slicker when I first saw him and then I found this paper in my stash.  Talk about made for each other!

And to make the card even easier I found this old sketch from Mojo Monday that was perfect!

I cut my red card base and two large patterned papers using the two largest Nested Rectangle dies.  For my red patterned layering piece. I cut it to 5 5/8 inches tall.

The yellow strip is 1 1/2 x 4 inches and the striped strip is 1/2 x 3 1/2 inches. I cut the white rectangle using the third largest of the Stitched Rectangle dies.

I assembled all the pieces except for the white rectangle.  The yellow strip starts 1 5/8 inches from the top.

Next I cut my squirrel and accessories from various colors of cardstock using the Spring Showers Buddies and the Rooster and Chick dies. My sentiment is stamped on an oval cut from the Windows Slimline dies.

I adhered my squirrel to the white panel.......

and used foam tape to pop it up from the card front.  (I love those little shoes!)

Finally I placed my sentiment in the corner and added the sun from the Rooster and Chick die set.

I hope my card has brightened your day a bit!  Remember the Slimline release is on sale for a limited time!

Dies used:


Thanks for visiting today!  I hope you have a fun and creative weekend!


Saturday, April 03, 2021

Easter Chick

It's Jeanne today with the Saturday post.  I have a cute little Easter card for you that is very simple to make.  Although this sweet chick is ready for Easter with her bunny ears, after Easter she can be used without the ears.  Wouldn't she make an adorable baby card!

Now on to my card.  I started with a sketch from Splitcoaststampers.

This simplifies the design process.  I decided that I would substitute the oval in the sketch with my chick and egg.

Then I picked my papers.  I cut a base panel  4 1/4 x 5 1/2 inches that will be adhered to my card base.  I used the largest of the Stitched Scallop Rectangle and Stitched Rectangle dies to cut my gingham layering panel.  When glued together the scallops just peek out from the gingham for a spring look.  Using the fourth largest of the Stitched Rectangles I cut my floral panel.

I arranged them as per the sketch and stamped my sentiment across the bottom.

It was time to cut my chick from various colors of scraps.  I chose a pink for her bow to coordinate with the flowers in the paper.

After gluing her down I added a few flowers I had leftover from another card that used the Bunnies in Pots die (also from this release).

I hope you've enjoyed my card today.  Be sure to visit the online store where the new release is on sale for a limited time!

Dies used:


Thanks for visiting.  I hope you have a blessed Easter weekend!


Saturday, March 20, 2021

Some Bunny Loves You

Hello Scrapping Cottage friends! Thanks for taking the time to stop and visit with us today. It's Mary Marsh here bringing you the Saturday edition of the Blog.

We have a brand new release of dies in the online store. It's our Spring Release with 22 new designs. Everything you need to create Spring, Easter, Birthday, Mother's Day, Father's Day, Thinking of you cards and so much more.

The Design Team has been showing samples using these new dies. So if you haven't seen them check back on the blog for lots of great ideas. The dies are currently on sale at 25% off so check all the new designs in the online store for some great selections. The Safari & Circus releases are still available at 25% off as well.

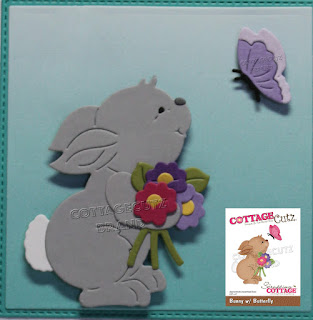
Now onto my card for today. I am featuring the new Bunny w/Butterfly die and created an Easter card for the two little ones that live next door to me. So let's get started with some details on how I created my card. 

Design Steps:
 I started my card this week with my layout. I found this sketch #845 over on Splitcoaststampers and decided to use it. The layers would allow me to use designer paper to create a festive Spring card. 
I looked through my designer papers and decided on these two coordinating patterns. I used the largest Stitched Square die for layer #2 and the largest Square die for layer # 3. For the background layer #1 I found this piece of light card patterned paper. I cut it to 4 1/4" x 5 1/2" and secured it to a white card base. 
For layer # 4, I used the 3rd largest stitched rectangle die. The width was fine but the height needed to be re-sized to 1 3/4".  I forgot to take a photo during the cutting process of the designer paper. So I repeated the process for you to see with cardstock. I cut the shape first 
and then measured at the 1 3/4" mark 
and placed it back in the die and ran it through my BigShot.
Here is the finished size. 
For layer #5 I used this piece of light purple cardstock and resized it to 3/4" x 3 1/2"using the same method.  I stamped my sentiment in a grape ink on this panel using my Stamp-a-ma-jig to get the placement.  
Next, I cut the bunny and butterfly images. I used colors that complimented my designer paper.
Now that all the card elements are prepared I am ready to start assembly. I secured the gray patterned paper to the card base first with double sided tape. Next, I attached layers 2, 3 and 4 secured to the card base. 
Added the sentiment strip with double sided tape.
I attached the bunny image using dimensional adhesive. I scattered a few enamel dots to finish off this card. 
I hope I have given you an idea with the image + the sketch for this new die.  See you next Saturday!

dies I used to create card: