Showing posts with label Christmas 2022 Release 1. Show all posts

Monday, January 30, 2023

Thanks a TON

Hi there crafty friends!

Kris here, and as promised in Saturday's post, I'm back with a tutorial for a Vertical Easel Card with a Floating Shaker!  Today's is the same style card, but a different theme.  I realized this weekend that I don't have enough "Thank You" cards, so I used the Festive Elephant from the Christmas 1 Release (which are all 30% off right now!)... I simply left off his Santa hat and tree and added a heart ♥ I also used the Thanks w/Shadow die, and then I spelled out "a ton" on the far right strip that holds the easel in place using the Stitched Alphabet die.  A few other dies are listed in my tutorial (and shown at the end of my post).  


Before I get to the tutorial, I'll share a few more project photos so you get a good idea of what we're making today!  

-Here's the front in closed position-

-Inside-

-View from the top as it is standing in easel position-

Trust me - this is so EASY to make, you don't even need a video!  If you've ever made an easel card, this is basically an easel turned on it's side... except that instead of your focal image on the front being glued to half your card front, there is a li'l mechanism that makes it pop forward when the card is in easel position.  ☺  And I stepped it up by making my focal image a shaker! (If you want to keep your card more flat, you can simply made a flat focal image piece.)

- Here's How I Made It -

BLACK CARDSTOCK:
(Card Base) Cut at 5-1/2" x 8-1/2" 
- score at 2-1/8" and 4-1/4" (along 8-1/2" side)

PINK CARDSTOCK:
(Front Mats)  Cut 2 Panels at 5 1/4" x 1 7/8"
(Inside Mat) Cut 1 Panel 5 1/4" x 2 1/2"
(Inside Mat) Cut 1 Panel 5 1/4" x 1 3/8"
(Focal Mechanism) Cut at 3" x 1-1/2" 
- score at 1/2", 1", 2" & 2-1/2" 

PATTERNED PAPER (Floral):
(Front)  Cut 2 Panels at 5 1/8 x 1 3/4
(Inside) Cut 1 Panel at 5 1/8 x 2 3/8

PATTERNED PAPER (Polka-Dot):
(Inside Edge)  Cut 1 Panel at 5 1/8 x 1 1/4

- DESIGN STEPS -

• Attach your patterned papers to the pink mats.

• Fold your mechanism so that the outside scores are mountain folds & inside scores are valley folds.


Mechanism:   Add strong adhesive to the bottom of your 2 outside flaps and attach them right up to the score line of your card front. See photo below.  It helps to attach one side first, then the other.


•  Attach your front panels over the glued flaps of mechanism but under the top part as shown.


•  Add foam strips (or dimensionals/pop dots) to the back side of your thin polka-dot panel and attach INSIDE your card, near the edge.


• Attach your larger panel (not popped up) to the side of it, leaving equal black border all around.


• Since the base is black, I added a white panel to the INSIDE far left (backside of card front) for writing a message.  That measures 5-1/4" x 1-7/8" - OR you could cut a larger white panel for the way back of your card cut at 5-1/4" x 4"

Our Card Base is DONE!  Easy peasy, right?!  


Now let's make the shaker!

BLACK CARDSTOCK:

• Die cut a frame by nesting the largest from the Nested Stitched Scalloped Circle set and the 3rd largest die from the Pierced Circle set as shown...

*Note:  this photo is not exactly correct, but my instructions are!  The photo shows that I first cut with the 4th largest die, but then I went back and cut it again with the 3rd largest and forgot to take a photo.


WHITE CARDSTOCK:

• Die cut a frame by nesting the 2nd & 4th largest dies from the  Pierced Circle set


• Glue your white frame onto the black scalloped frame, making sure to center it so there's equal border showing.  (Mine is not centered as it's not glued down yet in this photo.)


PATTERNED PAPER & ACETATE:

• Die cut a circle using the 2nd largest from the Pierced Circle set

•  Glue your acetate circle to the BACK of your scalloped frame.  

•  Add foam strips/tape on top of acetate, being careful it doesn't show from the front.

*TIP #1: if you remove the backing from your foam tape first, it makes it much easier to bend around curves like this. 

*TIP #2:  if you rub both sides of your acetate with a used dryer sheet, it will remove the static from it so your sequins don't stick to it!

•  Add your shaker elements to the well as shown below.

*TIP #3:  If you glue a few of your sequins to the patterned paper, when your card is standing up and all the rest of the elements fall to the bottom, it will still look pretty! (at least until they get shaken off! LOL)


•  Turn your patterned paper circle upside down and place centered onto the shaker.


•  Add Scor Tape or other strong adhesive/glue to the tab mechanism on card front and attach your shaker!


•  Die cut and color/assemble your CottageCutz Festive Elephant.  (The heart is left over from die cutting the Whimsical Hearts Slimline Die for another project, so use any CC heart die you have)

• Die cut "a" and "ton" from the Stitched Alphabet die from PINK & BLACK cardstock, then offset them and glue together.  

• Die cut Thanks w/ Shadow die from GREY & PINK cardstock and glue together.


•  Glue "a" and "ton" vertically to the inside popped up panel 


•  Glue "thanks" to the top of your shaker.

•  Pop up the elephant with foam tape to your shaker.  I added 2 layers of foam tape to his head to give it more dimension. ☺


Voilà! and DONE!

I hope you enjoyed this tutorial and found it easy to recreate!

-Here's my version I shared on Saturday-
see more pics of this one here

PRODUCT USED on today's card:


~Kristine

Monday, January 23, 2023

Be Mine Valentine Gnome

Hello and happy Monday CottageCutz friends!

Kris here sharing with you a cute slimline Valentine card I made using the Jolly Santa Gnome die from the Christmas 1 Release (which are all 30% off right now!) which I made into a Valentine Gnome ♥  I simply left off his white trim on his outfit, and exchanged the present & candy cane in his hands to hearts (from the Whimsical Hearts Slimline die) Getting creative with your dies gets you more bang for your buck!  


I used some cute papers from Doodlebug Designs behind the heart cut-outs.

DESIGN STEPS:

• I die cut the Heart XO Windows Slimline die from light teal cardstock.

• I decided I wanted a li'l bit of a pink border so I cut my card base at 7-1/2" x 8-3/4" and scored the 7-1/2" side in half at 3-3/4"

• I cut each of 3 patterned papers at 2-3/4" x 3-1/4"


• I added tape behind each of the 3 patterned papers and attached to card front as pictured below (even amount of pink border around the outsides).

• I added foam strips to the backside of XO Heart Windows layer to give a bit of dimension to my card.  Then I centered onto card front.


•  Next, I die cut my Jolly Santa Gnome from white cardstock and colored with Copic markers.  I die cut just the hat from a piece of patterned paper.  I then popped him onto the middle heart with foam strips.

•  I glued some random size hearts (left overs from cutting the Whimsical Hearts Slimline die) to the front.

•  And to finish it off, I die cut "Be Mine" from the Stitched Alphabet die and popped them up with foam strips.  ☺♥

Thanks so much for peeking in today!  I hope I've inspired you to get creative with your CottageCutz dies!  Happy Crafting xo
~Kristine

PRODUCTS USED:


Monday, December 26, 2022

Shaker Tag Gift Card Ornaments

Merry Christmas CottageCutz friends!  I hope you had a wonderful holiday with your loved ones. 

Kris here sharing with you today.  I know most of you are done making Christmas projects now, so maybe you want to save this idea for next year's gifts... OR you can always change the theme and use these for gift bag tags (thinking Valentine's... Birthdays...any special occasion!) ☺  

I'm a huge fan of shakers, so I made 2 ornaments that are shaker tags with gift card holders on the back, using the Jolly Santa Gnome from the Christmas 1 Release & I made the other with the Polar Bear Trio with Igloo from the Christmas 2 Release.  


The patterned papers and tiny tags are from 
Winter Wonderland (Polar Bears Tag) and 
 Let it Snow (Jolly Santa Gnome) from Doodlebug Designs

JOLLY SANTA GNOME TAG
White Cardstock:
• cut 5-1/2" x 3-3/4"
• die cut Jolly Santa Gnome
Red Cardstock (back of tag):
Acetate/Window Sheet:
• 3-1/2" x 4-1/4"
Patterned Paper #1 (red with Santas):
• 5-1/2" x 3-3/4"
Patterned paper #2 (green trees):
• 3-3/4" x 3" - then cut the top with a Hills Slimline die
Patterned Paper (tiny tags):
• cut apart one of the tiny tags and punch hole where indicated

HOW TO:

1.  Glue patterned paper #2 to the bottom of patterned paper #1.

2.  Measure along the TOP of the patterned paper #1 and make pencil marks at 3/4", 1-7/8" and 3"

3.  From the TOP, measure down each SIDE and place a mark at 1-1/4"

4.  Make a diagonal cut from the TOP 3/4" marks down to the 1-1/4" SIDE marks.

5.  Punch a hole about 1/2" down from the center (your 1-7/8" mark)

6.  Place that tag over your white piece and use as a guide to cut the corners off of white tag and punch hole in middle. 


7.  Using a rectangle die, (I used the 3rd largest of the Nested Wacky Stitched Rectangles) center it over your Patterned Paper tag and cut.

8.  Turn that tag onto back side and place Scor Tape (or other strong double sided adhesive) close to the rectangle cut-out.  Attach your window sheet.

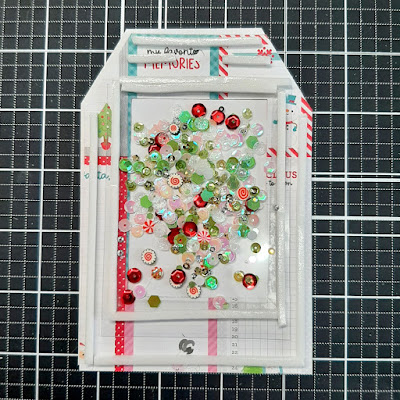
9.  Add foam strips/tape just outside the rectangle and around edges of tag.  (See photo below)

10.  Add sequins/shaker elements.


11.  Carefully place your WHITE TAG on top, lining up edges and the hole at top.


12.  Color your Jolly Santa Gnome and attach to tag front using foam tape for dimension. 

*Optional (but highly suggested):  Add Snow Writer (puffy snow, etc) to the trim on his hat & coat!  LOVE the dimension it gives 😊


13.  Glue the red Merry Christmas Ribbon to back of tag.

*Optional:  Add a pocket to the back for a gift card!


POLAR BEAR TRIO WITH IGLOO TAG
Same cutting measurements as the Santa tag with the following exceptions:
• the 2nd patterned paper I glued to the top of the white tag (inside shaker, instead of the front & cut the bottom with the hills die)
• I used the 2nd largest Nested Wacky Stitched Rectangle (larger than the one on Santa shaker)
• I die cut a large snowflake from the Snowflake Set
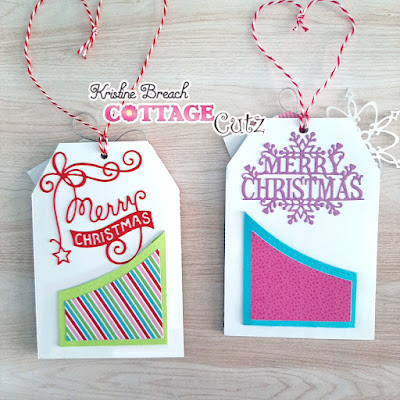
• I die cut Merry Christmas w/ Snowflakes (for back of tag) from purple cardstock


How CUTE are these?!!  
♥ these adorable CottageCutz dies!

They are for my girls, so here they are on the tree ☺


Merry Christmas to you all, and wishing you all the crafty goodness in 2023!
~Kristine

PRODUCTS USED: