Showing posts with label Build a Bow. Show all posts

Friday, August 26, 2016

Christmas card in classic colors


Hi, Vladka here!
On this card I used classic Christmas colors and I have to admit they are still my favorite. Are you interested in how I did it? Let me show you.. 


Basics:

Kraft cardstock for the card base: 4 1/4 x 6 inches (cut 4 1/4 x 12 inches, fold in half)
Additional piece of kraft cardstock and some white and red cardstock for die cuts 

Other Supplies:

CottageCutz Dies: Listed Below
Distress Ink:  Aged Mahogany, Peeled Paint, Forest Moss
Other: Scissors, Paper trimmer, Sizzix machine, Scor-buddy, Water, White watercolor in tube, piece of  dish sponge

1. First cut the Spruce Stems and Winter Branches out of white cardstock and color it with green and brown distress inks:


2. Put some white watercolor on the piece of dish sponge and drag gentle over the additional piece of paper and all die cuts.


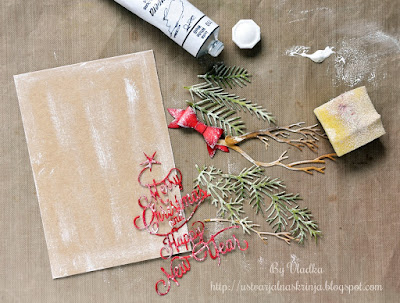
3. Arrange all stems and branches into the flower arrangement and glue all pieces together on the additional piece of paper.


4. With Build a Bow die, make smaller bow and glue it on the top of the arrangement. For finishing touch add also the Holiday Greetings Tree die cut. You can also add piece of brown fun foam between cardbase and additional piece of paper.


Card is now finished.


I hope you like it. Have fun creating. And don't forget, fifth CottageCutz challenge is waiting for you. This time theme is BIRTHDAY CARD. You can linked your project here. And please, use only Scrapping Cottage dies.

Friday, August 19, 2016

Winter Scene in the Ornament Bulb


Hi, Vladka here!

It is such fun to play with Christmas dies and today I have this card for you:


Let's go to basics first:

White card base: 4 1/4 x 6 inches (cut 4 1/4 x 12 inches, fold in half)
Additional piece of white cardstock and some white and light blue cardstock for die cuts and back side of the ornament.

Other Supplies:

CottageCutz Dies: Listed Below
Other: Paper trimmer, Sizzix machine, Scor-buddy, White watercolor in tube, paint brush, fun foam, green and brown copic markers

1. First prepare card base and use the biggest Bulb Ornament die and cut it out of additional piece of white cardstock. You will need the negative piece, but save the ornament bulb for the next project. Do the same with piece of fun foam, which should be slightly smaller as additional piece of white cardstock. This is our base.


2. Cut the snow hillDeer and Forest scene out of white cardstock and prepare also piece of blue cardstock for next step.


3. Let's go on with background. Take piece of light blue cardstock and some white watercolor and paint brush. Mix white color with a small amount of water. With paint brush, flick some droplets on the blue cardstock and let it dry.


4. Color the trees and the deer with green and brown copic markers:


5. Put some white watercolor on the piece of dish sponge and drag gentle over the Winter scene:


6. Use double sided tape and glue snow hill on the backside of the additional piece of cardstock so that it will be visible true the bulb hole. Glue also Deer and Forest scene on the backside of the fun foam so that it will also be visible true the bulb hole.


6. Now glue fun foam on the back side of the additional piece of white cardstock and blue piece of paper on the back of fun foam. Glue everything on the cardbase, which is already prepared beside.


7. With Build a Bow die, make bigger bow and glue it on the top of the bulb. Flick some white droplets also on the finished card:


8. Finished the card and glue everything on the cardbase and add also the Merry Christmas die cut. If you want, you can add also piece of acetate between additional piece of paper and fun foam and make shaker card out of it.


I hope you like this card. Have fun creating. And don't forget, fifth CottageCutz challenge is waiting for you. This time theme is BIRTHDAY CARD. You can linked your project here. And please, use only Scrapping Cottage dies.

Friday, August 05, 2016

CottageCutz Challenge #5 - BIRTHDAY CARD


Hi, Vladka is here!

Thank you very much for all 29 great cards and projects you've made for Challenge #4. Two lucky winners will be announced at the end of this post. So, stay tuned.


And here is time to start new challenge. 
This time theme is BIRTHDAY CARD.


So, create a card or on any other gift for birthday.
And please, use ONLY CottageCutz dies and not any other dies. "Add your link" button is available under the list of used dies. If you are not familiar with this button, please check this post for more explanation. Challenge will be closed on 31st of August!


So, before I announced the winers, I'm going to show you my project for today.

Basics:

White card base: 4 1/4 x 6 inches (cut 4 1/4 x 12 inches, fold in half)
Additional piece of white cardstock and some white cardstock to cut out the die cuts and kraft paper for the pocket.

Other Supplies:

CottageCutz Dies: Listed Below
Distress Ink: Fired Brick, Fossilized Amber, Mermaid Lagon, Aged Mahogany, Black Soot
Other: Scissors, Paper trimmer, Sizzix machine, Scor-buddy


Are you thinking what kind of card is this? It is birthday card for a boy which adores cars and so I was thinking that it will be fun to create a card  with a pocket and fill it with cars and the garage. Boy can take all these parts out of the pocket and can play with them.


Here you can see, how it looks when I put all the cars and the garage out of the pocket.


So, what you need to do first is, to cut all cars out of the white cardstock. I used Cars and Moving Track die for this. Color each of the car differently. Use distress inks and blending tool for this. Color also the tyres and use copic marker or any other black marker for this. I colored the tyres which are part of the car and also separate cut out tyres and glue separate one on the top of the car's tyre.


Now, color also the garage. Use red distress ink to color the roof and distress the edges with darker red distress ink. Color also the main part of the garage and use blue distress ink. 


To make garage's door, cut the rectangle (I've used the fourth biggest die) out of the white cardstock. To get more garage door look use the scoring board and make score lines. I made the score line every 1/8 of the inch. Glue all parts of the garage together: first the roof on the blue piece and than also the door. 


Now, prepare also the bow. Cut the biggest one out the white cardstock and colored all the parts with blue distress ink. Color also the back side of the main bow piece, because also this part is visible when bow is glued together.


Use also Fancy Happy Birthday die and cut the expression out of the white cardstock. With Scissors cut off the present and the cake.


Cut also the pocket out of the kraft carstock and glue it together and after that on the white card base. Glue bow and happy birthday expression on the pocket and put all the parts (garage and cars) in the pocket. Card is now finished.


-------------------------------------------------------------

And now go back to our challenge a little bit more. As I told you before, two lucky winners will be randomly chosen and will get gift certificate for Scrapping Cottage store.

First one will get gift certificate value of 50$...

... and second one in the value of 25$.

You have time till 31st of August to participate. 
Both winners will be announced in the same post as new challenge (for September) will begin.

All you need to do is take your CottageCutz dies and start creating! 
Please, use only CottageCutz dies!
Have fun and don´t forget to show us all your projects.

"Add your link" button is available under the list of used dies.

-------------------------------------------------------------

And of course we should not forget about the winners for the fourth challenge.

1st Gift certificate value of 50$ goes to Chez Moi. Her card was linked under number 2:


2nd Gift Certificate value of 25$ goes to Keti's Projects. Her card was linked under number 27:


Congratulations!

Please, contact Joanne at scrappingcottage@cox.net to claim your Gift Certificate.

This is it for today. All I want to show you before I left is the list of CottageCutz dies which I used on my project. Here they are: