Showing posts with label Bear Patient. Show all posts

Sunday, January 14, 2018

Get Well Soon

Hi!

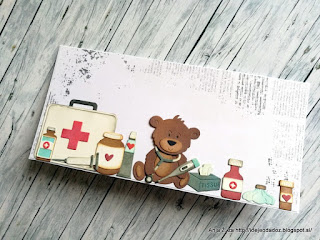
It's Anja here again. Today I made a card for my brother. He was sick for the last few days and went to the doctors yesterday. He had his appendix removed last night. Luckily everything is OK with him, but he will have to stay in the hospital for a few more days. So I had him in my mind when I was making this card. It's actually a simple one. I just combined a few different dies from the latest Cottage Cutz release.


For this card I used:
- Cottage Cutz dies (Bear Patient, Nurse Puppy, First Aid Kit, Get Well Phrase),
- Distress Oxides (Black Soot, Walnut Stain, Vintage Photo, Fired Brick, Broken China),
- white card base (10x21 cm),
- white and craft card stock for die cuts,
- patterned paper (9,7x20,7 cm),
- black pen,
- paper glue.

First I die cut all the small pieces. I used craft card stock for darker pieces (like the bear and the bottles) and white card stock for lighter pieces. I colored everything with Distress Oxides. When I had everything colored the way I liked it, I glued it together.


I cut a piece of patterned paper for the background. It is a bit smaller than the card base.


I glued the patterned paper on the card base and then added the bear and all the bottles and other pieces of first aid kit.


I first planned to add the get well phrase on the front side of the card, but taught it was to crowded. So I decided to put it inside instead. 


Now I'm on my way to visit my brother. Thank you for visiting and have a nice Sunday.
Anja Z.


Cottage Cutz dies I used:


Monday, December 18, 2017

Feel Better Bear

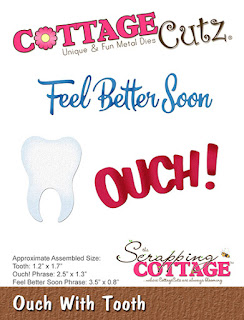
Hi, Lois here today with another card using dies from the Get Well release from CottageCutz.   The cute dies were released for Black Friday.  Again, I've made something other than an A2 card -- it's a Z Box Fold card, using both Bear Patient die and the Ouch with Tooth die, as well as a Double-Stitched Square die.


As I wasn't sure which of the images from the Bear Patient die I was eventually going to use, I cut all the pieces out of white cardstock so that I could color them.  I knew I was only going to use one sentiment from the Ouch with Tooth die, so I just cut it out of red cardstock.


Using various Copic markers and a couple of Wink of Stella brushes, I colored the bear pieces and constructed the various images.

I then cut the cardstock for the base of my card -- a 4 1/4" x 5 1/2" piece of dark brown and a 9 3/4" x 4" piece of kraft.


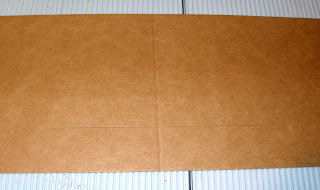
I scored the long piece at 5 1/4".   With the short edge of this piece at the top of my paper cutter and the long edge at the 1" mark, I cut a slit from the 3" mark to the 7 1/2" mark.   IMPORTANT:  If you decide to make a similar card, be sure that the larger section of the cardstock strip is at the top before you cut the slit.  (Ask me what happens when you don't place it in your paper cutter the correct way!)


I placed  the strip on my Scor-Pal with the long edge across the top and the larger section toward the left.  I then scored at the 3" mark down to the slit.  At the end of the slit (at the 7 1/2" mark), I scored down to the edge.  (I slightly folded on the score lines so that you can see them.)


Fold on the score lines to make the "box."


Apply Scor-Tape to the back of the 4 3/4" x 4" section, as shown.


Now it was time to cut the background panels of the card.  I wanted to use the Double-Stitched Squares and Rectangles on my card, but the rectangles weren't quite the right size.  So I just cut the front panel with the die and the rest of the panels as listed:
Cream cardstock - 2 1/2" Double-Stitched Square, 4" x 2 1/2" rectangle
Dark brown cardstock - 2 3/4" square, 4 1/4" x 2 3/4" rectangle, 3/4" x 5" strip, and (2) 3/4" x 2" strips
Patterned paper - 1/2" x 4 3/4" strip and (2) 1/2" x 1 3/4" strips


I layered the panels and adhered them to the front of the card.


I then glued the die cuts to the front and inside panels . . .


. . . removed the protective covering from the Scor-Tape and glued the back panel to the dark brown card base, carefully centering it.


And my card was complete.


CottageCutz dies used on my card are:

http://www.scrappingcottage.com/cottagecutzbearpatient.aspx

http://www.scrappingcottage.com/cottagecutzouchwithtooth.aspx


http://www.scrappingcottage.com/cottagecutzdouble-stitchedsquaresetbasics.aspx


Thursday, November 30, 2017

Sweet Get Well Bear!


Good Morning Scrapping Cottage Friends!

It is Pam creating with you today!!

A HUGE SALE IS GOING ON NOW!!! THIS SALE FEATURES OUR LATEST RELEASE DIES FOR THE ULTIMATE GET WELL CARD! HERE IS A PEEK of all the new release dies! Also make sure you check out our entire store there are many items on sale!! HERE IS THE LINK TO THE STORE!

Now on to todays card!

I am continuing to share our new release Get Well Dies.  They are just so perfect to cheer someone up who is not feeling well.  And we all know that this is the time of year for the nasty colds and flu.  As a matter of fact I think I will send this to myself because I have my first cold of the year!

Design Steps:

1.  Using the Bear Patient die cut the bear out of kraft card.  Then cut the soup can and tissue box out of white
 2.  Using TH Distress Oxides shade in the bear and add the rhinestones for his eyes
3.  Using Copic markers color in the soup can and the tissue box and assembly all of the pieces
 4. Using the Tea Time Doily die cut out a white doily.  Use the Expressions Get Well Phrase die cut get well out of red card stock

 5.  Us an A2 white card base cut a slightly smaller piece of red card stock and then a slightly smaller piece of DP and glue them all together
 6.  Glue the white doily to the top of the card
 7.  Pop dot the bear with the soup can and the tissue to the doily

8.  Glue the Get will to the bottom half of the card and your Get Well card is complete

Cottage Cutz Dies


I hope you will check out our massive sale and take a look at the new release Get Well Dies.  They are all so cute and perfect for a great Christmas Gift!
Blessings


Pam

Friday, November 24, 2017

Feel Better Bear

It's here!  Black Friday and the release of the new Get Well dies is here!!  Be sure to check out the website and the full release that is available today with special pricing.

Jeanne is posting today with a card that features two of the new dies.  Of course I love bears and this one is extra cute.  As an added bonus you can accessorize him to be "injured", or "sick" or just "under the weather" depending on the recipient's ailment.
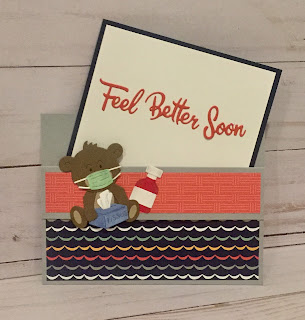
This is a pocket card with the sentiment on a separate card that lifts out of the pocket.
Start with a piece of card stock 8 1/2 x 5 1/2 inches folded to A2 size.  Score one side with the folded edge at the 3" mark on your score board.  Fold the small panel that is created opposite the fold in the card, so it creates a flap.  Cut two pieces of patterned paper for the front and flap, one - 2 1/2 x 5 1/4 inches and the other 1 x 5 1/4 inches.  For the sentiment card cut one piece of card stock 4 1/2 x 3 3/4 and another 4 1/4 x 3 1/2.   Using strong adhesive or scor-tape, glue the sides of the card together with the front flap down.  Adhere the smaller panel to the larger panel for the inside card.
Next, place a sheet of double sided adhesive on the card stock that the sentiment will be cut from and die cut the sentiment.
Since this sentiment is very casual, I set it at angles to enhance that feel.
The bear is die cut from two shades of brown; the rest of the items are cut from white card stock and colored with Copic markers. 
I love the detail in this set.  The tissue even slips inside a slit in the box!
When the card is inserted in the pocket, you can't see the sentiment until it's pulled out.

Check out all the new release Get Well dies - they are super cute and very versatile!  The dies Iused today:


http://www.scrappingcottage.com/cottagecutzouchwithtooth.aspx

Thanks for stopping by and have a great weekend!!!