Showing posts with label Bear On Cloud and Moon. Show all posts

Tuesday, April 21, 2020

Sweet little baby

Hi Janja here. Welcome to the blog.
For today’s post, I made two newborn baby cards.


- CottageCutz dies: Bear On Cloud and Moon, Stitched Sewing Notions (buttons)
- card blank: 4 1/4 x 5 1/2" (10,8 x 14 cm), folded
- white cardstock: 3 x 5 1/2" (7,6 x 14 cm)
- patterned papers
- white and brown cardstock
- embossing folder - dots
- glue, double-sided adhesive tape, self-adhesive foam pads

Cut out both small bears and put all the pieces together with a glue.


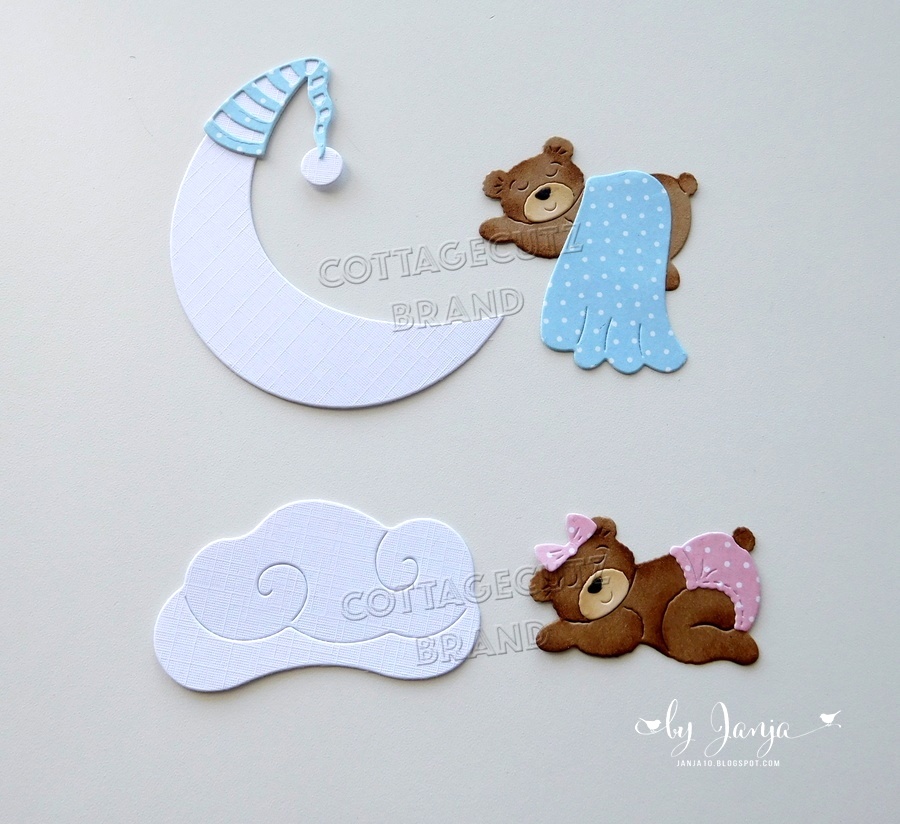
Trim two white cardstock. Use the embossed dots folder to add some texture.


Then trim the selected patterned paper to the size of the card bases. Attach backgrounds to the front of the cards.


Cut two buttons out of patterned paper. Stamp the sentiment on the white strips.


Now we have everything ready to complete the cards.


We have a new Gardening release of dies in the online store. All new designs are discounted for a limited time!

Thank you for stopping by.
Janja

Sunday, July 30, 2017

Sleeping Bear

Hi!

It's Anja here. Today I was inspired by violet. It's not one of my favourite colors, but I wanted to use something vibrant and Distress Oxide Wilted Violet seemed a perfect choice. I made a baby card with a cute bear sleeping in a basket.


I used:
- Cottage Cutz dies (Sweet Spring Kitty, Bear On Cloud and Moon, Cute Phrase),
- Distress Oxides (Wilted Violet, Worn Lipstick, Peeled Paint, Vintage Photo),
- white card base (15x15 cm),
- watercolor paper (14x14 cm),
- colored and white paper for die cuts,
- little white enamel dots,
- Versafine Onyx Black ink,
- alphabet stamps,
- paper glue.

First I made the background. I tapped the ink on my non-stick craft sheet and sprayed it with water. Then I just put the water colored paper on top and rotated it around. I dried it whit my heat gun.


I die cut all the paper pieces from colored and white paper. I colored the edges with Distress Oxides.


I put some dimension to my flowers and leaves. 


And then I just glued all the pieces together. I decorated the flowers with little enamel dots and stamped the rest of the sentiment.


And this is my finished card.


See you next Sunday when I will be here again using new wedding and nested dies. You can get a sneak peak at all the beautiful new dies in Janet's video below. The new dies are already in the store.


Thank you for stopping by. Have a fun Sunday.
Anja Z.


Monday, July 03, 2017

Congratulations, Baby Bear!

Hi, Lois here with my Monday card.  One of my favorite kinds of die-cuts are sentiments.   They can take a pretty card a step up with some POP!  Today's card is one of those times.  The card is rather simple, but the sentiment glued on top of the doily adds a bit more interest.


This baby bear from CottageCutz is adorable.  And actually you can make either a boy or a girl bear with the die.  It also has a sleep cap, which looks cute in blue.

To make my card I cut a piece of heavyweight pink cardstock 5 1/2" x 8 1/2" and scored it at 4 1/4".  The white matting panel is 4" x 5 1/4", and the dotted pink background panel is 3 7/8" x 5 1/8".


Next I cut the various die-cuts from pink, white, cream, and kraft cardstock.


Using a few  Copic markers and some pink ink, I added a bit of dimension to the die-cuts.


All that was left was to construct my card.  I popped the bear and cloud up on foam pop-dots.


CottageCutz dies used on my card are:

http://www.scrappingcottage.com/cottagecutzbearoncloudandmoon.aspx


http://www.scrappingcottage.com/cottagecutzovaldoilyandframe4x6.aspx


http://www.scrappingcottage.com/cottagecutzexpressionscongratulations.aspx


Tuesday, May 02, 2017

Bear on cloud (gate fold card)

Hi, Janja here!

Teddy bears are so popular toys. They are so soft to touch and ideal for cuddling.
On a gate fold card, that I share with you today, I put a lovely bear on cloud.


Supplies:
- CottageCutz dies: Bear On Cloud and Moon, Baby, Nursery Furniture, Elephants on Parade, Baby Diaper Pins, Stroller mini, Baby Carrier mini, Bathtub mini, Fancy Victorian Frame, Cross-Stitched Square set, Stitched Wide Oval Frame set
- white cardstock for card base: 11.4 x 5.7" (29 x 14,5 cm)
- patterned paper
- white and colored cardstock
- light pink organza ribbon

For card base trim white cardstock and fold it at 2.85" and 8.55 " (7,25 cm and 21,75 cm)


Trim patterned paper. First, attach organza ribbon on card base, and then cover the base with patterned paper. Use two-sided adhesive tape.


Cut out a square from patterned paper with the largest die from cross-stitched square set. Place it on to a little larger square from white cardstock.
Also cut out frames from white and patterned paper. Cut them in half with scissors, and attach to the back of the square.


Place square over the center fold. Take care that the adhesive is applied only to one-half of a square.


Add selected patterned paper also on the inside of the card. In the middle add space for text. Use the largest die from stitched wide oval frame set.


Cut out with dies all pieces, and assemble them into a whole.


To complete the card, mount all motives as shown, using glue and self-adhesive foam pads.


Thank you for coming over. Have a nice day.