Friday, November 01, 2024

Holiday French Horn


Hi friends, it Marla and I have another Christmas card to share.  This card features the Holiday French Horn and Rustic Wreath dies.  Dimension and layers make interesting and beautifully texture cards.  I liked how both of these dies had foliage, which makes tucking in layers easy peasy.  Let me walk you through the card process.

  • Die cut all of the pieces using white card stock.  Then die cut the french horn using metallic card stock.  I chose to use flat gold metallic card stock.
  • Color your images using a blending brush and ink.  
  • Add detail to the poinsettia layers and foliage with a Copic marker.
  • Cut two pieces of white card stock to 4" x 5.25 and 3.25" x 4.75"
  • Stamp the 4" x 5.25" card stock with an image of your choice.  I used a sheet music stamp.  Ink the stamp and spritz with water to get a slightly distorted image.
  • Dry emboss the smaller cardstock for texture.  I used an older wood grain embossing folder.
  • Adhere the sheet music layer to an A2 top folding card base.
  • Add foam tape to the back of the dry embossed layer and adhere at an angle on top of the stamped layer.
  • Assemble the pinecones, poinsettias and bird.  Add foam square behind the wing of the bird.
  • Assemble the die cut pieces to the card front.
  • Stamp the sentiment and use a fishtail die to cut out the sentiment
  • Add foam tape to the back of the sentiment strip and adhere to the card front.
  •                                            
Thank you for joining me today.  I have added the product links for easy shopping.  Until next time..... Marla


Head over to Cottage Cutz and do a little shopping today!

Get Social With Cottage Cutz


Sunday, October 27, 2024

Halloween Potions

Hello Friends

Before I get started I wanted to alert you to a fantastic HALLOWEEN SALE that we have going on in the store!  There are some SPOOKTACULAR prices so check it out HERE!

Halloween is only a few short days away so I thought I would share one more spooky but really not so spooky card.  I am using the following dies Jack-O-Lantern Witch and Potions Bottles

                         Background Photo by Freepiks

Design Steps:

1.  Use a black A2 card base, cut a piece of gray card stock 4 x 5 1/4 run it through a stone embossing folder and then run a blending brush with black ink lightly over the surface.  Glue the gray embossed piece to the black card base.  Next cut a piece of brown card stock 1/2 x 4 and run it through a wood grain embossing folder.  Glue it to the bottom to represent the floor
2.  To make the postion bottles use the Potions Bottles die.  I used blue vellum and a variety of colors to create the content of the bottles as shown above.  I cut the cork tops out of a cork sheet I had in my stash.  I made the shelf by running a piece of brown card stock through a wood grain embossing folder.  It measures 3 3/4 x 3/4.  I cut the shelf sides at an angle as shown above.  Glue the bottles to the shelf as shown
3.  Using the Jack-O-Lantern Witch die and cut out the pieces.  Assemble the pieces using a fine tip glue.  Arrange the cat, pumpkin and broom as shown below
4.  Add the sentiment, little ghost and the spider to complete your card


We have more inspiration on our YouTube Channel check it out HERE

Thanks so much for stopping by! 

Blessings and Take Care


Head over to Cottage Cutz and do a little shopping today!

Get Social With Cottage Cutz

Friday, October 25, 2024

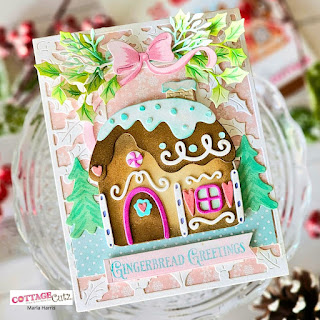
Gingerbread Greetings


Welcome back to the CottageCutz blog.  It's Marla back again today with a sweet Christmas card.  Baking and decorating gingerbread houses is such a fun tradition.  While my children are grown, I wait expectantly to share this tradition with my two grandkids.  In the meantime, I will settle for decorating this adorable Gingerbread Cottage.  Isn't it the cutest?


I used three different CottageCutz dies on my project today.  Let me share my process with you.
  • Die cut your pieces using white card stock and the Gingerbread Cottage, Holly Frame, and Vintage Holiday Lantern dies.  I cut the Gingerbread Cottage twice to add dimension to the pieces.
  • Ink your die cuts pieces from the Ginterbread Cottage and the folliage and bow from the Vintage Holiday Lantern die. 
  • Assemble the Gingerbread Cottage.  Double up the cottage, roof, windows, door frame, hearts, candy canes and frosting swirls for dimension.


  • Cut two pieces of pattern paper to 4.25" x 5.25" and 4" x 1.5".
  • Adhere the large piece of pattern paper to an A2 top folding card base 
  • Adhere the Holly Frame to the top of the pattern paper.
  • Adhere the smaller piece of pattern paper to the lower portion of the open frame.

  • Add texture to the pine trees, foliage and bow with Copic Markers
  • Adhere your Gingerbread Cottage scene and bow to the card front.  Add foam to the cottage and bow.
  • Tuck your foliage piece from the Vintage Holiday Lantern die behind the bow.
  • Stamp a sentiment and use a die to cut it out.  Add foam tape behind the sentiment before adhering it to the card.


That completes our card for today.  Thank you for stopping by to check out my tutorial.  Until next time.... Marla


Head over to Cottage Cutz and do a little shopping today!

Get Social With Cottage Cutz