Thursday, March 07, 2024

He is Risen

 Hello Friends

It is Pam creating with you today!    

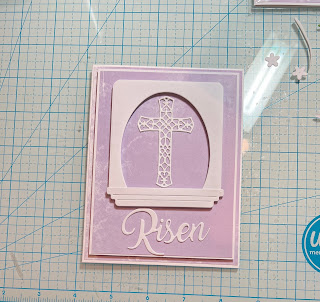
I have a few more Easter cards to complete before I mail them out to my family and friends.  I am doing multiples of the one I am sharing today. I just love the Easter Cross die that I am featuring today.  To me it represents the true meaning of Easter.

Background Photo by Freepiks

Design Steps:
1.  Use a white A2 card base, 2 pieces of DP purple one cut at 4 1/8 x 5 3/8 and the other 3 3/4 x 5, and one additional piece of white card stock cut at 3 7/8 x 5 1/8

2.  Glue the larger piece of purple DP to the card front.  Glue the smaller piece of purple DP to the extra piece of white card stock and then pop it onto the front using dimensional tape set aside
3.  Cut a rectangle piece of white card stock measuring 4 1/8 x 3 next using the 4th from the largest Pierced Oval die cut an oval just slightly above center as shown above.  Use a corner rounder and round the top corners of the rectangle.  Cut out the following dies on white card stock: Easter CrossHe is Risen (you just need the Risen part), for the flowers use the Garden Phrases die and cut out 2 large flowers, 6 medium flowers and 3 small flowers.  And finally on white cut out the window base using the Garden Window die.  Use the Spring Greenery die and cut out two leaves as shown above on green card stock
4.  I wanted a unique shape to showcase the cross so I made an arched window by taking the rectangle that I cut the oval in and cut it to measure 3 x 3 then I glued the window base to the bottom as shown
5. I then added dimension tape to the back of the oval window 
6.  I used dimension tape on the window then popped it onto the card base toward the top and glued down the cross and Risen
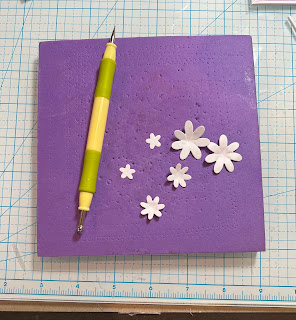
7.  Next glue down the greenery.  You can see below I added some bend to the flowers using my stylus

8.  For the large flower I glued to large flowers together, added 2 medium flowers and one small flower for the center.  For the other two flowers I glued to medium flowers together and added a small flower to the center


9.  Glue the large flower in the middle and then add the two smaller flowers.  To finish the card add two pearls to the corners and one pearl to the centers of the flowers.  Your card is now complete


We have more inspiration on our YouTube Channel check it out HERE

Thanks so much for stopping by!  And I will see you next Thursday.

Blessings and Take Care


Head over to Cottage Cutz and do a little shopping today!

Get Social With Cottage Cutz

Tuesday, March 05, 2024

So Lucky Slimline Paper Piecing Card

Hey crafty friends,
Melinda here with you on this Terrific Tuesday! Can you believe it is already March? My goodness how time is flying! Today I am sharing a fun card I created with some cute dies from Cottage Cutz. Take a look.

Here is another view of my card. The base is a 4 x 9 side fold base of Marigold Cardstock. I used some rectangle stitched slimline dies and cut out a white one and a smaller one with the polka dot patterned paper I created. 


Here's a closer look at the cute little "pot of gold". It was actually a "witches" cauldron I made the bubbles in yellow. I cut the shoes in white and then colored them in green and colored the yellow buckles. I also used the Alphabet and the same marker that I used for some of the gold coins I colored the YOU. I also lightly dusted the edges of the black cauldron with white. I then attached it to a white circle stitched die that I cut some of the patterned paper I created.

Here's a closer look at my little Leprechaun. He was actually a Christmas Baker Gnome. I just switched up his colors and then made his hat. I also added him to another circle stitched circle in some more of the patterned paper I create.

Here is a closer look at the darling little rainbow from the rainbow die. I just used a variety of my markers for the colors. I didn't use the typical rainbow colors but rather ones that I thought would work for my card. I also used my blue marker to put some outlines on the little clouds that are a part of the die set.

Here is a closer look at my title So and Lucky. I used the same alphabet I cut in white and then colored with my markers. I then just wrote to have in one of the clouds. I also cut out a variety of more pierced circles in a variety of my patterned papers.

Here are some photos showing how I pieced his little hat together. In the top left, that is the piece that the little bakers hat is. I just cut it down as shown. I then free handed the top of the hat you see it in the bottom left photos. I then traced the piece and then attached them. The bottom right shows the pieces assembled and in the back of the hat.

Here are some more photos showing some additional details for his little clover, I used the flower from the little garden flowers die set. You can see how the die is in white. you can see in my "clover" looking flower I cut the middle point out on each of the four petals to create the clover. On the top right I simply colored a piece of my cardstock anhd then used a hole punch to punch out several more small circles. In the lower right, you see the little leprechaun guy coming together.


Dies Used For This Project

Holiday Gnome Baker


Cauldron


Stitched Alphabet

Folk Art Rainbow 


Pierced Circle Set

Stitched Slimline Rectangle Set


Well, that about covers it for today. Be sure to come back real soon. You will want to keep up with my crafty adventures!  Don't forget to find me on social media too! Links are below.
Until the next time, have a wonderfully crafty day!
Melinda


Head over to Cottage Cutz and do a little shopping today!

Get Social With Cottage Cutz