Tuesday, November 22, 2022

Black Friday Release (Day 1)


Hello CottageCutz friends! Thanks for taking the time to stop and visit with us today. It's Black Friday release week here on the Blog. 

We have a new Classic 50's release that makes its debut here on the Blog and also in the online store today. You can pick up the bundle for a huge 65% off. That's under $97 or 30% off individual dies.  The release is filled with the cutest retro images from the 50's era. 
We will have group posts this week to give you lots of inspiration on different ways to use the dies. Today though we are featuring just one card and it's from Marla Harris.  She created a slimline card that has a great retro vibe using several of the new dies. 

Do you remember the days of the drive-ins? Who didn't love going as a kid! They are making a comeback in our area and a whole new generation is enjoying outdoor movies in the summer.

She is featuring the Cinema Drive-in Sign, the Classic Car Front + the Fifties Phrases #2 dies. The background is a stencil and the colors she used just add to the retro look of the card. This card would be so perfect for a guy possibly turning 50, a masculine birthday card or a Father's Day card. 

You can check out a video on our YouTube channel where Marla shows the entire release. Plus, she gives some additional detail on the card she created. Here is the link

Check back in to the Blog tomorrow where we will have more samples from the DT for your inspiration. 

There is also a Black Friday sale going on at the online store with savings of up to 85% on dies. Check it out here.  

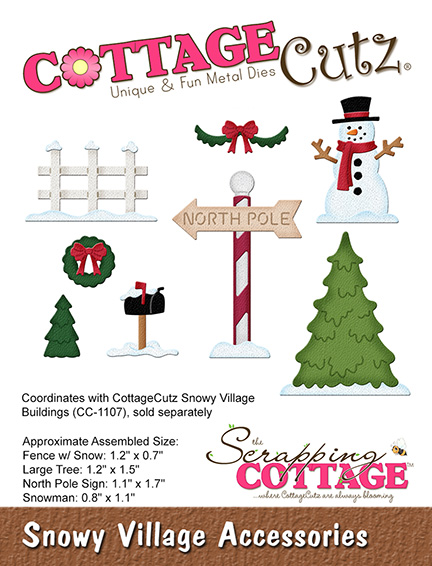
Dies used to create card:


Monday, November 21, 2022

Christmas Eve Campsite


Hello CottageCutz friends! Thanks for taking the time to stop and visit with us today. It's Mary Marsh here bringing you the Monday edition of the Blog.

It's new Christmas release time!!! We have new dies in the online store. Our Christmas Part 2 release with 36 new designs is available and ready for shipment.

The individual dies are on sale for 30% off. It's only for a limited time so don't delay. You are going to love all the whimsical designs that are available in this release. There is something for everyone to make your Christmas cards extra special this year.

The Christmas Part 1 dies are also available with 21 new designs and on sale for 30% off individual dies.

Today, I am featuring the new Christmas Eve Campsite die in a slimline design. I have several friends who have campers so this will go to one of them. 

I just purchased this new designer paper, and the background is so perfect for my campsite scene. It has the nighttime sky and the snowbank just ready for a die cut scene.  It comes in the slimline size of 3 3/4" x 9". I trimmed it down to 8 1/2". So, my card is 3 3/4" x 8 1/2". I placed the designer paper over my white card base.

I cut the Christmas Eve Campsite scene in white cardstock. I added a snowman, 2 small trees on the snowbank and a larger tree from the Snowy Village Accessories die. 

Well that's it for me for this post. We have a group post coming this week featuring our new Black Friday release. You won't want to miss our posts. 

Reminder: Our YouTube Channel has a new video from Linh Van. There is a giveaway for being a subscriber, liking the video and leaving a comment. Click here.

dies I used to create card:


Saturday, November 19, 2022

Four Easy Christmas Cards

Happy Saturday Cottage Cutz Friends!
Melinda here with you, and today I am sharing four super easy Christmas themed cards I created with a die from the FABULOUS Christmas release!


I made four easy cards with the same die.  3 are 4.25 x 5.5 and one is larger at 5x7. Here is a look at all four of them.
First up is the large 5 x 7 card. It is horizontal top fold. To make this card, I cut the die image out of some white felt. I layered that onto a white mat and then used a second piece of my background paper for the larger mat. I used some foam tape on the back of the top panel to give it just a little lift. The background image is one I created and printed with my color laser printer.


Here's a closer look at the die cut image cut from the felt. 

Next up is the card using a similar background image I created. I then cut the die cut from some white glittered foam.

Here's a closer look at the die cut image. It cut very nicely. I love the way it gives the die cut dimension, without having to layer 3 or 4 layers of paper together to get the same lift and look.

Next up, I created this pretty background image as well. For this one, I die cut the image out of some black glittered foam. 

Here is a close up of this one. I love how in one pass, the die cut cuts the foam. And with it already glittered it is quickly done and doesn't shed. Fast and easy with great results!


For my last one, I created this background image as well. I then cut the die cut out of some gold paper. I happened to have some gold paper that matched the specks of gold in the image.

Here is a closer look at the gold die cut. I layered this one onto some coordinating dark teal cardstock. I think this one is my favorite. But they are all pretty in their own way! So which one do you like the best? 

Here is one last look at all four of them together. You could literally crank this out very quickly with great results!


Don't forget to head over to the CottageCutz YouTube channel and check out all of the amazing projects on there. Our video team is doing a wonderful job of filling the channel with all sorts of creative content! You don't want to miss it!

Dies I Used


Here's a look at the entire release. Be sure to head over and grab them while they last!


Well that about covers it for today! Until the next time, have a wonderfully craft-die day!
Melinda Beltran

Friday, November 18, 2022

Bay Window Card Featuring Mr. & Mrs. Gingerbread Gnome


Hi everyone! Linh here and I have a new video up on the Cottage Cutz YouTube channel. Look how adorable Mr. & Mrs. Gingerbread Gnome are! And what a wonderful way to present them than a Bay Window card.  This fun fold is so easy and effective. You can make beautiful cards that are perfect for putting on display!


Thursday, November 17, 2022

Merry Christmas 8x8 Layout


Hey Krafty Friends, Jen from Katahdin Krafts, back with another  CottageCutz YouTube video on the CottageCutz Channel I decided to go with another layout this week, I had this picture just hanging out on my refrigerator for several years, and it needed a home!  I embellished my page using "North Pole Santa" and "Merry Christmas Phrase w/ Tree", they are both part of the latest release, "Christmas Part 2".


My green base cardstock is 8" x 8", and the red snowflake paper is 7.75" x 7.75".  I found papers in my stash that I thought matched well together and gave my layout a fun whimsical vibe.


You can find all my layout instructions over on the YouTube Channel!

While over on the channel, make sure you like and comment for a chance to win the "North Pole Santa" die!

The winner of the "Holiday Fence" die from my last video is Bobbi Justice, the details for collecting your giveaway prize are over on YouTube!  Thanks for stopping in, and happy krafting!


Wednesday, November 16, 2022

Christmas Puppies

Hello Scrapping Cottage Friends

We have Part 1 and 2 of the Christmas release available today! These releases combined have an amazing 57 designs!  We have Gingerbread Cookies, Gnomes, Santa in a Cadillac and much much more!!  Check it out HERE.  

The die I used for today's card is Christmas Puppies which I made into a mini slimline.


 Design Steps:

1.  Use the Christmas Puppies die and the following card stock:  Brown, tan, green, cream, dark red, red, white, pink, grey and light grey.  Shade the pieces with ink and assemble with a fine tip glue
2.  Base card is white 6 1/4 x 3 1/4, glitter white card stock 6 1/8 x 3 1/8, DP snowflake 6 x 3, and strip of white glitter card stock 1 x 6 cut with the Slimline Hills die.  Glue the glitter paper to the white card base, next add the DP snowflake paper and then the snow hill
3.  Glue the big center dog down flat, pop up the little tan dog to the left of the big dog and to the left of the little tan dog glue down the bull dog flat.  The dog to the right of the big dog pop up the tan dog with the pup on the back
4.  To complete the card add the sentiment and silver snowflakes

CottageCutz Products


Please take a peek at this Cheery Christmas collection!  I promise you will want every single one of this incrediable release!!! Click HERE to see all the cuteness!!

We have more inspiration on our YouTube Channel check it out HERE

Thanks so much for stopping by!  And I will see you next Thursday.

Blessings and Take Care


Tuesday, November 15, 2022

Silent Night Forest

Hello CottageCutz friends! Thanks for taking the time to stop and visit with us today. It's Mary Marsh here bringing you the Tuesday edition of the Blog.

It's new Christmas release time!!! We have new dies in the online store. Our Christmas Part 2 release with 36 new designs is available and ready for shipment.

The individual dies are on sale for 30% off. It's only for a limited time so don't delay. You are going to love all the whimsical designs that are available in this release. There is something for everyone to make your Christmas cards extra special this year.

The Christmas Part 1 dies are also available with 21 new designs and on sale for 30% off individual dies.

Today, I am featuring the new Silent Night Forest die. It's part of the Christmas Part 1 collection. If you are looking for some quick cards that you can multiples of, this card is for you. 

I used the colors from the Splitcoaststampers color challenge #922. We were to use soft succulent, blushing bride and evening evergreen for our color trio. Optional was to use a die cut. 
evening evergreen, soft succulent, blushing bride

I selected designer paper that is in the soft succulent color. I liked the subtle background script. I cut the designer paper so that it would cover the white card base. I also made it just a bit larger to accommodate the die cut image.  

White card base: 4 3/4" x 5 3/4"
Soft Succulent Designer Paper: 4 3/4" x 5 3/4"

The image was cut in the evening evergreen cardstock. To cover the blushing bride shade, I added some stars in that color cardstock. 
I made a 2nd card using the same die but with different background paper. You can give your card a different look just by changing the designer paper. This card is the same size as the previous one. I used a black designer paper with snowflakes then cut the image in white. I like the bold contrast on this one. 
Well, that's it for me for this post. I hope I have given you an idea for a clean & simple card. I will be back on Sunday with another idea for a quick card.

Die I used to create card: