Thursday, May 26, 2022
Candy Cart Mini Slim Line Card
Wednesday, May 25, 2022
Birthday Easel
Hello Scrapping Cottage Friends
It is NEW RELEASE TIME!!
It is our Sweet Treats release! There are 13 different designs and everyone of them can be used for a variety of occasions especially Birthdays!! The individual dies are 30% off. This sale price won't last long so click HERE to hop on over to the store!
Today, I am using the adorable Easel Sign w/Flowers. This die can be used to proclaim any occasion. I think it would make a really cute Wedding announcement.
Design Steps:
1. Use a white 6 1/4 x 4 1/4 card base, 6 1/8 x 4 1/8 blue card stock, 6 x 4 flowered DP, use the largest Pierced Rectangle die and cut out blue card stock and finally use the second from the largest Pierced Rectangle and cut out white card stock2. Use the Easel Sign w/Flowers and cut out the following card stock: red, yellow, green, silver, black and a piece of wood grain DP
3. Stamp the black insert piece with VersaMark and emboss with white powder. Assemble the easel with a fine tip glue
4. Glue the white rectangle to the blue rectangle and add a strip of green to the bottom of the white rectangle
5. Glue the easel to the middle of the rectangle and add a few flowers to the grass below the easel as shown above
6. Glue the flower DP to the piece of blue card stock add the white ribbon tied in a square knot. Then glue that panel to the front of the white card
7. Place dimension tape to the back of the blue pierced rectangle and then pop it onto the card front as shown below and your card is complete
CottageCutz Products
We have more inspiration on our YouTube Channel check it out HERE
Tuesday, May 24, 2022
You're So Sweet, Ice Cream Sundae Project
Hello Scrapping Cottage friends!
Sweet Treats Release
Melinda here with you on this Terrific Tuesdie! Today I am sharing another sweet project featuring dies from the New Sweet Treats Release! Talk about sweet! This set is over the top adorable! Here is what I created.
I created this sweet sundae card. I started with a standard horizontal top fold A4 card.
I created the base by adhering a blue cardstock to the white cardstock background. Along to that, I added a red polka dot paper.
I then turned to this super cute Ice Cream Sundae die and cut all the pieces out of plain white cardstock. Here is a look at the adorable Ice Cream Sundae. colored in the heart, strawberry, cup and straw. I added some sparkle to the ice cream.
Here's a closer look at the pierced circle die and the scalloped circle die. You can also see all the shimmer from adding some glitter to the mix.
Here's a closer look at the pretty little bow. I added it to give a border between the two papers.
Here's a closer look at the sentiment. I simply used a marker to write the sentiment.
Here is the new sweet treats release.
The Dies I used to create this project:
Pierced Circle Set
While I used the Nested Scallop Stitched Rectangle set, you can use this one as a perfect alternative.
It is filling up with beautiful projects and great how-tos!
Head over and check out the latest video!
Well that about covers it for today! Until the next time, have a wonderfully craft-die day!
Melinda Beltran
Monday, May 23, 2022
Birthday Cupcakes
I scored my card to 5x7 and cut a patterned paper to 4.75x6.75 and adhered it to my white card front.
To color my dies I used distress ink to color each cupcakke to match the colors in the paper.
Below is my completed card and to top it off I added some stickles in crystal to each cupcake.
These are the products I used
Saturday, May 21, 2022
Fun Fold Ice Cream Birthday Card
Hello CottageCutz friends! Thanks for taking the time to stop and visit with us today. It's Mary Marsh here bringing you the Sunday edition of the Blog.
It's new release time!!! We have new dies in the online store. It's our Sweet Treats release with 13 new designs. They are so perfect for any card making occasion you may have. The individual dies are currently 30% off.
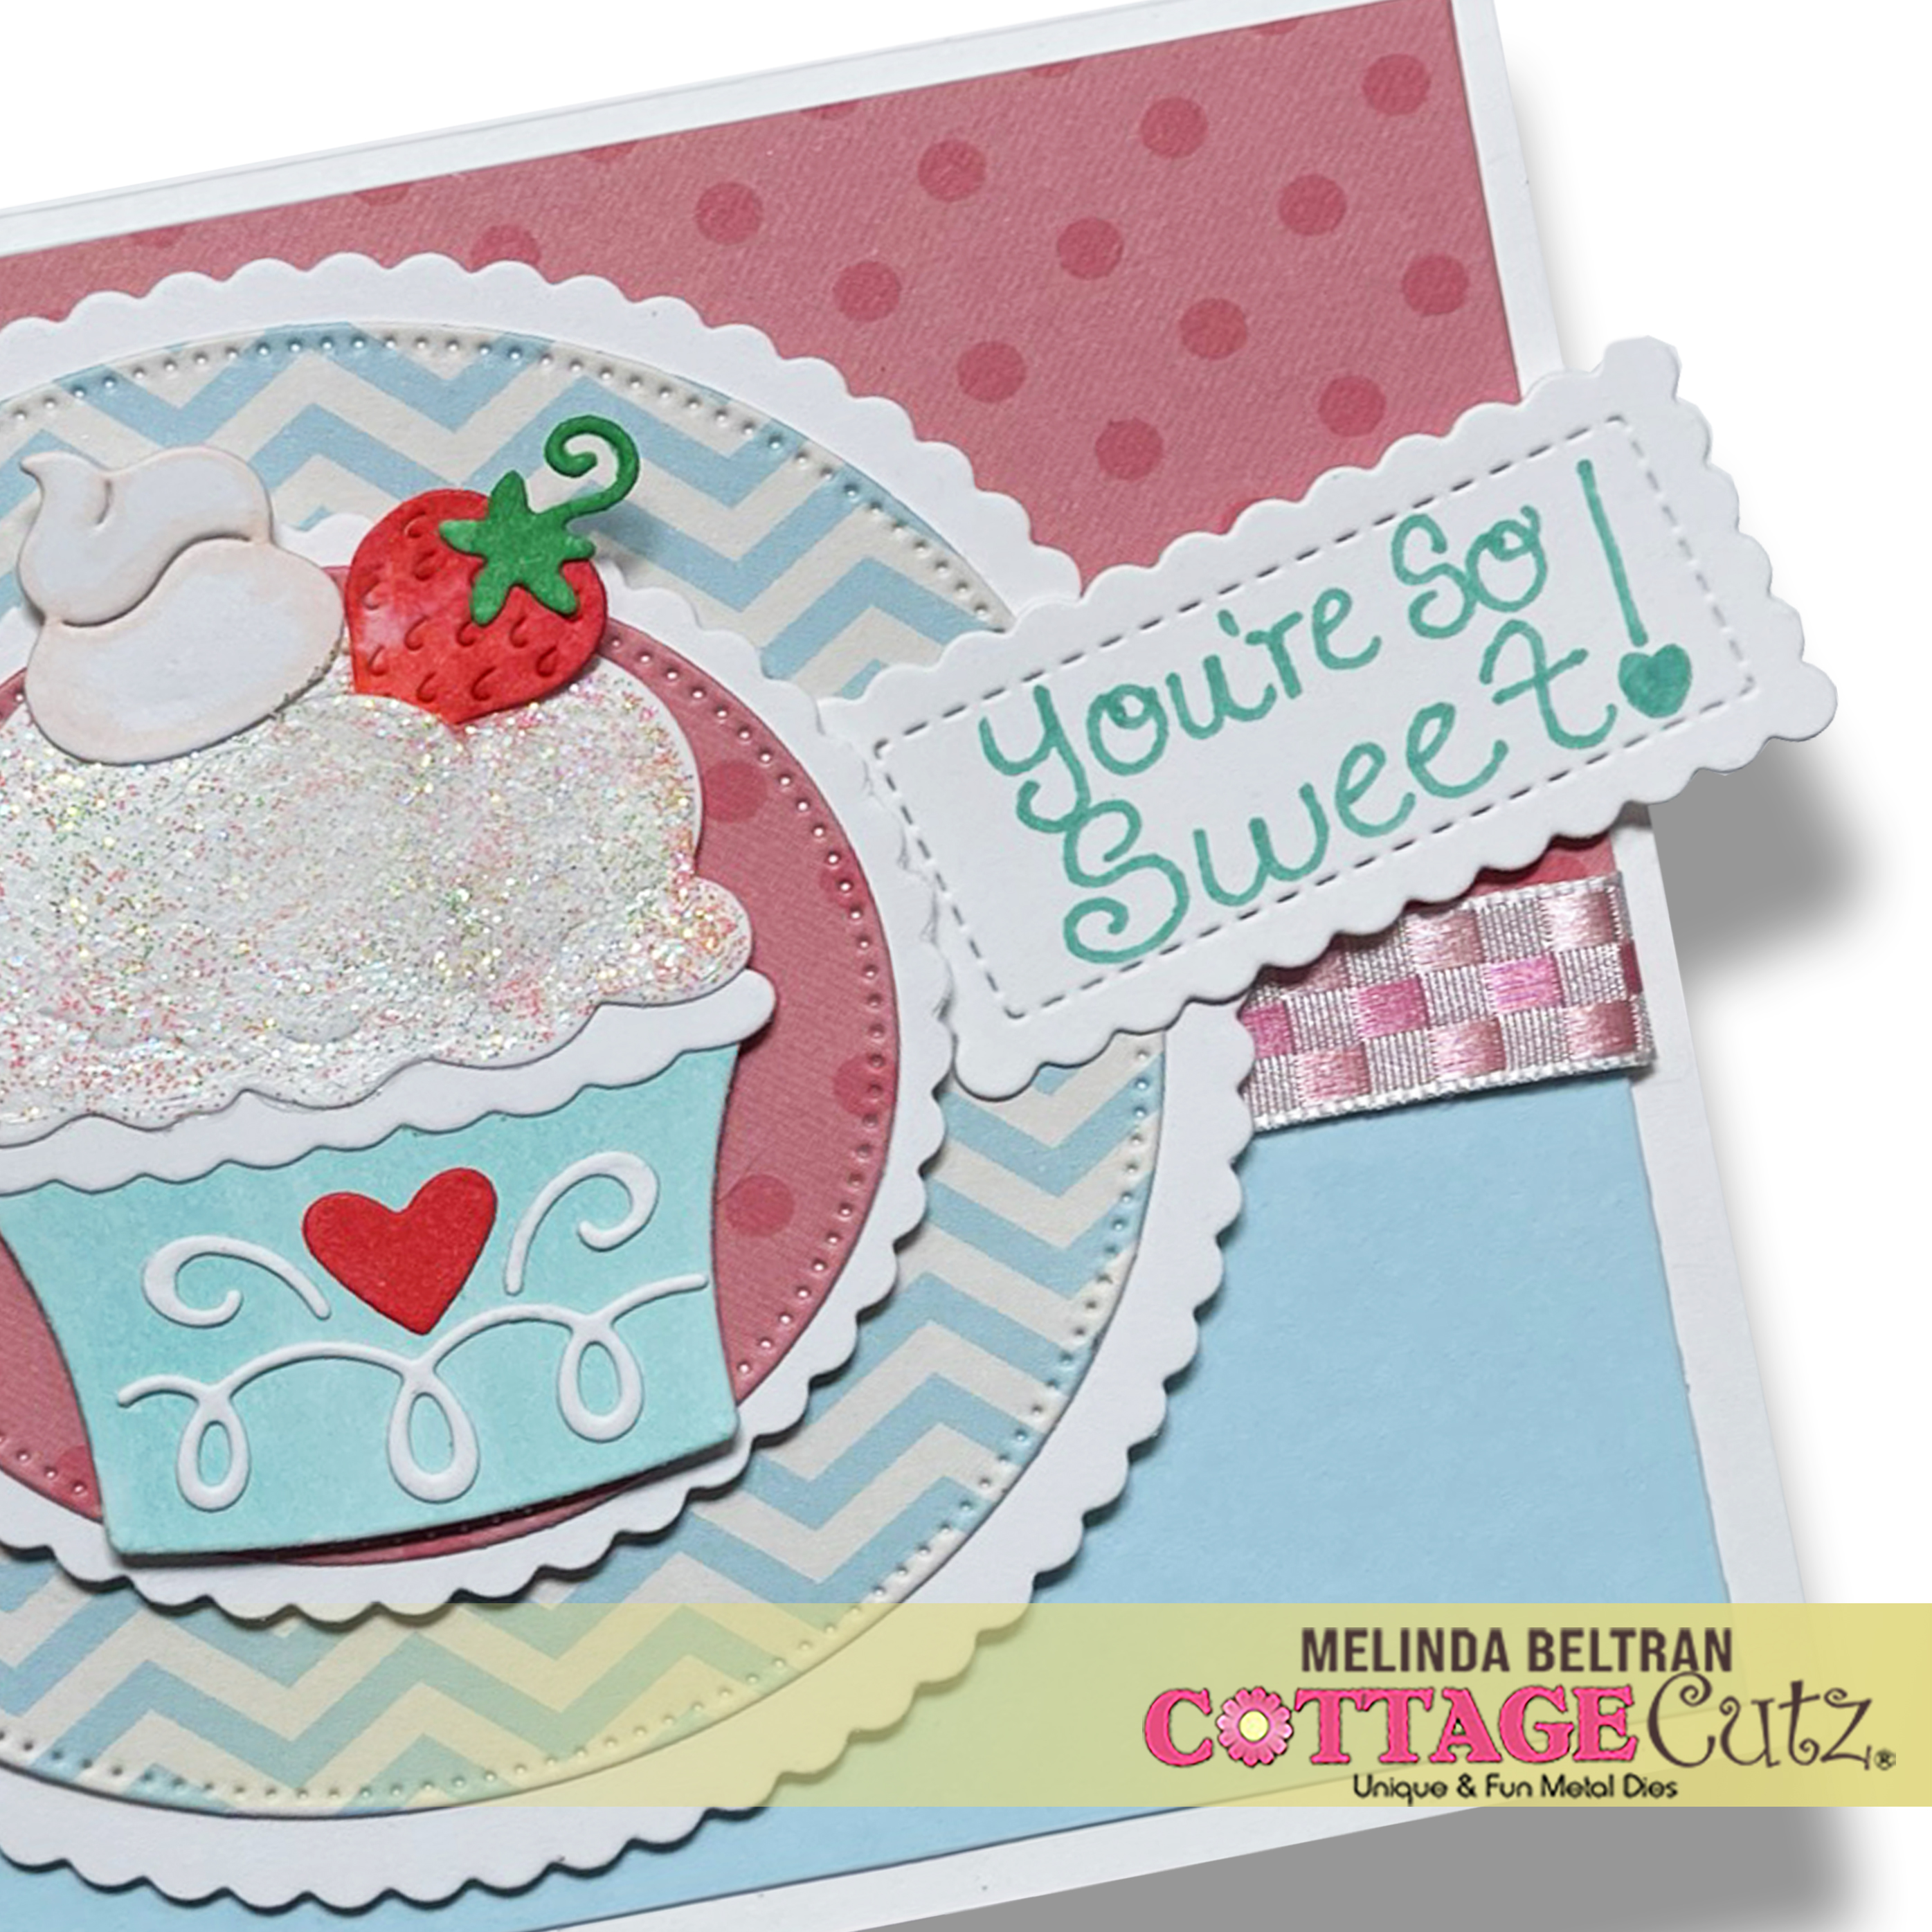
Today for your viewing pleasure I have created a birthday fun fold card. This fold is called a W-fold. I am using the new Build An Ice Cream Cone and the Ice Cream Sundae dies for my card. So let's get started with some details of how I made this card.
Design Steps:
Since I knew the fun fold I was going to use, I selected my card base and designer papers as my first step. I looked for a fun design and decided on this one. My fold is on the left side of my card.
Blue card base: 4 1/4" x 11" - scored at 5 1/4"
Designer paper Layer (outside) - 4" x 5 1/4"
I decided to stamp my sentiment on the card front at this point. I cut white cardstock at 1" x 1 5/8" and a blue layer at 1 1/8" x 5 1/4" and with the help of my MISTI, I stamped my "happy birthday" sentiment in blue ink to match the cardstock. Attached to card front with double sided tape.
Now onto the card inside. I added the same designer paper to the left side of the panel only. 4" x 5 1/4" for both panels. For the right side I decided to emboss a white panel for added texture. Added to the card base with double sided tape.
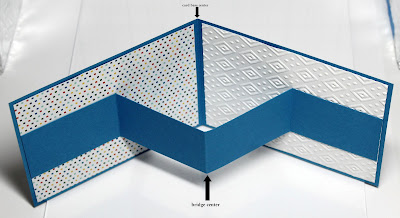
Now for the card bridge.
Cardstock is 1 3/4″ x 11″
score at 2 3/4″ x 5 1/2″, 8 1/4″.
Fold at the 5 1/2" score line and then bring the 2 end panels over to create a rectangle.
Now for the inside decorations. I cut an ice cream cone and an ice cream sundae. I layered these on coral cardstock measuring 2" x 2 3/4" and the white image panel is 1 3/4" x 2 1/2". Used double sided tape to attach. Tape is on the center of the panel only. The camera angle on this photo makes it appear that the centers don't line up. They do or card won't close properly.
To complete my card I added an ice cream cone to the card front.
I cut another piece of white cardstock 5 1/4" x 4" and attached to back of card for a personal note and to sign my name. I could have signed the yum - delicious panel but decided to leave that as is.
Well, that's it for me for this post. See you next Saturday.
Reminder: Our YouTube Channel has a new video from Linh Van. There is a giveaway for being a subscriber, liking the video and leaving a comment. Click here.
Friday, May 20, 2022
Theme Your Cake Shoppe And Use it All Year Long!
Hi everyone! My name is Linh and I'm honored and excited to be here as a guest designer. I have a new video up on the CottageCutz YouTube Channel. In this video, I'll show you how I took the Cake Shoppe from the new Sweet Treat release and combined it with the Spooky Camper set to create two different cards. The Cake Shoppe is super versatile and can be themed so you can use it all year long.
For both cards, I die cut from solid color cardstock. It's a great way to use up all your scraps and saves you from having to color little pieces. For the smaller pieces, I used a glue pen to apply adhesive. This allows you to get glue precisely where you want it. I like to die cut a lot of elements so I can mix and match and have a lot of choices when I go to create my card. I had so many leftover pieces, I made a second card!
This first card is a Halloween themed cake shoppe. |
This card converts the cake shoppe to a haunted house. |
On this second card, I used some of the Cake Shoppe elements differently. The small windows and front porch step I used as bricks. The greenery in the pots I used as bushes. And I combined more of the Spooky Camper elements to complete my haunted house. I had so much fun tucking all the spooky elements here and there. I especially love the cat that's hiding behind the pumpkin. :)
Subscribe to:
Posts (Atom)