Thursday, February 03, 2022

Never to Old to Puddle Jump

 Hello Friends

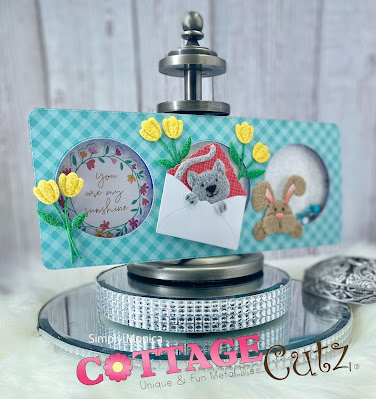
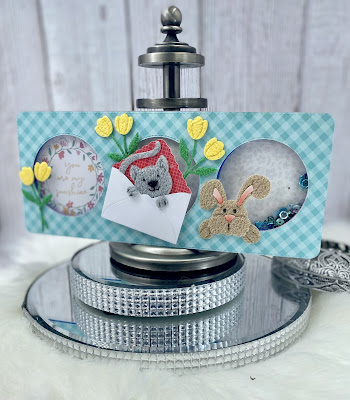
I am enjoying the versatility of the new Spring Release.  I have made two Valentines using them and today I am making a fun fancy fold belly band Birthday card.


Design Steps:

1.  Start with the Spring Showers Mouse die and cut out the pieces in: grey, pink DP, yellow DP, orange DP,  pink, black, and turquoise 
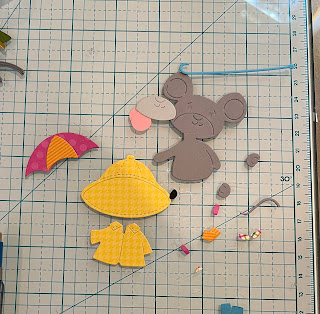
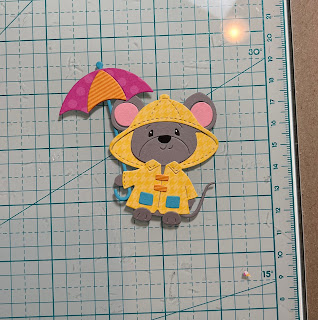
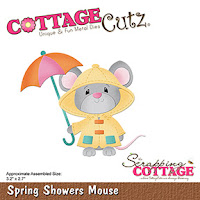
2.  Assembly the mouse using a fine tip, clear drying glue.  Color in the eyes with a fine tip black maker and add the white with a white ink gel pen.  Set the little mouse aside
3.  For the base start with a white piece of card stock cut 5 1/2 x 11.  Score at 1 1/4, 5 1/2 and 9 1/4.
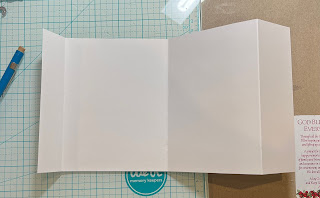
Fold as shown above first score is a valley fold, second score is a valley fold and the last is a mountain fold 
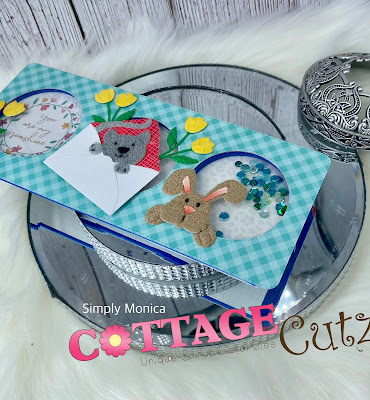
4.  When you close it up it should look like the above picture
5.  To cover the front cut 2 pink polka dot papers 1 x 5 1/4,  cut 1 orange stripe paper 1 1/2 x 5 1/4 and last cut the rain cloud paper 5 1/4 x 3 1/2
6.  Glue the pink to the first flap and then open the first flap and glue the second pink strip under the first pink strip, next flap glue down the orange strip and last open the orange flap and glue down the rainy paper
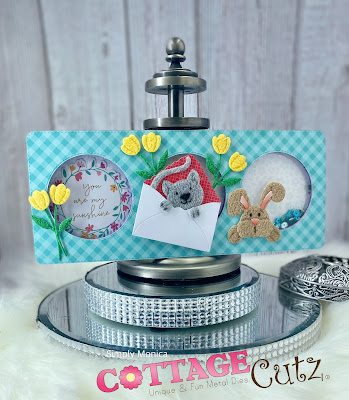
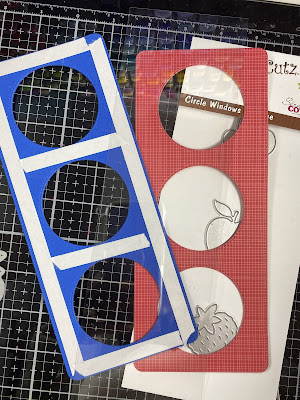
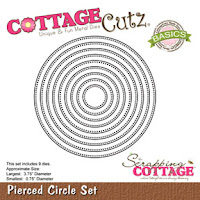
7.  To make the belly band cut a white strip 1 x 11 inches.  Wrap the belly band around the card and staple it together.  Make sure you don't get it to tight.  Use the second from the largest Pierced Circle die to cut out the rainy DP then glue to the center of the belly band
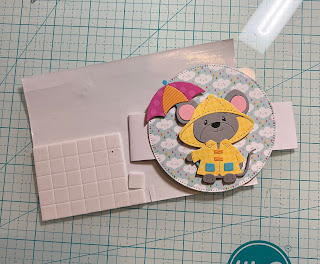
8.  Take your little mouse and pop him to the rainy DP on the belly band
9.  For the inside I cut a piece of turquoise card stock 4 x 5 1/4 added some left over strips to the bottom and stamped Happy Birthday.  To complete the front stamp your sentiment and layer onto pink and pop to the side front of the card

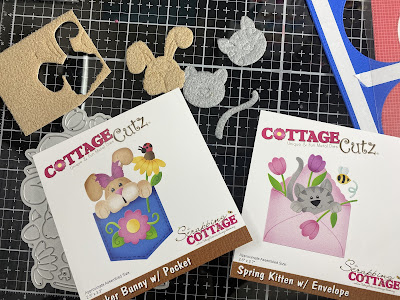
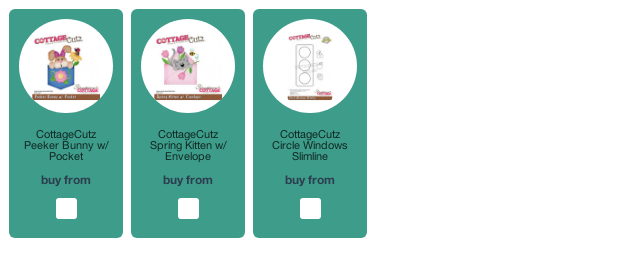
CottageCutz Products


Don't forget to check out the new Spring Release.  It is perfect for Valentines, Spring Birthdays and of course Easter!
We have more inspiration on our YouTube Channel check it out HERE
Thanks so much for stopping by!  And I will see you next Thursday.

Blessings and Take Care
Pam


Wednesday, February 02, 2022

Wishing You A Beautiful Day


Hello there friends! 
It's Theary here back on the blog today. For today's card, I wanted to share a fun card that I created using some new products from the New Release


This card just screams springtime! I'm not quite over the winter season just yet but, creating cheery cards with one of my favorite flowers makes me so happy.


You can check out the video on our YouTube Channel here. And, don't forget to subscribe, comment, and thumbs up for a chance to win another GIVEAWAY!

CONGRATULATIONS goes out to A Creative Muse for winning the last giveaway. Please contact us at mrmarsh917@msn.com to claim your prize.

Have a wonderfully blessed day!
Theary❤


Tuesday, February 01, 2022

Easter Village


Good morming Cottagecutz fans I hope your week is going well so far. It's Wendy bringing you the blog today.

So the card I'm posting today includes a light tutorial as my Friday posts are full tutotrials

So to begin with I took a white slimline card and used the 'Clouds Slimline' as a stencil. So you cut the die in white card and you can use this to ink onto your card. I start part way down the card and then move up the card. As the die is so long you really change the way the clouds sit on your card.

I then cut the 'Grass Slimline' twice. I mae sure that there were 2 different layers to make it look more realistic. I stuck the first piece down with glue and the second layer with 1mm 3D foam pads.

Next I cut out the three houses. the 'Carrot House' the 'Hello Spring Bunny Cottage' and finally the 'Spring Gnome Cottage. I assembled all elements from the dies. The dies as I have mentioned before are so intuitive it makes it easy to put together your houses. I made sure that I gave the houses some 3D elements by using 1mm foam pads on the windows, doors, and of course that cute little grey bunny in the 'Hello Spring bunny' house. Once assembled I added them to the card with 3D foam pads.

I took some elements to finish off the card as follows:
- Tulips from 'Spring sheep die'
- Chick from 'Miss Spring Bunny die'
- Sign from 'Spring Chicken die' - I stamped a sentiment on this
- Sun from 'Campin Out Sun and Moon'

I do hope you like the card. This took me less than an hour to pull together so I hope you will give it a try. Remeber to add some 3D elements such as small flat back pearls for eyes, noses and flowers. It just makes the card extra special. i wish you a wonderful week and I will see you Friday with another Easter inspired card.


Dies I have used:


Please don't foget to check out our YouTube Channel for more great designs

Monday, January 31, 2022

Slimline Shaker

Hi, everyone it seems like the weekends go by so quickly as Monday is here again.  Today I am sharing a slimline window shaker card with two of the new release from the January 2022 release!  Peekers Bunny w/Pocket and Spring Kitten w/Envelope how cute?!! 
CARD

1.  I took the slimline window die and cut it using patterned paper.  I couldn't decide between red and teal so I actually cut it out twice
2.  I then cut two layers of the window using foam so that I could add height for my shaker window.  I added some acetate for the window and then adhered all the layers together

3.  I used some flock paper I had to cut out the bunny and cat to make them more life-like or give them a better look of fur and I love how it turned out.  

I glued all the layers together and added some sequins to my shaker window to complete the look of my card and I hope everyone enjoyed my shaker card and see you next Monday same time same place!

In case you didn't hear, The CottageCutz YouTube channel is up and running.  Head over and check out the latest video! There is a giveaway for subscribing too!

Sunday, January 30, 2022

Bunny Peeker Treat Box w/ Bonus Card

Happy Sunday Scrapping Cottage friends!
Melinda here with you today. It's another Sunday Funday and I hope you are enjoying some crafting! I am sharing a little more spring inspiration featuring dies from the new SPRING RELEASE! Today's project is a super cute little box with the adorable new Peeker Bunny w/ Pocket Die for the front!

The new Peeker Bunny w/ Pocket Die is part of the fantastic new Spring Release! I started by cutting out my die pieces in white cardstock. I then colored my various pieces in with my markers. I did also cut out the pocket piece in blue cardstock as well as a patterned paper for the sides of the box mats from my Doodlebug paper pad.


I decided to make my Peeker Bunny w/ Pocket the front of a cute little treat box, instead of a card. The box size I ended up using comfortably holds 3 Ghirardelli Chocolate Squares with some tissue. That's the perfect amount for a little gift for your co-worker's, teachers, etc. this spring season.

Box Assembly
I settled on starting with a piece of paper 5.25 x 5.25 size.


I scored all four sides at 1 5/8th. That is the next 1/8" line past the 1/2" mark.

Here is what it looks like when scored. It is not a perfect square size. I settled on this size to match the width of the pocket piece as close as possible.

Next you will want to cut it as shown. The easiest way to remember how to do this is just cut the line of the outside score to the first cross line. Then do a quarter turn and repeat. Do this all the way around. You will also want to cut a little slice out so that it makes assembly easy.

This photo shows you where to apply your adhesive. You will put it on the "top" of each of the four corner tabs you created. Once you do this, simply fold up the box and adhere the sides.

Here is what it looks like assembled.

This is a slight segue. I wanted to share all the various size boxes I worked up before I settled on my size. I wanted to come up with one that was as close to the width of the pocket without making it too complicated. Can you tell I am not the greatest at math?....LOL!

Here is one more look at the finished box. After I assembled it and took my photos, I realized I left off the sweet little ladybug that sits on top of the flower!!!! UGH! SOOOO.... I had to get it on somewhere!!! 

So I whipped up this cute card. I had extra pieces, so this came together easily. 
My finished card size is a 5x5 top folding card. I used a piece of white cardstock for my base. I then used the same blue cardstock for the pockets as a base mat. On top of that I layered some Doodlebug patterned flowers paper, a strip of some of the bright green paper in the same pad. I then used the Wacky Stitched square for another base and then some more Doodlebug patterned paper for a mat. I set my sweet little bunny in her pocket on top of that. I did add a little foam tape to the back of the die cuts to give them just a bit of lift and dimension.

Here is a side view. You can see that sweet little ladybug on top of this flower. 


Here you can see I used the double stitched rectangle and the hello and spring words from the Hello Spring Bunny Cottage.


The Dies I used to create this project:


In case you didn't hear, The CottageCutz YouTube channel is up and running.  Head over and check out the latest video! There is a giveaway for subscribing too!


Well that about covers it for today! Until the next time, have a wonderfully crafty day!
Melinda Beltran