Thursday, November 19, 2020

Gingerbread Gift!

Hello Friends,

It is Pam creating with you today!

Just a reminder that our online store is featuring some beautifully detailed Christmas dies.  The dies are from Christmas Part 1 (22 designs), Christmas Part 2 (21 designs), and Christmas Part 3 (12 designs).  All of these fabulous dies are on sale right now in the store for 25% off.  Just click here to check them out.

Today,  I am working with the Gingerbread Baker die.  It is perfect for making little gift bags full of gingerbread cookies! I found this adorable little gingerbread man cookie cutter.  So I am going to fill these bags with little tiny gingerbread men! 


Design Steps:

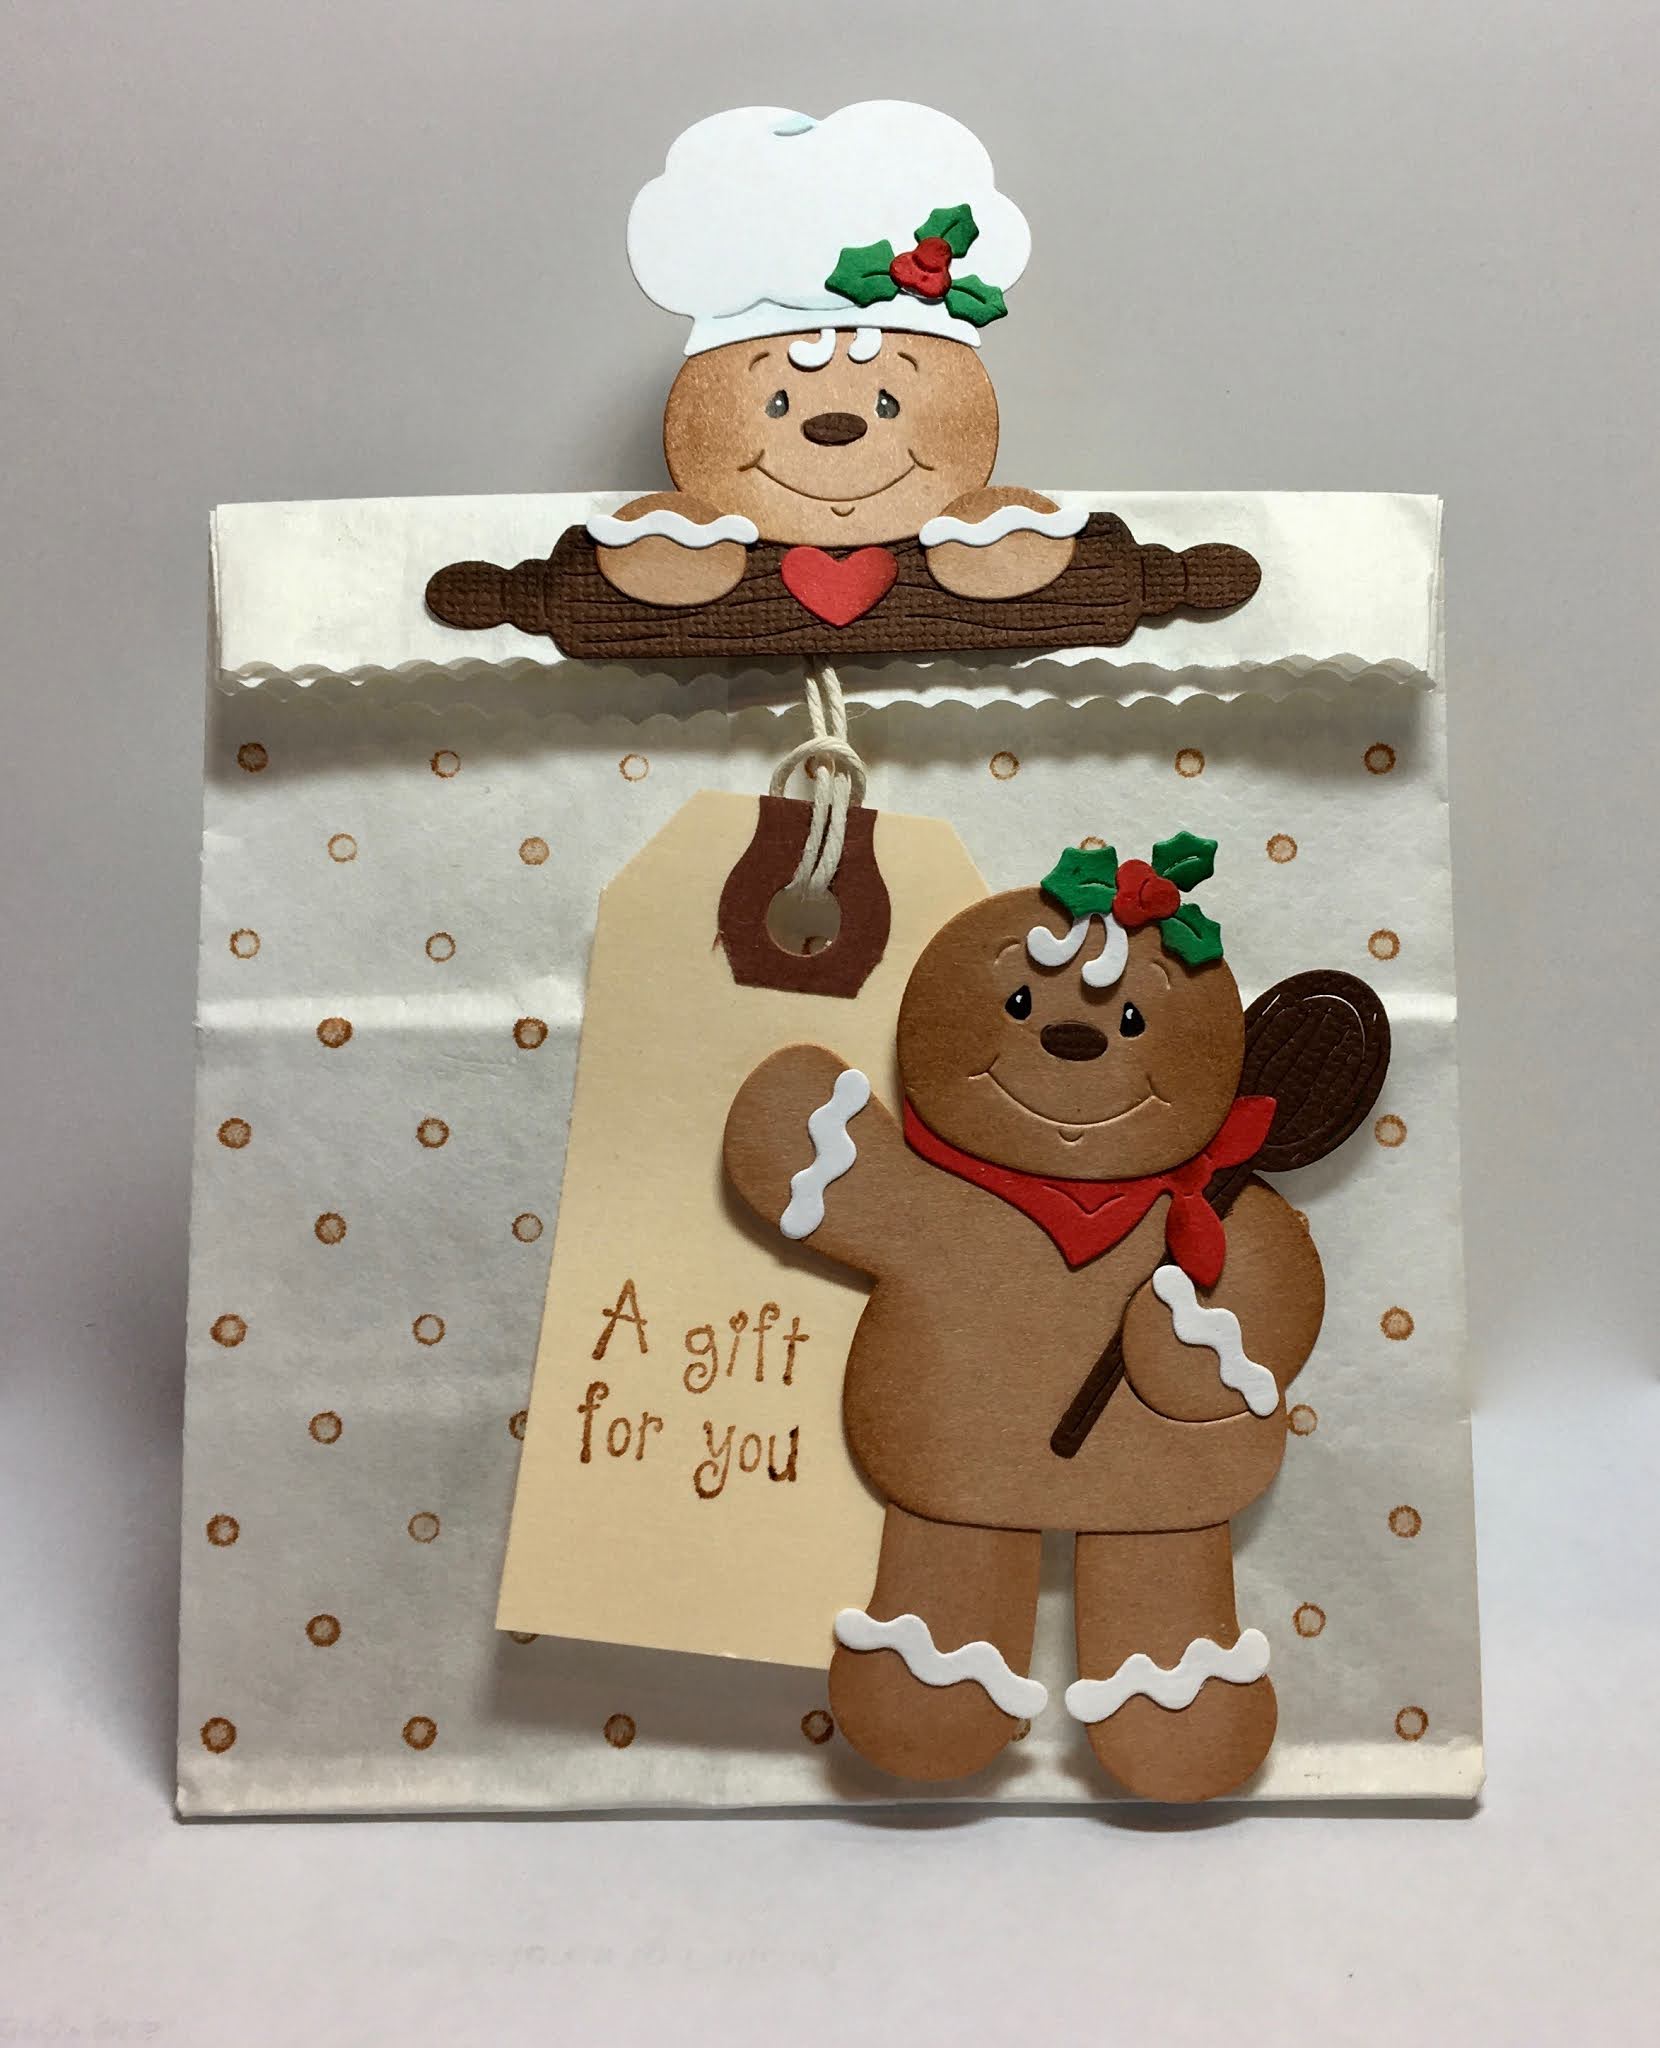
1.  Using the Gingerbread Baker die cut light brown, dark brown, red, green and white card stock.  Shade the pieces using a variety of ink colors and a small applicator

2.  Assemble the little gingerbread men using a fine tip glue.  Use a fine tip black marker to color in the eyes and then add a dot of white ink using a white gel pen

3.  Use a polka dot background stamp and stamp a small white bag.  Next I used our largest Scallop Retangle die to cut off part of the bag and to get a scalloped edge.  I also used an Avery Shipping Tag 2 3/4 x 1 3/8.  Stamp the tag in brown with A gift for you.  

4.  Loop the tag over the top of the bag and glue the Gingerbread man with the rolling pen on top of the string.  I only glue down the right side of the gingerbread man on the bottom of the bag so the tag could just slide behind him.  This way you can open the bag without ripping him. Your cute little gift back is complete

CottageCutz Products

Thanks so much for stopping by today.  I really appreciate it!
Blessings
Pam


Wednesday, November 18, 2020

Sweet Christmas

Hello!  This is Sukie and today I have a Christmas card to share.  For this card, I worked with the Sweet as a Christmas Cookie die set from the Christmas Part 3 die release.  It's just one of the fabulous die sets from the Christmas die releases which are currently on sale.

I used glittered card stock for some of my die cut pieces and some Stickles for the solid card stock pieces. The sparkle and shine adds a fun element to the cookies.  I also cut out a circle from patterned card stock and a Nested Stitched Scallop Circle from white card stock.
All of the papers are from my stash of Christmas themed card stock.  The colors of the striped paper were the inspiration for my die cut pieces.
Once I layered the striped paper on my card base, I added the red strip of card stock to break up the stripes. The double circles were affixed on top.
The next step in my card design process was to add the sentiment inside the circle.  The whimsical font makes for a fun focal point on my card.
A row of cookies was adhered below the sentiment inside the circle filling in all of the empty space.
The remainder of the cookies and rolling pin were added in the remaining empty space inside of the circle.
The finished card is perfect for tucking in with some yummy home baked treats during the upcoming holiday season!
Here are the die sets used on my card, available in the store:

Monday, November 16, 2020

Christmas Keys

Hi!

It's Anja here for my Monday's post. I made another "interactive" Christmas card today. I'll tell you a bit more about the crafting process below.

For this card I used:

- Cottage Cutz dies (Christmas Keys, North Pole Express Tag, Peeker Pocket),

- Distress Inks,

- craft card base (13x13 cm),

- white card stock for background (12x12 cm) and die cuts,

- patterned paper for background (11,5x11,5 cm) and die cuts,

- scissors,

- black pen,

- white pen,

- gold pigment ink,

- silver pigment ink,

- adhesive foam pads,

- paper glue. 


After cutting and coloring all the parts for the keys I started on the background. I used a few pieces of leftover patterned papers. After I cut the pocket I placed it on white card stock and cut a few millimeters around to get a bigger pocket in white. I glued the patterned one on top and then with adhesive foam pads to the card base. That's how I got a bit more space to stick all three keys in. I decorated the pocket with North Pole Express Tag. And my card was done.


Hope you like my project for today's post. Have a nice week and see you again on Sunday. 

Anja Z. 


Cottage Cutz dies I used: 


Sunday, November 15, 2020

Christmas Card & Ornament

Hi!

It's Anja here. I have a 2 in 1 card for you today. I made a card with an ornament you can remove and place it on your Christmas tree.

For this card I used:

- Cottage Cutz dies (Snowman Joy Ornament, Merry Christmas Love, Circle Set),

- Distress Ink,

- Zig water color brush markers,

- white card base (15x15 cm),

- red card stock for background (14x14 cm) and die cuts,

- white water color paper for die cuts and background (13,5x13,5 cm),

- gold acrylic spray,

- gold marker,

- white pen,

- black pen,

- glitter brush,

- brush,

- thread  (aprox. 20 cm), 

- heat gun,

- paper glue. 


First I cut the ornament and the circle. I cut two pieces of the ornament. I colored the circle with blue shade of ink.

I combined two ornaments (I cut one piece in the way that all the small pieces stayed in the silhouette) and placed it on the circle. Then I colored it.

Next I cut all the pieces for the background. I cut the ornament out of the watercolor paper. I used the positive and the negative later on. I also cut two sentiments and glued the red paper on the top of the white one.

Then I colored the background. I sprayed gold acrylic color to the glass mat and tapped the paper over it. I dried the paper with the heat gun.

When all the pieces were ready I glued the red background, gold background and one piece of the ornament on the card base. Next I added the sentiment. I only glued letters "m" and "y" of "merry" and "c" and "as" of "Christmas". I also added a bit of glue to the bottom of the rest letters of "Christmas" to hold the ornament. I added a piece of thread to the ornament. When the glue was dried I inserted the ornament in the middle and my card was finished.


Thank you for stopping by. Have a nice day and see you again tomorrow for another post. 

Anja Z.


Cottage Cutz dies I used for this project:


Saturday, November 14, 2020

Santa & Reindeer Truck


Hello Scrapping Cottage friends! Thanks for taking the time to stop and visit with us today. It's Mary Marsh here bringing you the Saturday edition of the Blog. 

Our Christmas dies are in the online store. And, you can still pick them up on a 25% sale. We have Christmas Part 1 (22 new designs), Christmas Part 2 (21 new designs) and Christmas Part 3 (11 new designs). 

Today, I have for your viewing pleasure a card featuring the new Santa & Reindeer Truck from the Christmas Part 2 release. It's one of those whimsical dies that would make a really cute Christmas card. So let's get started on some details of how I created my card.

Design Steps:
I started my card this week with the Splitcoaststampers sketch #827 I noticed the option of doing a pocket card and I thought this die would be cute on a tag to fit in the pocket. Here is a link to a YouTube video for step by step instructions. 
I cut my shaded spruce (green) cardstock to 4 1/4" x 11". I scored at 5 1/2" and then again on one side at 1 1/4". 
 
Then fold at the score lines with a bone folder for a nice burnished edge. I used a corner rounder and rounded the flap and the top portion of my card.

Next, I added Scor-tape or any strong adhesive to the outer edges of the top portion of the card. That forms the pocket. 
I decorated the front panel with a plaid designer paper and layered with a brushed gold cardstock. Attached with double sided tape.
 
Gold panel: 4 1/8" x 4 1/16"
Designer Paper Panel: 4" x 3 15/16"
I wanted to use ribbon but not make a bow like they did in the tutorial. I attached a 3/8" cherry ribbon and secured it underneath the flap. Then added more Scor-tape to the top of the flap to seal it. 

For element 4 of the sketch, I used the Santa's Express Tag die from the Christmas Part 1 release. I cut it once in white cardstock and then again in cherry cardstock. I did a die inlay technique and added the cherry letters to make the white tag pop. The card pocket is finished.
Now I am ready to start the tag that will be placed on the inside of my card. I cut the images using the cardstocks cherry cobbler & shaded spruce to match the card front designer paper. I cut a tag using the mail tag set using some snowflake designer paper. This piece had the background colors I was looking for. 

Looks like this die is out of stock but what you could do is cut a piece of cardstock 3 1/4" x 5" for the image. That's what the tutorial shows to do. I wanted mine to be a tree decoration and the friend I am sending this too likes these tags for her Christmas tree. 
 
I resized this tag to make it 5 1/4". Here is some info on how I did that. I cut a piece of cardstock to 5 1/4". Taped it on the cutting plate of my Big Shot. 
 
Ran it through leaving about 3/4" uncut. 
Then I moved the die to the end of the cardstock and I made sure to line up the edges of the die with the already cut edges. I turned it around so the uncut edge would go through the Big Shot on this pass. Sorry I forgot to take a photo of this part of the process. But here is a photo of the finished tag with the die to show the difference in length. 
This is what the card looks like when it is together. I originally had cherry bakers twine on the tag and then changed it to the cherry ribbon I used on the pocket front. Then,  I changed it again to add gold cording tied in a bow. I like it better this way. 

Well, that's it for me for this week. I hope I have given you a different idea for a way to use this cute new die. See you next Saturday!


die I used to create card: