Saturday, May 23, 2020

Beautiful Friendship

Hello Scrapping Cottage friends! Thanks for taking the time to stop and visit with us today. It's Mary Marsh here bringing you the Saturday edition of the Blog. It's Memorial Day weekend and what is usually labeled as the "official" start of summer.

And speaking of Memorial Day there is a big sale going on to celebrate this holiday in our online store You can save up to 70% on dies and the new Gardening release is 25% off. It's a good time to get some good prices on CottageCutz dies. These new dies are perfect for Father's Day, birthdays, thank you, or even a thinking of you card for the person who loves to garden.

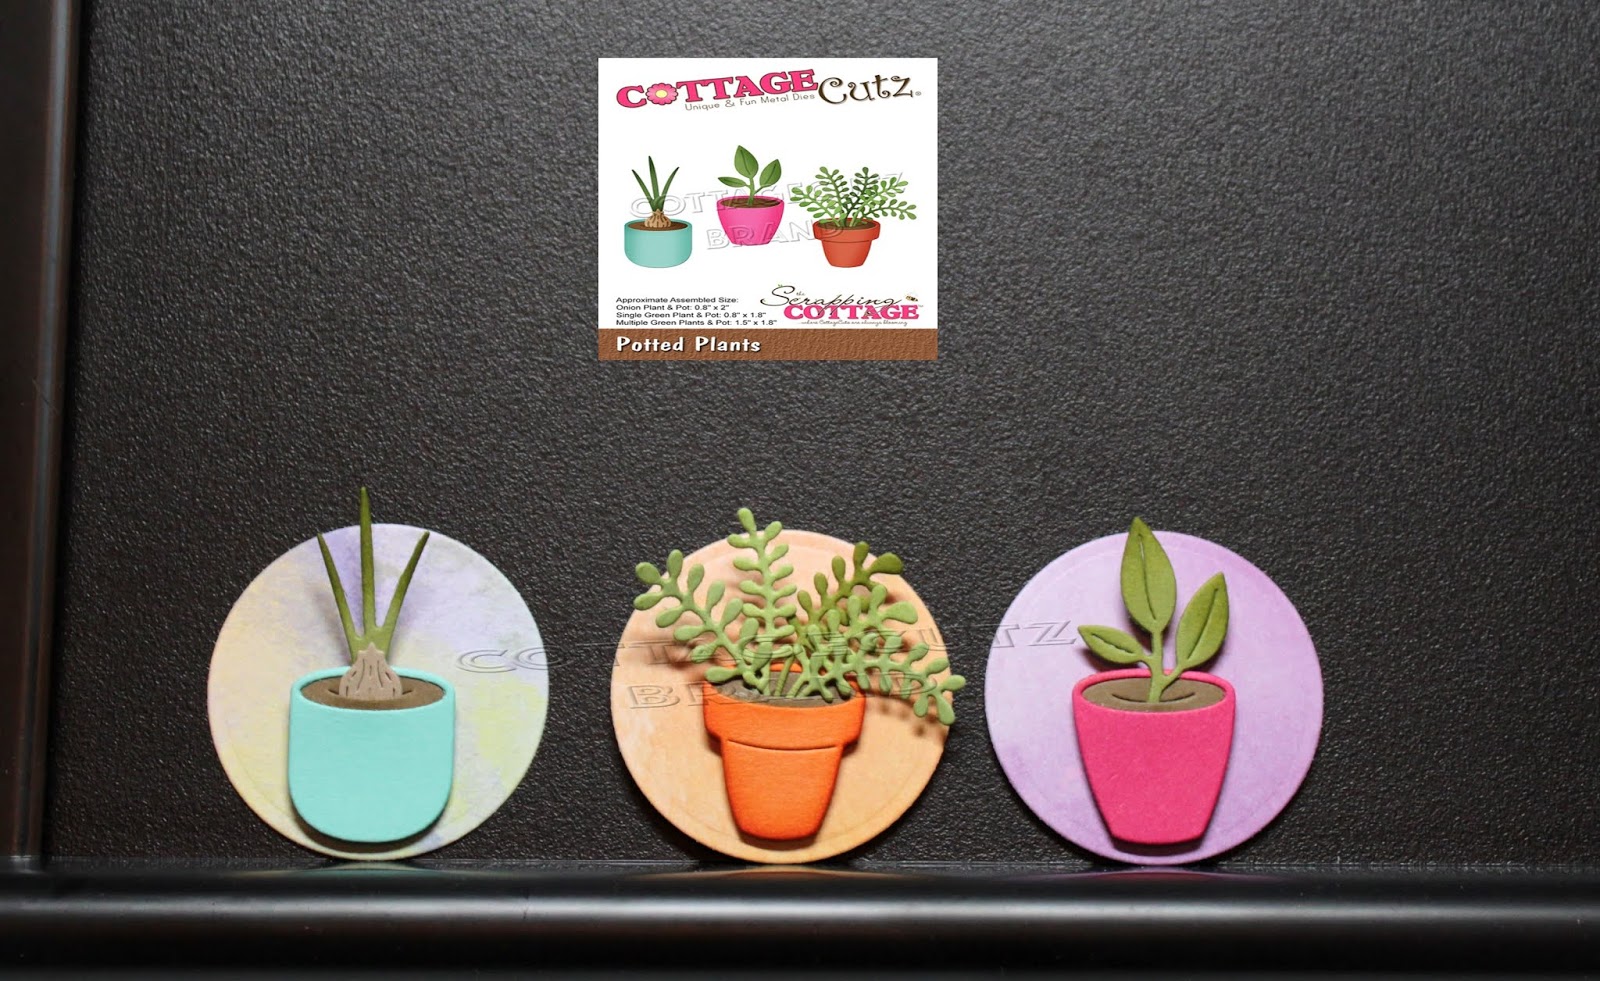
For my card today, I am featuring the new Potted Plants die and created a thinking of you card for a friend. So let's get started with some details on how I created my card.

Design Steps: 
As I have said so many times before, having a layout in mind at the card start is always a big boost for me and jump starts my creative thought process. I love working with the sketches that are out there in the online world. That way I can just choose the card colors and designer paper and I am good to go. I had this sketch saved on one of my Pinterest Boards. I thought it would work well with my potted plants. 
Next, I chose the designer papers. I have a pack of watercolored backgrounds that have been a favorite go to for me lately. I love the colors they have blended together in this pack. And, then I don't have to do any ink blending. It's all done for me with the designer paper. 
For the 2 rectangle elements of the sketch, I used a purple and a lemon-lime cardstock. The purple measures 1 1/2" x 5" and the lemon-lime 1" x 4 1/8" 

I cut the potted plants in various bright cardstocks. I used the circle set (4th smallest) to cut my circles from the leftover piece of designer paper. 
Stamped my sentiment on the 1" x 4 1/8" piece of lemon-lime cardstock. I thought this particular sentiment was a good accompaniment for the plant images. 
Now that all the elements are cut, I am ready for card assembly.
I attached the images to the purple rectangle panel using double sided tape. The sentiment panel is attached with the same adhesive. 
To finish off my card, I attached the image panel to the card base and then scattered a few purple glitter enamel dots. And, that's it for me for this Saturday. I will be back on Monday with another card. 

dies I used to create card:


Friday, May 22, 2020

Garden Party

Happy Friday!  It's Jeanne with you today and I have a card featuring the Golden Bear die from the new Gardening release.  The bear isn't used in this card but the adorable beehive and bees are!
I started this card by using a sketch from Freshly Made Sketches blog.
I cut my base panel, and two inner panels from white cardstock.  The base panel I embossed using a floral embossing older and I cut the other panels using the largest of the stitched rectangle dies and the second largest of the Scalloped Stitched Rectangle dies.
I the went through my cardstock samples and chose my colors.
I cut all the pieces and used ink in the same or slightly darker shades to give some depth to the edges of the pieces.  The bees wings are cut from vellum.  I loe using vellum for wings so that they are translucent.  Art Glitter Glue allows you to glue vellum without the glue showing through.
 Next, I centered and adhered the panels together.
Using the green cardstock, I cut the phrase using the Garden Phrases die.
I added it and the other elements to the center panel.  Finally, I added a few sequins.
This new release has a wonderful variety  of dies that can be used for numerous occasions.  Be sure to stop by the online store where select dies are on sale for Memorial Day!

Dies used:
http://www.scrappingcottage.com/cottagecutzgardenbear.aspx
http://www.scrappingcottage.com/cottagecutzgardenphrases.aspx
http://www.scrappingcottage.com/cottagecutzstitchedrectanglesetbasics.aspx
http://www.scrappingcottage.com/cottagecutznestedstitchedscalloprectangleset.aspx
Thanks for visiting today!  I hope you have a fun and creative weekend!


Thursday, May 21, 2020

Garden Sign

Hello Scrapping Cottage Friends,

It is Pam having fun with you on the blog this gorgeous Thursday!

This little sign card can be for encouragement, graduation or a just because card.  I love mixing fun papers with our wonderful Garden collection.  I am a bit of a paper hoarder so I love when I can actually use some of it.  My husband said I have enough paper and dies to last a lifetime.  But you and I know you never have enough craft supplies!
(Background Photo by Chad Madden on Unsplash)
Design
 1.  Use an A2 white card base, green card stock 4 x 5 1/4, Designer Paper 3 3/4 x 5.  Glue the green to the white card base and then glue the DP to the green
 2.  Cut out the pieces of the sign using the Garden Phrase die.  I used brown wood designer paper, pink, white and yellow card stock.  Using the Gardening Hat and Gloves die cut it out in white card stock.  Using the Spring Grass die cut it out using green card stock
 3.  Shade the pieces using a variety of Tim Holtz inks and a small applicator.  Next glue the grass to the card front then add the sign and phrase.  Assemble the hat and the gloves using a fine tip glue
6.  Last pop up the hat to the upper corner of the sign.  Then glue one glove flat to the card and pop up the other to that glove as shown.  Add the flowers and the rhinestones

CottageCutz Products


I am so glad you where able to stop by today.  I love looking at all the wonderful dies in the Garden Collection.  It just makes me want to go out and plant a wonderful flower garden!

Blessings and see you next time
Pam


Wednesday, May 20, 2020

Live Life in Full Bloom

Hello!  This is Sukie and today I have cheerful card to share for my design team post. My card showcases the new Gardening dies which include such cute characters with a happy vibe!
I selected the Gardening Mouse and the Garden Phrases for the focal point of my card.  All of the pieces were cut with card stock and inked on the edges for some dimension.
I created a simple background for my card using a cloud stencil with some ink.  I only used one ink color however created an ombre effect. The puffy clouds make for a fun card base.
Once I had my background completed, I added the dirt mound and adhered the garden sign by tucking it into the mound at a angle.
The mouse was adhered to fit perfectly under the sign.  Next I added the rake in his hand creating the whimsical gardening scene.
The final die cut was the small gardening tool added to the dirt mound.  It fit perfectly between the sign and the adorable mouse.
Here are the dies used on my card, available in the store:

Tuesday, May 19, 2020

Puppy in a Garden Cart

Hi Janja here. Welcome to the blog.
Today, I want to share with you a card with a cute puppy in a garden cart.


- CottageCutz dies: Puppy in Garden Cart, Potting Shed (potted plants), Retro Tag Toppers
- blank card: 5 5/16 x 5 5/16" (13,5 x 13,5 cm), folded
- white cardstock: 4 3/4 x 4 3/4" (12 x 12 cm)
- grey paper strip: 4 3/4 x 5/8 " (12 x 1,6 cm)
- different colors of cardstock
- different colors of ink pads
- brick wall stencil
- white texture paste
- spatula
- enamel dot
- glue, double-sided adhesive tape, self-adhesive foam pads

I used different colors of cardstock for all the cutouts and colored the edges with slightly darker ink pads.
You can also use white cardstock and then color all the cutouts with any color media.


Cut a square out of white cardstock. Then apply a white paste, stained with grey and red ink, over the brick wall stencil and let it dry.


Cut a banner out of white cardstock and stamp a sentiment.


Add a grey strip to the bottom edge of the brick wall.
Complete the card.


Thank you for stopping by.
Janja


Monday, May 18, 2020

Father's Day

Hello Scrapping Cottage Friends!

It is Pam sharing with you today on the blog!  I hope you are enjoying your Monday!

I am having so much fun creating with our new Garden Release.  I decided to make a card for my brother for Father's Day.  He loves working out in the yard and at one point in his life he had a landscape company.  So I thought this card would be perfect for him!

To make this card I used a sketch from one of the Splitcoaststampers Challenges.  The sketch looked like this:

I used a variety of designer papers and a bright red ribbon to finish it off.  The dies I used are the LawnmowerSpring Grass and Wacky Stitched Circle.  I have linked them so you can take a peek.  

CottageCutz Dies


Thanks so much for stopping by and I do hope you check out all the wonderful dies we have in stock right now!
Blessings
Pam