Saturday, November 16, 2019

Christmas Hope

Hello Scrapping Cottage friends! Thanks for taking the time to stop and visit with us today. It's Mary Marsh here bringing you the Saturday edition of the Blog. 

We have the new release of Christmas Part 2 in the online store and they are all in stock and available for delivery. There are 34 new designs in this release. 

This release has something for everyone. So if you prefer a more religious tone to your cards- we have you covered. If you like a more whimsical design featuring Santa, reindeer, gnomes, moose or even a hot chocolate theme you will find some really cute dies.

I actually do a combo of religious and whimsical for my Christmas cards. Today, for your viewing pleasure, I am going religious with the new Hope Nativity die. It's from the Christmas Part 1 release.

Once I selected my die for this week's post, I decided to use a pattern from a stargazer paper that I bought at Hobby Lobby earlier this summer. I selected this pattern because I liked the colors and the silver swirls. I paired it up with a coordinating grape cardstock and then my card base is a silver metallic.

Silver Card Base: 4 1/4" x 5 1/2"
Grape Layering Panel: 4 1/8" x 5 3/8"
Designer Paper Panel: 3 7/8" x 5 1/8"
I cut my image with grape cardstock.  I decided (after I took the photo) to double cut the image to give it more dimension. 
I started card assembly at this point. I had two different thoughts on how I was going to finish up this card. So I thought it best to assemble and then make my decision. My cards are always a work in progress. I adhered the designer paper to the grape layer with double sided tape. 
Next, I added the Hope Nativity image to the designer paper. For this I used Ranger multi medium matte. I like this adhesive because it dries clear. Behind the manger scene I cut a small circle and sponged with wild honey ink. 
Originally, I was going to use the phrase "Christmas" on the card for a sentiment that would read Christmas Hope. Then I thought about adding some some stars as well and thought the stars from the Snow Village die would work. 
When I cut them and laid them across the top, I liked the look so that's what I used instead. My camera was acting wonky and the silver metallic swirls in the photo somehow turned to gold (lol)!!!
To finish up my card I attached my image panel to the card base and I am done. I hope I have given you some inspiration on a way to use this new die. And, the card leans more to the clean and simple side so it would be easy to mass produce. 
Well that's it for me for this week. See you next Saturday!

Dies I used to create card:


Friday, November 15, 2019

Holiday Hedgehog

Happy Friday!  It's Jeanne today with a CAS card using the adorable Holiday Hedgehog die.  This die is perfect for the holidays, winter or anytime (just remove his hat and scarf!)
I started by cutting all the pieces from white card stock using the Holiday Hedgehog and Winter Window dies.

I colored the hedgehog using Distress Oxide inks.
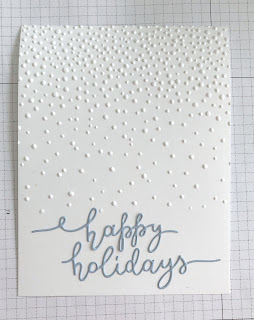
For the background, I wanted to use an embossing folder that reminds me of falling snow, but I didn't want the embossing to go all the way to the bottom.  So I partial embossed a 4.25 x 5.5 inch panel.
I laid out my sentiment (but did not adhere it) and marked where I wanted the embossing to end...
then I ran the panel and folder through my die cutter with the embossing mat over just a part of the folder.
This kept the bottom from being embossed so I could glue down my sentiment.
This card is also for a sketch challenge at CAS Colours & Sketches and they asked that the angular feature be kept.  This is actually fairly simple.  Just lightly draw a cross with the intersection at the mid point of each line then cut from point to point.
You can get a diamond shape of any size doing this.  (If it weren't for the challenge I would have used an oval die for the background of the hedgehog.)
The hedgehog panel is popped off the card using foam dots and  the snowflakes are covered in covered in Wink of Stella.

Dies:
http://www.scrappingcottage.com/cottagecutzholidayhedgehog.aspx
http://www.scrappingcottage.com/cottagecutzhappyholidayspolarbears.aspx
http://www.scrappingcottage.com/cottagecutzwinterwindow.aspx

Thanks for stopping by.  I hope you have a fun and creative weekend!

Thursday, November 14, 2019

Reindeer Baking!

Hello Scrapping Cottage Friends!

It is Pam sharing with you today!

I am so glad I have gotten a head start on my Christmas cards.  So that I can make each one of them special for the family member or friend.  The one I am making today is going to a friend that loves to bake.  I personally would rather bake then cook!  These little baking reindeer are just adorable!

Design Steps:

 1.  Using the Let's Bake Cookies die cut all of the pieces out in white card stock
 2.  Color and shade the pieces using your favorite markers
3.  Assemble the 3 reindeer and place dimension tape on the back of each of the reindeer
 4.  Use a white A2 card base cut a piece of red polka dot DP  4 x 5 1/4.  And then using the Double Stitched Rectangle die cut second from the largest cut out a piece of DP.
5.  Glue down the DP stitched rectangle then wrap white Ric Rack to the red DP on the top and bottom.  Then glue to the card base
6.  Arrange your little reindeer on the front of the card and add your sentiment


CottageCutz Productions


Thanks so much for stopping by!  And I hope you are having fun making your Christmas cards for friends and family.  There is still a lot of time to shop for dies to make someone a very special card!

Blessings
Pam

Wednesday, November 13, 2019

Wishing You a Very Merry Christmas!

Hello!  This is Sukie and today I'm sharing a card for my design team post.  The beautiful Christmas Cardinal is the from the Christmas Part 2 die release and is one of my favorite dies from this release.
For my card base, I went with a basic color palette and fussy cut the pieces for the fence.  I heat embossed a sentiment from the Scrappy Moms (retired) Merry & Bright stamp set on a hand cut flag.
I layered the fence posts onto my card base building the fence along the bottom edge. Next, I splattered the background with some white paint for a snowy affect and matted it on a black card base.
I cut out the Christmas Cardinal in white card stock and used my Oxide Inks to shade all of the pieces.  I went with the traditional red theme for this sweet bird.
The cardinal was perched on the snowy fence as the focal point of my card.  I love the way he pops against the neutral background.
The embossed sentiment was added above the cardinal as the final finishing touch on my card.
Here is the die set used on my card, available in the store:

Tuesday, November 12, 2019

Penguin's Christmas Tree

Hi! Janja here with you.
For this week's post, I used two penguins from the Christmas release Part 1.


- CottageCutz dies: Penguin's Christmas Tree, Birch Trees & Deer
- blank card: 5.3 x 5.3" (13,5 x 13,5 cm), folded
- patterned paper: 5 x 5" (12,7 x 12,7 cm)
- white cardstock: 4.5 x 4.5" (11,5 x 11,5 cm)
- colored cardstock
- colored ink pads
- embossing folder -
- glue, double-side adhesive tape, self adhesive foam pads

Cut out penguins and a tree from colored cardstock. Use color pads for more depth.


Cut out birch trees of white cardstock. Cut off a white hill with scissors. Color the edges with a gray ink pad.


Trim patterned paper and white cardstock. Create a snowy background with an embossing folder.


Now gradually paste all the elements on a snowy background.


Add some glitter to the star.


Paste the white cardstock to the patterned paper. 


Cover the front of the card and leave a narrow edge. 
We're done.


Have a nice day.
Janja