Sunday, May 26, 2019

Fantasy Tags

Hi!

It's Anja here. Today I don's have a card for you. Instead of the card I made three tags, that can be used with birthday gift bags for kids. I used cute images from Magical Fantasy Release.


For this project I used:
- Cottage Cutz dies (Magic Dragon, Unicorn Kitty, Magical Fairy, Mail Tag Set),
- Distress Inks (Spun Sugar, Worn Lipstick, Pumice Stone, Tumbled Glass, Shabby Shutters, Mowed Lawn, Forest Moss, Mustard Seed, Antique Linen) and Oxides (Broken China, Worn Lipstick),
- white cards stock for die cuts,
- stencil - clouds,
- water spritzer,
- heat gun,
- black pen,
- white pen,
- scissors,
- adhesive foam pads,
- paper glue,
- ribbons in different colors.

First I cut and colored the dragon. I used black and white pen for the eyes. I cut the tags along with the images. I cut the biggest of the tree tags.


Second I colored the fairy.


And I colored the kitty last. I used Distress Inks for all tree. And black pen for the eyes.


Next, I colored the tags. I used Distress Oxides for coloring. I used a plastic stencil to color the clouds on the first one. Then I spritzed the tag with water and then dried it with the heat gun.


I colored the second tags with two shades of Oxides. I again used water drops to add a little dimension.


And the last tag I just colored around the edges. And forgot to take a picture. Sorry for that.

And when I had all three images and tags ready, I used glue and adhesive foam pads to adhere the images on the tags. And the last thing I did was putting the ribbons on the tags. I used pieces of ribbon from my stash. And my fantasy tags were done.


That's all from me for today. Sending greetings from Amsterdam :)

See you again next week.

Anja Z.


Cottage Cutz dies I used for the project:


Saturday, May 25, 2019

Princess Birthday

Hello Scrapping Cottage friends! Thanks for taking the time to stop and visit with us today. It's Mary Marsh here bringing you the Saturday edition of the Blog.

We are still featuring cards using the new Magical Fantasy release.  If you haven't seen the Magical Fantasy release yet, you have to drop by the online store and check it out. These new dies are all so cute and whimsical. There are 27 new designs, and I am in love with everyone of them. They are currently on a Memorial Day sale at 25% off.

Today, I am featuring the new Fairytale Castle + Little Princess & Roses dies to create a birthday card for a little girl. The princess theme is so popular with little girls, and I have plenty of friends with little girls and friends with granddaughters. I used a inlay technique for this card. So let's get started with some details on how I created it. 

Step 1: I selected some patterned paper that had a cloud like background. I used a white card base to keep it neutral since its going to a little girl.
card base: 4 1/4" x 5 1/2"
designer paper layer: 4 1/8" x 5 3/8"

I used the 2nd largest stitched circle die (3 3/8") to cut my circle in the designer paper.
I built my castle on the die cut circle. Used the colors on the packaging because they were perfect for this card. 
Stamped the birthday sentiment in grape ink. I knew I was going to angle the Princess sentiment so the card corner was the best spot.
I decided at this point to start some card assembly. I used a double layer of mounting tape on the back of the image panel. I wanted it to be raised up enough so the castle image would sit flat against the card base. 


I cut the Princess phrase in pink cardstock using the Little Princess & Roses die. I cut 2 phrases to make it stand out more on the designer paper. 
I adhered this to image panel with Ranger multi matte medium. I also used the crown that is part of the Princess die. The Princess wand is from the Once Upon a Time Die. 
Well that's it for me for this Saturday. I hope you enjoy the holiday weekend and that there are some fun plans in your schedule. See you next time!

dies I used to create card:


Friday, May 24, 2019

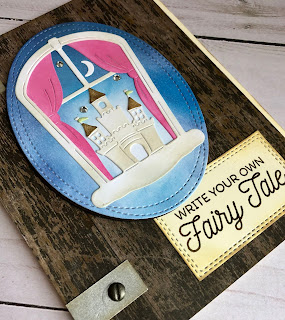
Write Your Own Fairy Tale

Happy Friday!  It's Jeanne today with another card using the Magical Fantasy dies.  I wanted to make a card that had a "possibilities" theme to it.  I thought the combination of this die, sentiment and an old book fit that bill. 
I started by inking the background to the castle using Distress Oxide inks in various shades of blue.
I used the second largest of the Wacky Stitched Oval Dies to cut the oval for the castle.
I cut the castle pieces from white card stock and used Distress Oxides to color those as well.
I assembled those on the oval.
To create the "book" I used a weathered wood paper cut to 4 1/8 x 5 1/2 inches.  Then I cut a piece of ivory card stock 4 1/4 x 5 1/2  inches.  This gave me a little bit of the pages peeking through.  I used ink to add patina to the edges of both.  I also used two strips of "tin" card stock cut to 1/2 x 1 inches for the hinges.
I added three ovals of dark brown underneath the main oval to form the medallion.
I stamped my sentiment on ivory using brown ink and distressed the edges using Antique Linen and Vintage Photo inks.
To finish everything I used two tiny screw brads on the hinges and some rhinestones for the stars in  the sky.

Dies used:
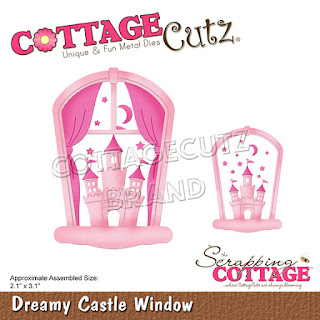
http://www.scrappingcottage.com/cottagecutzdreamycastlewindow.aspx

http://www.scrappingcottage.com/cottagecutzdouble-stitchedrectanglesetbasics.aspx

Thanks for stopping by today.  I hope you have a fun and creative weekend!


Thursday, May 23, 2019

Make A Wish

Hello Scrapping Cottage friends! Thanks for taking the time to stop and visit with us today. It's Mary Marsh here bringing you the Thursday edition of the Blog.

We are still featuring cards using the new Magical Fantasy release.  If you haven't seen the Magical Fantasy release yet, you have to drop by the online store and check it out. These new dies are all so cute and whimsical. There are 27 new designs and I am in love with everyone of them. 

Today, I am featuring the new Sweet Unicorns die. It looks like it's currently out of stock but it should return soon. I needed a birthday card for a 4 year old girl and she loves unicorns. They are hot with the kids these days. Unicorns are everywhere along with rainbows and glitter. I thought I would turn it into a shaker card. She will love shaking the sequins around. They really aren't hard to make and it has that "wow" factor. So let's get started with some details on how I created this card. 

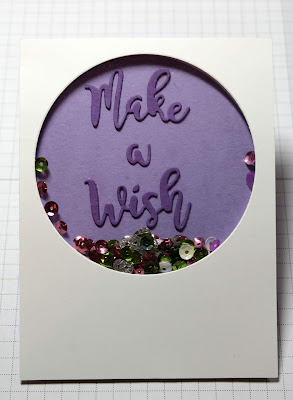
Step 1: I decided to cut the circle first to make sure I had enough room for my sentiment inside the circle. Using white cardstock 3 3/4" x 5" and the 2nd largest double stitched circle die I cut my circle. I used this die because it was the size I wanted for my opening. I will save the die cut circle for another use. 
Now I need to make my "window". I used a window sheet cut to 4" x 3 1/2". It's smaller than my white panel but larger than the circle opening. I used double sided tape to secure the window sheet in place. To avoid static on the window sheet I used my powder tool on both sides of the sheet. You could also use an embossing buddy. It will keep the sequins from sticking to the sheet. 
Next I used foam tape and ran it around my circle opening. I also used dimensional adhesive on the corners to make sure it's the same height all around my card. I again used the powder tool on the inside of the foam tape. It cuts down on the stickiness and the sequins won't stick to it. 
I cut the Make a Wish words in grape cardstock from the Fairytale Birthday die. I added to a lighter shade of purple. I wanted to have some color in the shaker background. 
Added the sequins to the inside of the circle. I added a little more than I thought  I would need because I wanted her to be able to shake it. 
I peeled off the foam backing and placed my sentiment panel on top. Since it is the same size as the shaker panel I lined it up at the top first. 
I wanted the shaker panel to pop and so I added a layer of the grape cardstock to this panel. The layering panel is 4" x 5 1/4"

Step 2:  Now that the image panel is ready, I cut my unicorn images from the Sweet Unicorns die. I used the package coloring as my color guide. 
Added them to the image panel and secured with double sided tape. 
To finish off my card, I secured the image panel to the pink card base. The base is 4 1/4" x 5 1/2". Added a few pink enamel dots and my card is complete. Don't you just love the unicorn images? I hope I have given you an idea for a way to use this new die. See you on Saturday with another card from this new release. 
dies I used to create card: