Thursday, March 21, 2019

Bunny's Garden


Hello Scrapping Cottage Friends!

It is Pam sharing on the Blog today!

I just love Spring weather not to hot and not to cold!  I am continuing to make my Easter cards and I am just in love with this die.  It is so so cute!  We have 36 new release Spring Dies in the store just waiting for you to take a look!  So please jump on over to the store for a peek!


Designer Steps:
 1.  Mask off a piece of white card stock that has been embossed with a 1/4 border
 2.  Use TH blue ink and sponge on the sky
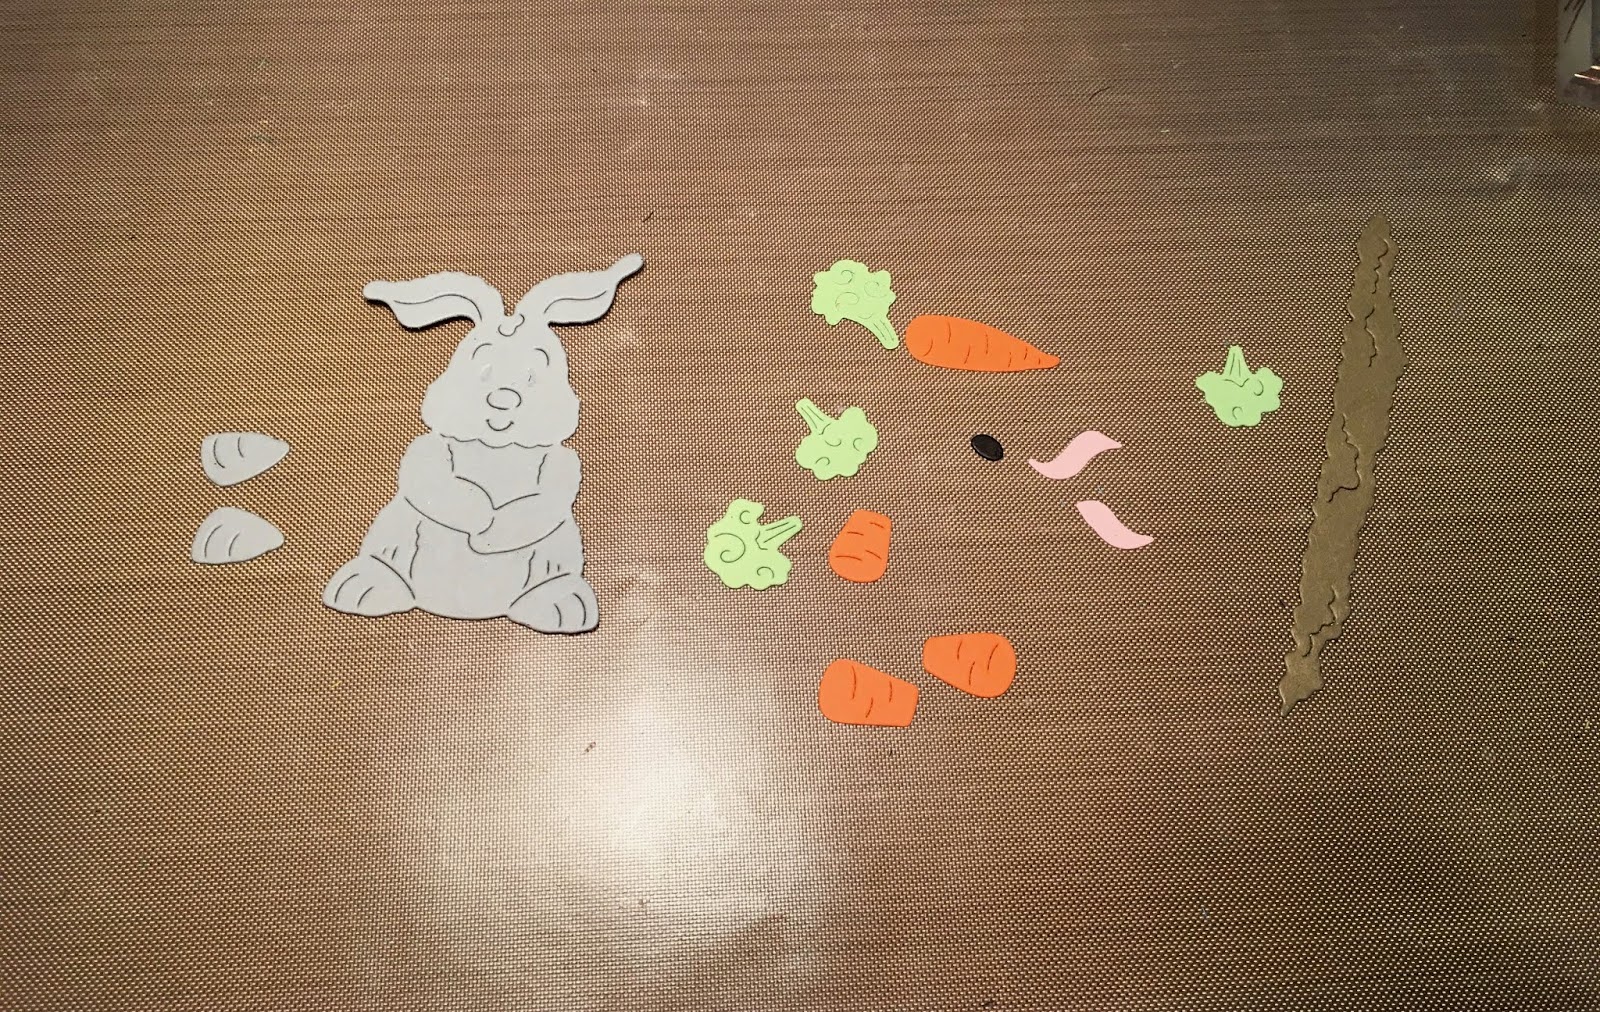
3.  Using the Carrot Patch Bunny die cut out the pieces using green, orange, pink, black, gray, and brown card stock
4.  Cut out the fence and grass using the Spring Grass die and Victorian Fence die
5.  Using TH inks shade the pieces of the bunny and assemble
6.  Glue the fence and grass to the background first then add the garden and the bunny to the scene

7.  For a base use an Orange A2 card.  Glue the white card with the scene onto the card base

CottageCutz Products


I hope you are able to get out and enjoy the beautiful spring weather!  Also make sure to crave out sometime to get crafty!!
Blessings
Pam

Wednesday, March 20, 2019

Birthday Wishes Card

Hello!  This is Sukie and today I'm sharing this sweet birthday card for my guest designer post.  With it being the first day of Spring today, the floral design is perfect to share.  This die is so versatile and can be used for many occasions.
I used the Spring Teacup Bouquet for the focal point of my card.  Once I die cut all of the pieces out of white card stock, I watercolored everything with some Distress Inks. I went with a non-traditional color theme for my flowers.  I used some kraft card stock for the cup.
The background was kept simple with some kraft and watercolor card stock.  The frame was cut from the Stitched Wide Rectangle Frame Set
The flower clusters were assembled inside of the frame and adhered to the base of my card.  The arrangement of flowers was spread out to fill up the inside of my frame.
As a finishing accent, I added a sentiment from the My Craft Spot (retired) Tiny Tags 3 stamp set. The sentiment was attached to the cup handle with a jute bow.
I used these dies on my card, available here:

Sunday, March 17, 2019

Puppy with Easter Eggs


Hi!

It's Anja here. I've bought some new colored sprays this week and had to try them out. This time I used it with the background and to color this adorable Puppy.


For this card I used:
- Cottage Cutz dies (Puppy With Valentine, Chickies w/Egg Plant, Grass, Tree & Vines),
- Distress Inks (Spun Sugar, Worn Lipstick, Barn Door, Fire Brick, Spiced Marmalade, Mustard Seed, Peeled Paint, Vintage Photo, Black Soot),
- white card base (13x13 cm),
- watercolor paper for background (12,5x12,5 cm),
- white card stock for die cuts,
- color sprays (pink, red, orange, brown),
- plastic stencil for background,
- heat gun,
- black pen,
- white pen,
- paper trimmer,
- paper glue.


First I cut and colored the puppy, eggs and grass. I used brown spray for darkers part of the puppy. I used black and white pen for the eyes.


I made background using a stencil and three colors of the spray. I dried the paper with the heat gun.


Then  trimmed the paper to the right size.


When I had everything cut and colored I glued the pieces to the card base.


And that's all from me for today.
Have a nice Sunday,

Anja Z.


Cottage Cutz dies I used for this project:


Saturday, March 16, 2019

Hatching Bunny (new die)

Hello Scrapping Cottage friends! Thanks for taking the time to stop and visit with us today. It's Mary Marsh here bringing you the Saturday edition of the Blog.

We have a new release of 36 Spring dies in the online store. There are a variety of designs so perfect for Easter or Spring card making. Take a look in the store you definitely won't be disappointed.

For my card today I am using the new Hatching Bunny die. He is just too cute peeking out of the cracked egg. I couldn't resist using him on an Easter card. So let's get started with some details on how I created my card. 

Step 1: Having a layout in mind at the card start is always a big boost for me. That way I can just choose the card colors and designer paper and I am good to go. I liked this week's sketch #740 on Splitcoaststampers because of the somewhat simplistic design. I thought the stacked diamond shapes would be perfect as a background for this little bunny.  
I looked through my designer papers to get one that had some soft Spring like colors to it. I settled on this one that I have had since 2012. It had all the colors that I wanted. 
Soft Blue card base: 4 1/4" x 5 1/2"
Designer Paper layer: 4 1/8" x 5 3/8"

For the diamond shapes I used the Stitched Square set (5th largest) die set and cut in Primrose cardstock. For the vanilla layers I used the Square Set (5th largest) die. I sponged background clouds on the top 2 diamonds with tumbled glass distress ink. On the bottom diamond I sponged mowed lawn distress ink. 
The Hatching Bunny and other elements from this die are all cut from cardstock. I used a cocoa shade for the bunny, a medium green for the grass, primrose for the tulip and a soft blue patterned paper for her little bow. 
I decided to stamp a sentiment on the egg as well as the top diamond shape. A "Easter Hello" phrase seemed right for this card. 


Now that all the elements are cut I am ready to start card assembly. 

Step 2: I secured the designer paper to the card base using double sided tape. 
The diamonds are secured with the same medium. 
Started layering my Bunny image from the grass up on the diamond shapes.
 I kept looking at my card and thought it just needs something else. So I decided to add a small sun image on the top panel and scattered some blue sequins around the card. And, that did it for me. Card is complete and so is my post for this week.

I hope I have given you some inspiration and an idea for a way to use this cute new die. Have a great week and I will see you next Saturday.

Dies I used to create card:


Friday, March 15, 2019

Bunny Kisses

Happy Friday Cottage Cutz fans.  It's Jeanne today with a quick, graphic Easter card.  I love cards that I can easily make multiples of and this is one of them.
I started by cutting an A2 card base from green card stock, a white panel 5 3/8 x 4 1/8 inches and a gingham panel 5 1/4 x 4 inches.
I then cut a complete set of bunnies from both blue and pink card stock using the Spring Bunnies Trio die.
Because I only needed one bunny for this card I now have extras I can use to make more of the same card (or design a new one!)
I used the largest blue bunny with pink ears and cut a frame using the middle of the Stitched Wide Circle Frames.
I cut an opening in the gingham panel using the middle of the Stitched Circle dies.  Since I used gingham it was fairly easy to get the circle equidistant from the top and right side by counting the squares.
Then I lightly traced the circle on the white panel so I would know where to place my bunny.
I glued it down, added the pink ears and used a pen to color the eyes and nose. I also erased the pencil line although it really wasn't necessary.
After I added the top panel and the frame, the pencil would not have been seen anyway.
I cut the sentiment from green card stock that matched the base and used a self adhesive sheet on the back.  I find this makes it easier to adhere thin sentiments to my card.
I used foam tape to adhere the assembled panel to the card and added some sequins in a matching purple.

This card is simple to make and with cutting the multiple bunnies at one time you could easily make several cards quickly.

Dies used:
http://www.scrappingcottage.com/cottagecutzbunnykissesandeasterwishes.aspx
http://www.scrappingcottage.com/cottagecutzspringbunniestrio.aspx
http://www.scrappingcottage.com/cottagecutzstitchedwidecircleframesetbasics.aspx
http://www.scrappingcottage.com/cottagecutzstitchedcirclesetbasics.aspx

Thanks for stopping by today.  I hope you have a fun and creative weekend!