Saturday, August 18, 2018

Teapot Snowman

Hello Scrapping Cottage friends! Thanks for taking the time to stop and visit with us today. It's Mary Marsh here bringing you the Saturday edition of the Blog. 

Our new Christmas dies have arrived and are available, and on a 25% sale,  in the online store.  There are 29 new designs in this release and it's only Part 1. The design team has started featuring these new designs and we are hoping to give you lots of ideas for your Christmas cards.

For my card today, I am using the Teapot Snowman die. I am presenting it as a Christmas card, but it could also work for a Christmas thank you note, a winter birthday or as a get well card. So let's get started on some details of how I created my card.

Step 1: This week I started my card with the card colors. I used the colors for the Splitcoaststampers Color Challenge #700 which are sweet sugarplum, mint macaron and chocolate chip. I thought they were perfect colors for this cute little guy peeking out of a teapot.

sweet sugarplum, choc chip, mint macaron
Mint Macaron Card Base: 4 1/4" x 5 1/2"
White Layering Panel: 4 1/8" x 5 3/8"
Mint Macaron Striped Layer: 3 7/8" x 5 1/8"
 
Step 2: Cut the snowman and teapot in the challenge colors. Used a darker green for the holly, the berries, candy cane and heart I used a cherry red.
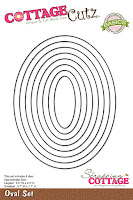
I used the largest nested stitched eyelet oval and the 2nd largest from the oval set die to cut the panels for the image. I used sweet sugarplum although in this photo it looks just a bit darker than the true color. Sometimes our cameras just don't cooperate fully (lol).
Step 3: All the elements are cut and ready for card assembly. I started with the patterned paper panel since I am using ribbon on my card.  The ribbon is also the mint macaron shade.  
Stamped my sentiment in chocolate chip ink. I used my MISTI because it's a clear stamp and sometimes you don't get a good image with one stamping. Today though, one stamping worked fine.
I attached the image to the oval panels using dimensional adhesive. I always like the look when the image is just slightly lifted. It just gives nice dimension to your work.
To complete my card, I decided to add a small bow and I scattered some sweet sugarplum enamel dots.
Well, that's it for me for another week. I hope I have given you an idea for using this die. See you next Saturday.
dies I used to create card:
http://www.scrappingcottage.com/cottagecutzteapotsnowman.aspx
http://www.scrappingcottage.com/cottagecutznestedscallopovalset.aspx
 
http://www.scrappingcottage.com/cottagecutzovalsetbasics.aspx


Friday, August 17, 2018

Penguin Hugs

Happy Friday!  Have you had a chance to look at the new Christmas Dies Part 1?  Aren't they wonderful?  And for a limited time they are 25% off!

It's Jeanne today and my card features the adorable Hugging Penguins from that release.
I started by cutting the penguins from black, white, Cherry Cobbler and Mossy Meadow cardstock.
I used Copic markers to color the beaks and feet, and add dimension and shading to the white of the penguins and the fur trim on their hats.
I assembled the penguins.  In order to get them close enough to "hug" I had to cut off the arm of the guy on the left.  A great thing about this die is that these also stand alone - they don't have to hug or wear winter gear making them very versatile.
When they were close enough I added the scarf.
I cut the word "hugs" from Mossy Meadow and used an adhesive backing sheet.  I really like to do this with word dies.  It makes adhering them so much easier.
I used an A2 card base in Mossy Meadow, cut a white panel 5 3/8 x 4 1/8 inches and embossed that using a cable knit embossing folder.
The plaid and solid panels are cut using the second and third largest dies from the Double Stitched Rectangle Set.
After adhering the phrase I added the penguins using foam tape.  I just love these little guys - they give me the warm fuzzies!

 Dies:
http://www.scrappingcottage.com/cottagecutzhuggingpenguins.aspx

http://www.scrappingcottage.com/cottagecutzdouble-stitchedrectanglesetbasics.aspx

http://www.scrappingcottage.com/cottagecutzexpressionsplushugsphrase.aspx

 Thanks for stopping by today.  I hope you have a relaxing and creative weekend!

Thursday, August 16, 2018

New Christmas Dies!!

Hello Scrapping Cottage Friends!

It is Pam crafting with you today!

It is so hard to believe but Christmas is just around the corner!  And CottageCutz is all ready for it!! This is Christmas part 1 of a 2 part release!  And it is just amazing!  The die I am using today is perfect for making multiple cards.  It is beautiful and makes a gorgeous quick card!  The best thing about all these beautiful dies is that right now they are 25% off but just for a limited time! Don't miss out on this fantastic sale!


Design Steps:
1.  Use an A2  navy blue splattered with white card base.  Cut a piece of music DP just slightly smaller then the A2 front base and glue it to the front of the card
2.  Use the Journey to Bethlehem die and cut it out of gold card stock
3.  Back the gold die cut with a slightly smaller piece of the splattered navy card stock

4.  Place foam on the back of the backed die cut and glue to the front of the card
I have another sample below with a different color scheme! I used red, silver and black on this card!

CottageCutz Products

Thanks so much for stopping by and don't miss out on the fantastic sale going on in our store!
Blessings

Pam


Monday, August 13, 2018

Let It Snow!

Hi, Lois here with some exciting news.  It's time to show off a brand- new CottageCutz Christmas die.  Just arrived in the The Scrapping Cottage store is Part 1 of the new 2018 Christmas dies -- and they're 25% off for a limited time.  The card I made for today uses a cute one called Snowman Lane.


Once again I pulled out my little book of Sketch Challenges from Splitcoaststampers and used Challenge 120, which gave me a nice big panel for my snowman scene..


Last week when I was in Michaels, I saw some packaged card bases and envelopes in various sizes.  I picked up two packages of 5 x 7 cards, one with silver trim and one with black trim.  I chose one from the silver-trimmed package for my card.  Along with the card base, I cut some cardstock and patterned paper as follows:

Silver gray cardstock - 4" x 5 1/2", and three pieces 2" x 4 1/2"
White cardstock - 4" x 5 1/2" (which will be trimmed down to 3 3/4" x 5 1/4"
Striped patterned paper - three pieces 1 7/8" x 4 3/8"


I then die-cut my images from a piece of white cardstock.  Look at all those pieces!


After I colored the various pieces with Copic markers, I constructed my snowmen and their accessories and set them aside.


I used a favorite technique for a snowy sky on the 4" x 5 1/2" piece of white cardstock, which uses masking fluid and a toothbrush.


I placed a strip of washi tape along the bottom of the cardstock because I wanted the bottom to remain white.  After dipping the toothbrush into the masking fluid and tapping it against the bottle to get most of it off, I splattered it onto the cardstock by tapping the toothbrush against my finger.  I repeated the process until I was happy with the result.


After letting the masking fluid dry, I sponged on two shades of distress blue ink (Tumbled Glass and Chipped Sapphire) over the whole area . . .


. . . and then removed the washi tape and brushed off the masking fluid with my finger.  Voila!  A snowy sky!  I trimmed off the edges where the ink was heavy from the sponging.


I then layered the patterned paper onto the gray strips and adhered them to the card base.


I created my little snow scene on the white/snowy panel and stamped a sentiment in the corner.  The street sign wasn't really big enough to write Snowman Lane (the name of the die) on it, so I just wrote Main St. with a white gel pen.  By the way, the die also has a pair of ear muffs, which you could substitute for a hat on one of the snowmen.  There are also some small "snowflakes," which I chose not to use because of the created background.


Here again is my finished card:


The CottageCutz die used on this card is:

http://www.scrappingcottage.com/cottagecutzsnowmanlane.aspx

Be sure to check out all 28 new dies in Part 1 of the CottageCutz Christmas collection for 2018.