Friday, August 04, 2017

Wedding Doves


Good morning!  It’s Jeanne here with my first post as a guest designer on the CottageCutz Blog. I am excited to be a part of the team and share my crafting skills with you.
  
 The card I have for today's post would make a great engagement, wedding, or anniversary card.  For a wedding, it would be fantastic to do in the bride's colors.  The layout for this card came from a sketch challenge on Splitcoast Stampers.
I started with a pink card base of 8 1/2 x 5 1/5, scored at the 4 1/4 inch point and a vanilla layer cut to 4 1/8 x 5 3/8.
Next I cut the doily using the largest die from the Nested Stitched Doily Set.  Since the color of the pink cardstock was close to the vanilla color, I sponged the edges with pink to give some definition.
From vanilla cardstock, I cut two medium flowers, one small flower and one large flower along with a small and medium center from the Plumeria and Leaves die.  I sponged the edges of the flowers in pink and the centers in yellow.  I also added just a touch of pink to the very center of each flower.
When I have very small items to glue, I usually place a large drop of glue on a craft mat and use a toothpick to put the glue on my piece.  The toothpick also helps me to place the item where I want it on the card.
I cut the birds from vanilla cardstock and their perch and the word "love" from a matte silver cardstock. The birds were edged in a light grey ink and their beaks colored in the same yellow I used for the flower centers.  I used a Multi-liner to dot their eyes.
The last step was to put it all together.  The doily, birds, and one medium flower are glued to the vanilla layer.  I used a foam dot to place the small flower on top of the medium flower.  The larger flower was created in the same way and adhered to the card using two layers of foam dots.  I added the word "love" and some pearls to finish it off.
That’s my card for this week. I hope I have given you some inspiration on ways to use the new wedding dies. See you next Friday.
Products used:
http://www.scrappingcottage.com/cottagecutzpairofdoves.aspx

http://www.scrappingcottage.com/cottagecutzlivelaughlove.aspx

http://www.scrappingcottage.com/cottagecutznestedstitcheddoilyset.aspx

http://www.scrappingcottage.com/cottagecutzplumeriaandleaves4x4pre-order.aspx

There is another great release of new dies over in the online store. The Nested Shapes with 17 designs as well as a Wedding Release with 20 designs. Janet (our video artist) has put together a video showcasing all the new nested shapes dies. Just click on the photo below to be taken to the CottageCutz YouTube channel.
https://www.youtube.com/watch?v=2LOQcFflcIE&feature=youtu.be


Thursday, August 03, 2017

Roses!

Good Morning Cottage Cutz Friends!

It is Pam sharing with you today.  I am playing with the new release Rose with Wedding Ring die and giving you options to make your dies more versatile.  The card I made for you today can be a wedding card, birthday card, thinking of you and many others.  Who wouldn't love a beautiful bouquet on their card!


1.  Start with an A2 Vanilla card base cut a light pink piece of card stock to 5 1/4 x 4 and a piece of dark pink card stock 5 x 3 3/4
2.  Run the dark pink through an embossing folder and then glue the layers to the front of the card and set aside
 3.  Using a mint green card stock and the Cottage Cutz Roses with Wedding Ring die cut out 6 stems.  Then cut out 5 dark pink roses and 5 light pink roses.  Using your copic markers shade the flowers.  Using the largest of the Cottage Cutz Nested Stitched Eyelet Rectangle Set cut out a vanilla rectangle

 4.  Begin the arrangement in the center of the retangle and work from there.  I cut a lot of the leaves off and rearranged them in the bouquet.  Use a glue dot to attach your bow mount the rectangle to the dark pink on the front of your card


Cottage Cutz Products


There is another great release of new dies over in the online store. The Nested Shapes with 17 designs as well as a Wedding Release with 20 designs. Janet (our video artist) has put together a video showcasing all the new nested shapes dies. Just click on the photo below to be taken to the CottageCutz YouTube channel.
https://youtu.be/2LOQcFflcIE

I hope you will visit our shop!  We have a great selection of beautiful dies!

Thanks for stopping by!
Blessings


Pam

Monday, July 31, 2017

A Love Story

Hi, Lois here today with a card using some of the new CottageCutz dies.  As you may know, there is another great release of new dies over in the online store. The Nested Shapes with 17 designs as well as a Wedding Release with 20 designs. Janet (CottageCutz's video artist) has put together a video showcasing all the new nested shapes dies. Just click on the photo below to be taken to the CottageCutz YouTube channel.

https://www.youtube.com/watch?v=2LOQcFflcIE&feature=youtu.be


I'm showing off several of the new wedding dies  today.  I saw a fold-out card on Pinterest a couple of weeks ago that I thought I could create -- depicting a little love story.  The card I saw on Pinterest was a birthday card; mine is a wedding card, using the following CottageCutz dies:
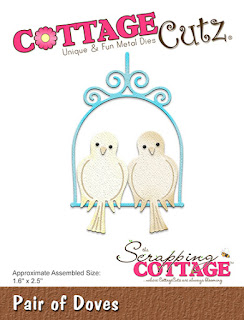
Pair of Doves
Wedding Chapel
Garden Bride and Groom
Mr and Mrs with Hearts
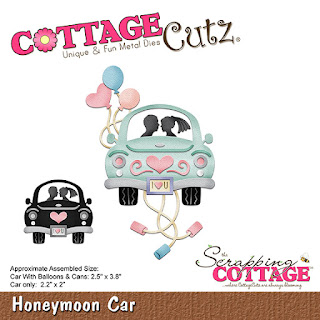
Honeymoon Car


There are many panels of cardstock on my card:

White - 5 1/2" x 11 1/2", 2 3/4" x 4 1/4", 3 3/4" x 5", 3" x 4 1/2" (2), 2 1/4" x 3 3/4" (2)
Blue - 4" x 5 1/4", 3 1/4" x 4 3/4" (2), 2 1/2" x 4" (2)
Patterned Paper - 3 5/8" x 2 1/4", 2 7/8" x 1 1/2" (2), 2 1/8" x 1 1/4" (2)


Cut the various die-cut pieces from white, blue, gray, pink, and black cardstock, as shown.


Score the 5 1/2" x 11 1/2" piece of white cardstock at 1/4", 3 3/4", and 7 1/4".


Rotate the cardstock  and, with the 1/4" scored side at the top, place it at the 5/8" mark of your paper cutter and cut down to the last score line.  Cut out the 5/8" section, as shown.


Place a strip of 1/8" Scor-tape on one side of the 2 3/4" x 4 1/4" piece of white cardstock and adhere to the 1/4" section.  Trim the excess 1/4" strip at the top, as shown.


Adhere the various pieces of patterned paper to the remaining white panels and run a piece of narrow blue ribbon around the top of the patterned paper, adhering at the back.  Add some color to the die cuts using Copic markers to give some dimension and construct the die-cuts on the white panels. (As I was constructing the chapel, I decided that I needed a couple of yellow pieces for the windows.)  Then adhere the white panels to the blue panels.


Stamp the small sentiments to several of the panels and adhere to the card base.  Add some pearls throughout.


CottageCutz dies  used on my card are:

http://www.scrappingcottage.com/cottagecutzpairofdoves.aspx

http://www.scrappingcottage.com/cottagecutzweddingchapel.aspx

http://www.scrappingcottage.com/cottagecutzgardenbrideandgroomelites.aspx

http://www.scrappingcottage.com/cottagecutzmrandmrswithhearts.aspx

http://www.scrappingcottage.com/cottagecutzhoneymooncar.aspx


Sunday, July 30, 2017

Sleeping Bear

Hi!

It's Anja here. Today I was inspired by violet. It's not one of my favourite colors, but I wanted to use something vibrant and Distress Oxide Wilted Violet seemed a perfect choice. I made a baby card with a cute bear sleeping in a basket.


I used:
- Cottage Cutz dies (Sweet Spring Kitty, Bear On Cloud and Moon, Cute Phrase),
- Distress Oxides (Wilted Violet, Worn Lipstick, Peeled Paint, Vintage Photo),
- white card base (15x15 cm),
- watercolor paper (14x14 cm),
- colored and white paper for die cuts,
- little white enamel dots,
- Versafine Onyx Black ink,
- alphabet stamps,
- paper glue.

First I made the background. I tapped the ink on my non-stick craft sheet and sprayed it with water. Then I just put the water colored paper on top and rotated it around. I dried it whit my heat gun.


I die cut all the paper pieces from colored and white paper. I colored the edges with Distress Oxides.


I put some dimension to my flowers and leaves. 


And then I just glued all the pieces together. I decorated the flowers with little enamel dots and stamped the rest of the sentiment.


And this is my finished card.


See you next Sunday when I will be here again using new wedding and nested dies. You can get a sneak peak at all the beautiful new dies in Janet's video below. The new dies are already in the store.


Thank you for stopping by. Have a fun Sunday.
Anja Z.