Monday, September 28, 2015

Get your Witchi on

Hi all! Vladka here today!

Fall is here and also Halloween will be here soon. You can find a lot of inspiration here on CottageCutz blog and I have one for you today too. 
I used this Witch on Broom. She is on her way to cool witch party. I made this background with watercolor paper and different Distress Inks. I started with Peacock Feather, put it on my craft sheet, added some water and put paper on, to get some splodges. then I dried it with heat gun and used another Distress Ink, this time Chipped Sapphire and repeat the whole step. The last Distress Ink which I used was Black Soot. After everything was dry I used also white tempera and brush to made some paint splatters which look like stars
The moon is made the same way as background, but this time I used just Weathered Wood Distress Ink and after that cut the moon out with circle die. The Witch is cut out of black cardstock and sentiment was created in Word and printed on paus paper. Yellow stars and clouds are cut out with Baby Sleeping on Moon die. This is my card for today. Have fun.
And be sure to leave a comment on all of our post from 9/8/15- 9/23/15 on the CottageCutz BLOG as we are doing a GIVEAWAY to 1 lucky person! You can WIN 2 of the NEW Halloween dies. Here you can find more.

Card Supplies I used:
CottageCutz dies: Witch on Broom 
Card stock: watercolor and black
Distress InkPeacock Feather, Chipped Sapphire, Black Soot, Weathered Wood
Other: circle die,  scissors, paper trimmer, scor-buddy, glue tape, paus paper, printer

Saturday, September 26, 2015

Butterfly Themed Pocket Letter Featuring CottageCutz Dies

Hello everyone.  Today it's Carol with a project share featuring tons of CottageCutz dies.  Pocket Letters are a wonderful way to use your CottageCutz dies.  They fit perfectly in or on the pockets of these plastic sleeves.
 The middle pocket uses CottageCutz Ornate Fence.  Pocket #3 is CottageCutz Flowerpot Mini, and Flower Mini.  I used some Butterfly Embellishments.
For the center of the pocket letter, Pocket #4 has CottageCutz Daisy Showers.  The Center Pocket is a shaker and it features the CottageCutz Springtime Window.    Pocket #6 features CottageCutz Flower Bouquet Jar.

 This is a tag created to dangle on the Pocket Letter.  It's a blackboard tag that comes from Michael's.  A Cricut alphabet cartridge was used to create the name.  The CottageCutz Victorian Frames was used to decorate the tag.  The butterfly is CottageCutz Garden Delight.  As you can see, CottageCutz dies are absolutely perfect for creating Pocket Letters.

Thank you so much for stopping by to check out this Pocket Letter.   Until next time, Happy Crafting.  See you soon!

Wednesday, September 23, 2015

Happy Halloween card

Hi there,
welcome to CottageCutz Blog with new CottageCutz project on from me (Olena).


Today I am sharing with you my new Happy Halloween card
 I created with boooooeautiful NEW CottageCutz Halloween Release.

The finished card measures 4" x 5 1/2" (10.5 cm x 14 cm.).
To make card, start by cutting black card stock 5 1/2" x 8 1/2", score at 4 1/4" and fold crease to make card base.
Next, cut orange and cream card stock in different sizes. Using embossing folder embossed orange piece. After all, glue cream and embossed orange piece together. Decorate panel with orange ribbon and button (how show on picture) and glue to black card base.


The next step is Halloween vine panel. Start by cutting orange card stock using the Halloween Vine die. Glued vine to black panel and cream base. Decorate vine with Stella brush clear glitter. Putting Vine panel to card and add sentiment. 

 ***********************************************************
Be sure to stop by the CottageCutz BLOG as we are doing a GIVEAWAY to 1 lucky person! You can WIN 2 of the NEW Halloween dies!! Whooohooo, super fun!!
Here is a LINK to the CottageCutz Blog! Have fun and Good Luck to all!


_________________________________________
Card Supplies:
CottageCutz dies: Halloween Vine
Card stock: black, yellow and cream
Inks: white and orange
Stamps: Happy Halloween  sentiment
Other: Wink of Stella Brush clear glitter, scissors, paper trimmer, scor-buddy, craft glue, pierce tool, ribbon, button, Dew Drops and embossing folder.
_________________________________________

Thanks for visiting, I hope your day is wonderful! 
Olena


Monday, September 21, 2015

Halloween Mini Page 2/Giveaway

Hello everyone, and Happy Monday to all!
Today I wanted to share a page from the Halloween Mini Album I have created using CottageCutz darling Halloween Collection of dies :)

For this 1 page I used 4 of the CottageCutz Halloween Dies from the NEW Release.
CottageCutz Graveyard Border,CottageCutz Witch on Broom , CottageCutz Witch With Lantern , and CottageCutz Halloween Night Scene. All cut using Black Card stock, super EASY! Love how this page turned out. I just added some gingham ribbons, and a tag to complete my page.
These are the CottageCutz dies used for this page :)

Thank you for looking and have a lovely day!!!
 
Don't forget to leave a comment to be entered to WIN 2 Free CottageCutz Halloween Dies!!
Good luck to all!
hugs,
Cheryl

Saturday, September 19, 2015

CottageCutz Witch With Lantern Halloween Card

 
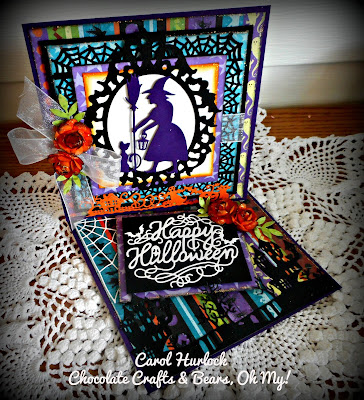
 Fall is in the air.  Can you feel it where you are?  Hello everyone it's Carol.  Welcome to another CottageCutz creation.  Today the featured dies are from the Halloween release.  For this card the Witch w/Lantern, Haunted House w/Bridge, Happy Halloween w/Bats, and Spooky Border were used.  This card is called a "Twisted Easel Card". 
The colors in this Halloween Paper are really fabulous are papers from an older K& Company pad.  The black paper makes all the colors really pop.
Along with CottageCutz dies the following were used to create this card:
K&Company Paper
Sizzix Ornate Frame
Martha Stewart Spider Web Punch Around the Page
Martha Stewart Frond Punch for leaves with the roses
Marvy Flower punch to create the roses
Distress Inks:  Black and Spiced Marmalade
Diamond Stickles
Ribbon
 Thank you so much for stopping by today.  It's really appreciated. Until next time, Happy Crafting.
See you soon.

Be sure to stop by the CottageCutz BLOG as we are doing a GIVEAWAY to 1 lucky person! You can WIN 2 of the NEW Halloween dies!! Whooohooo, super fun!!

Here is a LINK to the CottageCutz Blog! Have fun and Good Luck to all!

For this project the following dies were used:


Friday, September 18, 2015

Card for a Friend/giveaway

Hi all. Vladka here!
Hello CottageCutz Fans!!
Be sure to join us for our Giveaway, as all Commenters will be entered to WIN the 2 Halloween CottageCutz dies below!! Have fun and good luck to all!

Today I have gentle white-green card for you, easy to make. My card base is cut out with die and background is made with impression plate. But you can use 4 by 5 3/4 inch white card base and cut out one more peace of cardstock a little smaller as card base and embossed it with embossing plate if you want.
Butterfly Flourish Vine is colored with Peeled Paint Distress Ink and Fancy Victorian Frame is cut out four times and glued on top of each other. I did the coloring and the frame the same way as with die cuts here in this post of mine, where I created birthday wreath. Butterfly is cut out one more time and glued on top of Butterfly Flourish Vine. I also did some stamping in corners and the sentiment of course. This is it for today!
Card Supplies I used:
Card stock: white
Distress Ink: Peeled Paint Distress
Stamps: greenery in the corners and the sentiment,
Other: die for card base and impression plate,  scissors, paper trimmer, scor-buddy, glue tape

Sunday, September 13, 2015

Happy Halloween card

Hi there and welcome to CottageCutz Blog with 
new CottageCutz project on.

Today I am sharing with you my new Happy Halloween card I created with 
boooooeautiful 
NEW CottageCutz Halloween Release.


Very easy card to make.  
The finished card measures 4" x 5 1/2" (10.5 cm x 14 cm.).
To make card, start by cutting black card stock 5 1/2" x 8 1/2", score at 4 1/4" and fold crease to make card base. Next, cut violet, yellow card stock in different sizes. Cut patterned paper and ink edges with green craft ink. Pierces the holes on edges and draw the line from one hole to another imitated sewing line. Cut yellow ribbon and added to glued together patterned and yellow piece card stock. Then, All pieces of card stock glue together on black card base.
  

The next step, cut tag topper. Using black card stock and "Halloween Tag Topper" die made tag topper piece. Next, using original and scalloped circle dies cutting to made base for cut topper with yellow and violet card stock pieces. All pieces glue together.


To finish card, glued violet ribbon under topper circle and added to card using foam tape. Decorate card with Dew Drops, yellow string and yellow rhinestone.


Be sure to stop by the CottageCutz BLOG as we are doing a GIVEAWAY to 1 lucky person! You can WIN 2 of the NEW Halloween dies!! Whooohooo, super fun!!

Here is a LINK to the CottageCutz Blog! Have fun and Good Luck to all!

Card Supplies:
CottageCutz dies: Halloween Tag Topper.
Card stock: black, yellow, violet.
Inks: green
Stamps: -
Other: ribbons, white gel pen, yellow string, scissors, paper trimmer, scor-buddy, craft glue, pierce tool, Dew Drops and self adhesive yellow rhinestones


Saturday, September 12, 2015

CottageCutz Happy Halloween!

Hello CottageCutz Fans!!
Be sure to join us for our Giveaway, as all Commenters will be entered to WIN the 2 Halloween CottageCutz dies below!! Have fun and good luck to all!

Today's card was designed for SplitCoastStampers Sketch Challenge. On my card for today, I used the Super cute NEW CottageCutz Halloween Release. I kept it pretty simple, YEP this is simple for me, as many of you know I love lots of layers normally...hehehehe


Halloween Vine
Happy Halloween w/Bat
Haunted Mill
Witch on Broom

For the Happy Halloween I used some Glitter to change the black card stock, and have it pop a little. On the Witch I used some CIP in the color of Coal. I left the Haunted Mill and Halloween Vine just plain black. The Design Paper is from American Crafts Haunted Hollow Collection.

To embellish I used some Really Reasonable Ribbon in Green Gingham, and a button with some jute. Also used an old MS punch for the border layer.
Supplies Used
CottageCutz Halloween Dies
Sticker, Glitter, RRR Ribbon, Button, Jute,
Punch, AC Card stock and design Paper


Thank you for looking and have a wonderful weekend!
Hugs to all!