Friday, August 26, 2011

Boo!

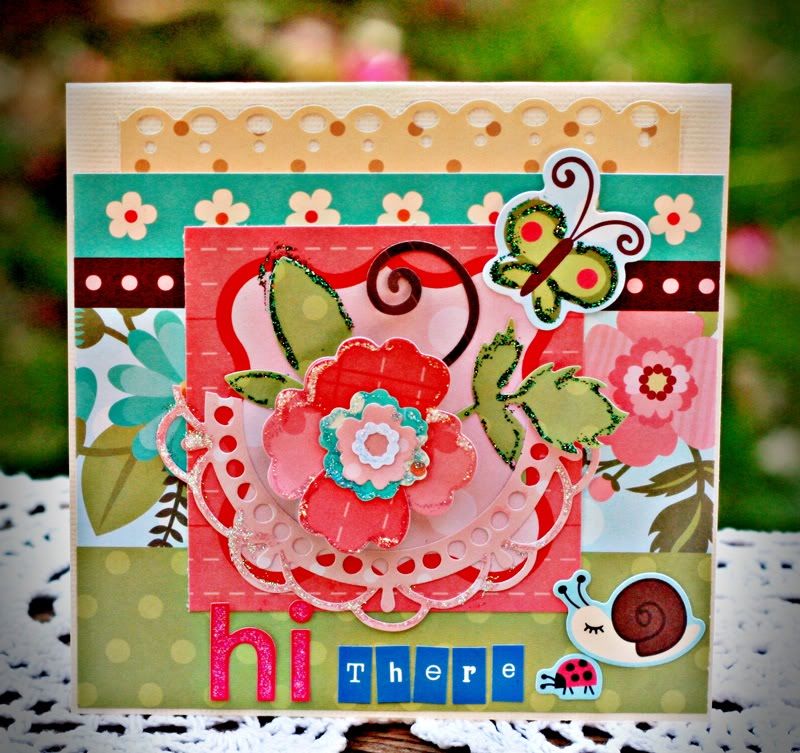
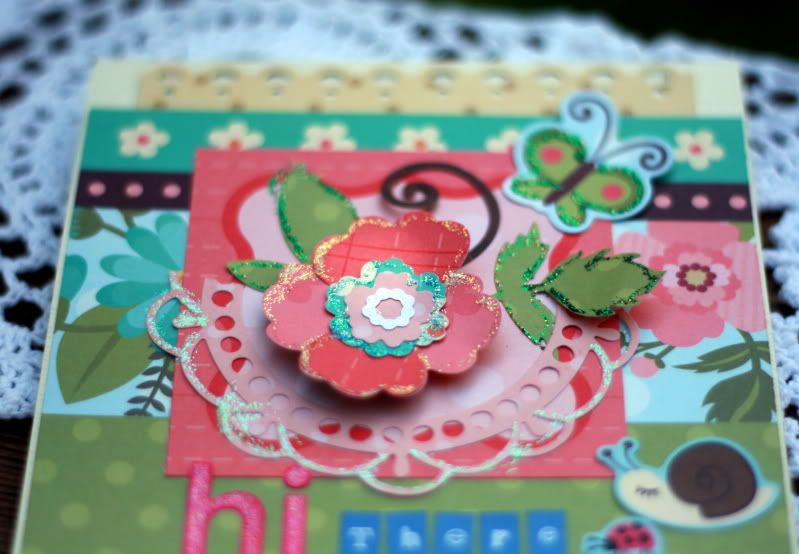
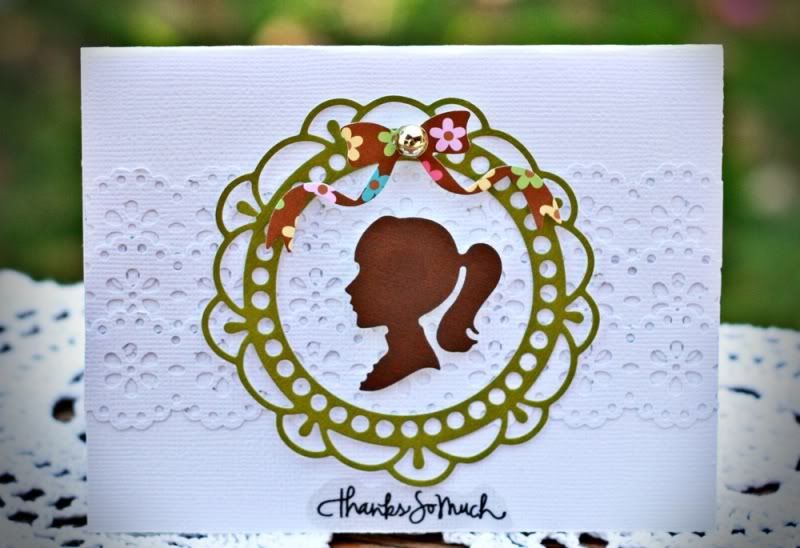
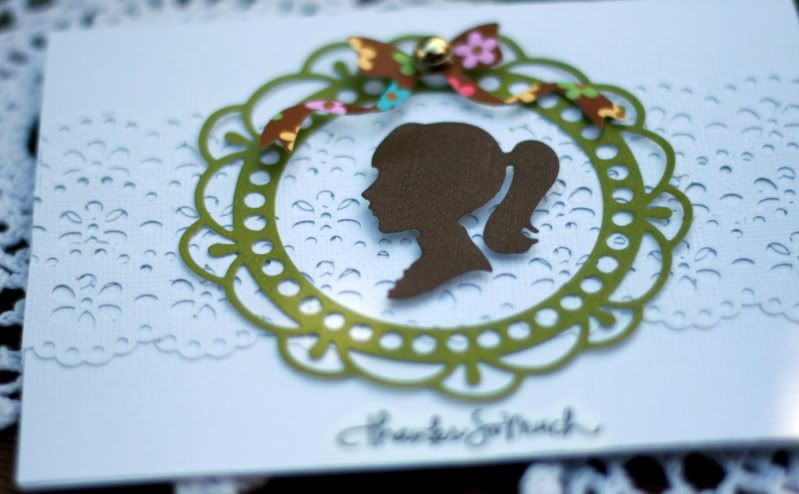
Good Morning!  Is anyone else glad it's Friday?  Whew!  What a week!!!!!  I am so ready for the cool weather of Autumn,, and my favorite holiday, which is Halloween, so I've been breaking out the Halloween papers and crafting away.  Did you know that there's a new Halloween release out at The Scrapping Cottage?  There are some wonderful new designs for 2011, and we've got some fabulous dies from last year to play with, as well.  That's what I've been playing with, and I've combined several dies from several of the releases this year for this card.  

 In creating this card, I used the following Cottage Cutz dies:  Knickety knack Cat 3x3, Ghost and Bat 3x3 (both designed by Peachy Keen Stamps, and include stamps), Airplane with Banner & Sign (designed by My Little Shoebox), and Circle With Eyelets.  I added some sparkle to this design with the glittery paper, and I shadowed/shaded the cat and moon with a little sponging.  To give the cat a little more dimension, I cut two cats, one in black, and one in light gray and glued them together, offsetting the gray just a little bit.  This gives an awesome shadow effect, and was a technique that was shared on this blog, by my fellow designer Erika in this post a few days ago.  The sentiment was stamped with the "Boo" stamp, which is included in the Ghosts & Bat die/stamp set.

I'm so glad you could spend some time here today!  I wish you a very happy Friday, and a blessed and beautiful weekend!


Oh, I almost forgot!!!!  I wanted to remind you about our latest challenge here at The Scrapping Cottage Blog.  Angelica is our hostess this month, and she's got an awesome sketch challenge posted for you to play along with.  Just click on the blinkie in the top left sidebar of this blog, and it will take you directly to the challenge.  There's a $25.00 gift certificate to The Scrapping Cottage up for grabs to one lucky player, so what are you waiting for?  Let's see what crafty goodness you've got up your sleeve!!!


Thursday, August 25, 2011

Pack Your Bags!


While I'm afraid the only travel plans in my near future is a trip to Charlotte....I still thought it would be fun to make a travel-themed card with a pocket built in, to hide away tickets for a special get-away.

I used the Scooter and Tug Boat die set from CottageCutz- and I must say, they are stinkin' cute! The papers are from Best Creation - Travel Forever. I also got to play with the new Shape Studio Tool Square 25 from Epiphany Crafts, to make my custom epoxies.


Don't you think that this would make a fun way to surprise someone with a couple of tickets to someplace wonderful?

hugs,

Gini

Wednesday, August 24, 2011

Water For Elephants Goes Layout


When I first looked at the Popcorn/ Cotton Candy Die all I could see the cotton candy as was a banner.  I thought how cute that would be.  So I started making the banner and realized this is going to be to big for a card...gonna have to make a layout with it. Once I got into it I also realized how influenced I was being by the current book I'm reading " Water For Elephants".  I have to tell you I'm really enjoying this book and can't wait to see the DVD next month.  It's about a circus during the depression...so I think you can see the retro circus feel.


Once I had settled on a theme and really started putting everything together it just flowed.  The Graphic 45 circus paper along with a vintage photo of a turn of the century circus troop...it was all just perfect. 


I used the Ticket Booth flourishes for corner flourishes on the green cardstock and also the scallop is from the Ticket Booth. I always think it's fun to look at the dies and see what all you and create beside the obvious.  I  enjoyed doing this layout just for fun...it wasn't a family picture, or anything important to document...it was just FUN!!!

Hugs,


Tuesday, August 23, 2011

Sweet Thank You

Good Morning everyone! Angelica here, hanging onto the last bit of summer. For today's project, I wanted to create something using the new My Little Shoebox collection from The Scrapping Cottage. These designs are a little whimsy, but still feminine enough to create a soft and delicate "thank you" note.

 I pieced almost every element from the Laundry Line die and the Pink Peony Flower die using "Good Day Sunshine" by My Mind's Eye. I inked everything with just one color of Distress Ink - Antique Linen. I thought it really gave it the vintage country look I was going for. (Seems like I'm always going for vintage country these days!) The sentiment is from "Thankful Hearts" (Verve Stamps).

Here's a photo to show you the dimension you can create with the MLS Peony die. It's gorgeous and really simple to put together. I doodled a bit on the flower and leaves with a white Gelly Roll pen.

Don't you just love that dress? SUCH cute designs in this collection!
QUICK TIPS:
  • I use Zig Two-Way glue for all my Cottage Cutz piecing. It dries clear and quickly. It won't leave an icky residue, either. 
  • I always run one 4x4" sheet of white cardstock on my new dies first. Not only will you then be able to see where each element will cut after mounting the foam, but you'll have extra pieces in case you want to ink any element a solid a color. I always, always cut extra. :)
That's it for today! I hope you enjoyed it and left feeling inspired. Have you played along in the Cottage Cutz August challenge yet? I created a simple sketch and we'd love to see what you come up with! Up for grabs is a $25 Gift Certificate to The Scrapping Cottage.

Have a beautiful day! ~ Angelica

Monday, August 22, 2011

Carousel Birthday Wishes

Hello everyone and Happy Monday to all! 
Today I used the Beautiful Carousel Horse (4x6) Cottage Cutz for my card :) This is from the Carnival Release !


I LOVE this darling Carousel horse, and thought using a cream card stock would be perfect for my card. I then airbrushed all the pieces with different copics listed here:
RV02,RV04,BV00, V09,V06 I added some pearls to the stand, and to the horse.
I used tacky glue to glue all my pieces together, this was super easy to do, and then set it aside to dry while we had dinner :) hehehehe
for the eye on the horse I used Viva Black Pearl Pen.

When I saw this design paper that is how I got my inspiration for my Carousel horse.  I thought adding a little pink would be a nice pop for the shades of purple I used.
Next I added my favorite sewing stitch. And lastly a little bow with flower!

Thank you for looking and have a wonderful week!!
Hugs,
Cheryl


Sunday, August 21, 2011

Happy Sunday ! - Hi, There!


Hello again , from Sunny Singapore ! 

I must share that tools in my papercrafting are such  gamechangers for me! 
I'm NOW having even more fun than before with my Cuttlebug , 
diecutting with our latest , adorable releases.
No project now feels complete unless I add even one little tiny Cottage Cutz diecut ! 
It's that gamechanging for me ! 


For my first card here , I wanted to try out the coordinating Orchid die 
And loving  frames at the moment , I couldn't resist adding half a circle ornate frame 
to "contain" my piecing . ;)  I also glitzed up the Orchid Flower with some Stickles ! 
A little bling is never wrong , huh ?! I also used foam pads to pop up the design as and where I wanted more dimension. 

No matter your cardmaking style , whether it be on the simpler side or otherwise , 
the use of diecuts to me simply gives you a unique finishing  no matter how many times 
you use the same design ! 


For this Thank you card , I have combined the girl silhouette and ribbon diecuts from the Cameo and Oval Frame die  with the ornate circle frame  for a more balanced design with this card orientation. 


I wouldn't say that clean and simple is my go to style usually with cards, 
but it was easy to be inspired to try  to this clean , graphic look for 
a change here ! ;) 

So, don't allow your Cottage Cutz dies to be in cold storage .
Keep them always in sight on your crafting table and the more you use them ,
the more your creative mind 
will find ways to get more out of them ! ;) 


Saturday, August 20, 2011

Tou are invited

 You are invited this week for a party!. This weeks card is an invitation for a kids birthdat party. I used the Clown Game die from Cottage Cutz on the cover of the card. This die has the clown water game. The die can also be used without the balloon part of the die.
 On the inside of the card I created a box with an acetate window. I than filled the box with balloons. I trimmed the box with Balloons using the mini balloon dies from the birthday collection by Cottage Cutz, along with a lot of dots for confetti.
 This is a photo of the boxed open. The box was 2" x 3 3/4" x 1/2" with a a wacky random cut hole cut for the window.
 This view shows you how you need to add a spine to the card, in this case 1/2" . The card will be shaped like a book.
 I also used the clown die without the balloon top, lip hole and base from the die. This way you can use the die for a clown head only.  I added to a 2 1/2" scallop square and strapped to a 12" candy tube filled will Jelly Belly beans. You could have also filled the card box with jelly Belly bean. . not using the balloons.

All you need to do to attach the clown is add a strap on the back to bridge the tube. You than just slide it on. The tube was 1/2" round.  .so I made the bridge slightly smaller so it would fit snug and not slide off.


Its a cute way to sent a gift with an invite. When sending an invite. . add something that is related to the event inside the card.. . . The kids will love it. . . OK. . .  start blowing those balloons up.

Thanks Barry

Friday, August 19, 2011

A Taste of Halloween


With the pre-order release of the new CottageCutz Halloween dies it got me ready to make Halloween cards again :) So I decided to give you a taste of Halloween today with the MLS Spooky Treats die.

Here is my first Halloween card for this year
I used this Stardust Gelly Roll pen to detail the Raven and the other diecuts. I love how this looks on black. I've shown below how you can write with it and smear it if you want the sparkle to spread. I also used some pinking shears to make my little zig zag trim.
With school starting it seems as though Halloween is just around the corner so get your Halloween dies ordered for all your spooky projects.
Have a great Friday!
Kay

Wednesday, August 17, 2011

It's a Party!!!

I love the carnival. So many wonderful memories growing up and now we are making new memories with our children. Hi everyone, Erika Taylor here today to share with you a sweet birthday card using the Boardwalk Carnival Silhouette die. For this card I decided to create a shadow by cutting the first die in black, then the second with a polka dot patterned paper. Offsetting them slightly, to create the shadow effect. Isn't that cute??? These little dies are truly a joy to work with and so easy to use.

So lets take a look at my little birthday card inspired by the carnival. Hope you like it


Try your hand at creating shadows by doubling up your die cuts from Cottage Cutz. It really adds a dimension and is perfect for every occasion. Thanks so much for stopping by today. Make sure you leave a comment and let me know what you think. Until next time

Toodles
Erika Taylor


Fishing You Were Here

Good morning friends!


Today I have made a card featuring the Cottage Cutz Ring Toss and Fish Bowl die.  This die is from the Carnival Release.  Everything was cut from white cardstock and colored with Copics.  The fish with sentiment was cut from the Boys Will Be Boys cartridge.  The sentiment is from K. Andrew Designs Art Stamps, Splash-tastic Summer.

I also wanted to mention the Halloween Release pre-order is in the store.  I know a lot of you have been waiting anxiously for this release, and let me just say, "It is well WORTH the wait!!!"  I am so excited!  I want them all!!  Have a GREAT day and thanks for looking!

Hugs and smiles,
Janice

Tuesday, August 16, 2011

Happy Birthday Clown

Good morning!!  Lorie here today, and I have a fun card to share with you.  With all the fairs, festivals, and fun things going on as Summer winds down, it couldn't be a more perfect time for this carnival release.  For my card today, I used the Clown Game die from the carnival release, as well as the Ornate Circle Frame from the My Little Shoebox release.
All of the pieces for this creation were cut with colored card stock, and shaded by sponging using the same tone ink as card stock.  I did add some highlight to some of the pieces by sponging with white craft ink, and I added more stark highlights with a white gel pen.
When creating this card, I followed Angelica's new challenge for The Scrapping Cottage Blog.  You can find all the details in her post, here.  I sure hope you can play along, Angelica comes up with some of the best sketches I've ever worked with, and I DO so love sketches!!  You have a full month to come up with a card, layout, or project using the sketch below, and there will be a random winner of a $25 gift certificate to The Scrapping Cottage drawn from all the entries. 


Wishing you a blessed day and lots of happy crafting!