Friday, November 23, 2018

Christmas Cookies!

Happy Black Friday Cottage Cutz fans!  It's Jeanne sharing today.  I hope you all had a wonderful Thanksgiving. Now it's time to get ready for Christmas.  The Scrapping Cottage has a Black Friday sale going on right now with great deals.  You'll want to shop early for the best selection!

Now on to today's post.  Even after my Thanksgiving cooking/baking I'm still in the mood for more.  It must be that time of year.  So I made a card featuring the Handmade Cookies dies.
To start I cut all the pieces from Kraft card stock and white glossy card stock.  I used glossy stock to simulate white icing.
Then I used Multi Medium Matte to glue the icing to the cookies.
I used the largest Double Stitched Rectangle die to cut a white rectangle and adhered that to a piece of red card stock.
I have a guide that allows me to cut a mat in various sizes larger than a rectangle or square panel (I'm afraid I have forgotten what it is called).  In this case I cut the red 1/16th inch larger than the stitched panel.  I then mounted that to an A2 size piece of patterned paper mounted to an A2 card base.
I placed the cookies on the card but did not glue them down.  I used this to position my sentiment and used my stamping platform to stamp it in red.
I glued most of the cookies to the card base, but used foam dots to pop up the tree and the angel.
Finally I added a few sequins for sparkle.  This card goes together quickly and would be perfect to make for multiple cards.

Dies:
http://www.scrappingcottage.com/cottagecutzhandmadecookies1.aspx
http://www.scrappingcottage.com/cottagecutzhandmadecookies2.aspx
http://www.scrappingcottage.com/cottagecutzdouble-stitchedrectanglesetbasics.aspx
Thanks for stopping by today!  I hope you have a fun and creative weekend.  And don't forget to check out the Black Friday sale at the Scrapping Cottage!


Thursday, November 22, 2018

Ice Skates and Mittens

Good Morning Scrapping Cottage Friends!

HAPPY THANKSGIVING TO EVERYONE!  I HOPE YOU ALL HAVE A WONDERFUL DAY WITH FRIENDS AND FAMILY.  DON'T FORGET TO COUNT YOUR BLESSINGS!

It is Pam crafting with you today!

Guess what???  We have already started our Black Friday Sale!  So hop on over to our store and check out the fantastic savings!  Don't forget to shop early for the best selections on our fabulous products.

Now onto today's card.  I have used one of our new dies called Ice Skates and Mittens.
Design Steps:

 1.  Use an A2 Kraft card stock base, cut a slightly smaller piece of red card stock, cut a piece of checked DP 4 x 5 1/4 and then using the largest Double Stitched Rectangle die cut a piece of Snowflake DP

2.  Glue the red and black checked paper to the kraft card base
3.  Pop the Double Stitched Rectangle to the card front and set aside
4.  Cut out all of the pieces in white using the Ice Skate and Mittens die
5.  Color the pieces with your favorite markers.  I used my Copics
 6.  After you have colored the mittens assemble them
7.  Pop dot the mittens to the front of the card as shown


 8.  Use TH Distress ink to add some shading to the skates
 9.  Use your markers to color in the soles and heels of the skates
10.  Use darning thread to lace up the skates.  Add Stickles to the blades for some sparkle.  Pop dot the skates to the front of the card as shown and then add the sentiment and glittering snowflakes
CottageCutz Products


Our Black Friday Sale is going on now!!! Please stop by now for the best selections!

Blessings

Pam


Wednesday, November 21, 2018

Baked with Love Layout

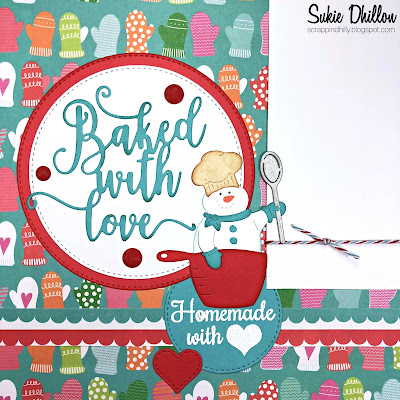
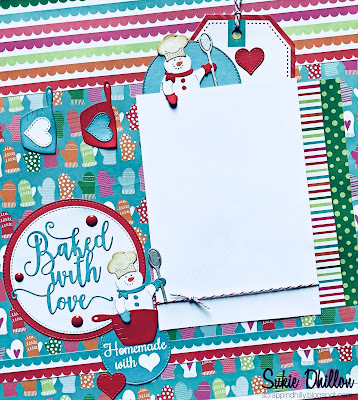
Hello!  This is Sukie to share a layout page for my guest designer post.  When I saw the adorable Measuring Cup Snowman die, I was immediately inspired to create a layout page to memorialize our holiday goodie baking event.
I found the perfect papers in my stash with the oven mitt background. The rich colors are so beautiful.  I cut out a few of the measuring cups and an additional snowman for extra embellishments on my page.  All of the die cuts were inked on the edges for a bit of dimension.
The Stitched Circle Set was used for the different sized die cut circles. The hearts are from the Stitched Heart Set.
I tucked in a journaling tag behind the photo mat accented with a die cut heart.  The sweet snowman was placed on the die cut circle and adhered next to the tag with some Glue Dots Adhesive Tape.  A bit of Peppermint Icicle Trendy Twine was the perfect accent on my photo mat and tag.
A line of measuring cups hanging along the edge of the paper provides a fun element on my layout.  The hearts were adhered to the measuring cups with some Memory Book Glue Dots.
The whimsical title was placed on the double die cut circle so it would pop on my page.  I simply added the the measuring cup snowman next to the title for a cohesive look.
I placed the title on my layout page and tucked in heat embossed sentiment from the Scrappy Moms (retired) "Filled with Love" stamp set.  A few enamel dots and die cut heart were the finishing accents on my layout page.
Here are the the dies I used to create my layout page available over at Cottage Cutz:
The Black Friday sale has already started over at Cottage Cutz with some amazing prices, head on over to check it out!

Tuesday, November 20, 2018

Autumn Cards

Hi, Janja is here.
For today's post, I prepared two autumn cards.


Supplies:
- kraft card base: 5.3 x 5.3 " (13,5 x 13,5 cm), folded
- white card base: 4.25 x 5.35 " (10,7 x 13,9 cm), folded
- patterned paper: 5 x 5 " (12,7 x 12,7 cm)
- beige card: 4 x 5.2" (10 x 13,2 cm)
- color cards
- colored pads
- embossing folder: brick
- fun foam
- sequins
- glue, double-sided adhesive tape, self-adhesive foam pads

For the first card, cut out a basket and vegetables from color cards. Use colored pads for more depth along the edges.


Cut out the sentiment and use only the lower part.


Use the card in a beige color and an embossing folder for the background. The bottom part of the background is not embossed.


Complete the card.


Cut out and assemble a fox and a hedgehog for another card.


Prepare and combine all the elements we need for a shaker card: card base, transparent foil, fun foam, frame and two pieces of patterned paper.


Add some sequins into the opening and complete the card.


I wish you a happy Thanksgiving day.