Wednesday, June 27, 2018

Just For Guys Team Samples (Part 3)

Hello Scrapping Cottage friends! Thanks for taking the time to stop and visit today. We are sampling DT cards from the new Just For Guys release. There are 14 dies in this release and it's currently on sale for 25% off.
They are ideal for all your masculine type cards. The dies have a great retro and classic look. There are so many possibilities as you will see from the cards today.

We have had a good response when we do a group post on a release. It gives you the opportunity to see more card samples from the Design Team.  We have 4 more samples for your viewing pleasure today.

Card 1: Our first sample is from Janja Albrecht. She created a chocolate bar and used the Hats, Glasses & Moustaches die to decorate it.
To get the look of a chocolate bar, she used the basic squares dies, brown cardstock and then ink to shadow for such an authentic look. She scored the brown cardstock and made a grid before attaching the square die cuts. She added some torn aluminum foil and patterned paper. Super cute idea for a masculine birthday card.
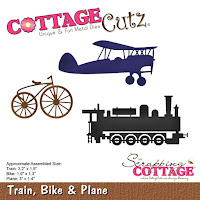
Card 2: The next sample is from Pam MacKay. She used the Train, Bike & Plane die to create a great masculine birthday card. The retro dies coordinate so well with her punny sentiment.
The fold type is a circle top card. When you open the card front it folds over the circle to display the sentiment on the inside as well. Pam bought pre-cut card stock but here is a link to a tutorial on Splitcoaststampers so you can create the same look.
This is the card inside. You can see how the card front folds over the circle so it lays flat to carry the sentiment to the inside. It's such a creative way to tease a guy about his age. And, it's all in fun.
Card 3:  The next sample is from Anja Zurga. She used the Hats, Glasses & Moustaches plus the Retro Alphabet dies to create an awesome masculine card. This could be used for a variety of occasions -think birthday, anniversary or even Valentines Day. She created a tall and skinny card and the use of stitched circles help draw your eye right to the images. These new dies make masculine card designing a breeze. 
 Card 4: Our last card for today is another from Anja Zurga. On this one she used the Racecar & Flags + the Retro Alphabet dies. This is another example of a great guy card for that special someone who is a car enthusiast or auto mechanic. Or how about as a graduation card for the one who will be going to a trade school to learn auto mechanics.
The team did such a fabulous job with their samples today. I hope they have sparked some additional ideas for ways to use these new dies.  And, remember they are currently 25% off in the online store.
 
dies used to create cards:
http://www.scrappingcottage.com/cottagecutzhatsglassesandmustaches.aspx

http://www.scrappingcottage.com/cottagecutzracecarsandflags.aspx
 
http://www.scrappingcottage.com/cottagecutzretroalphabet.aspx
http://www.scrappingcottage.com/cottagecutztrainbikeandplane.aspx
 

Monday, June 25, 2018

Dad's Tool Box

Hi, Lois here with a really special card today -- a real labor of love.  My late husband was an auto mechanic, who had several large tool chests, chock full of the tools of his trade.  When I saw the new "Just for Guys" release from CottageCutz, and particularly the die called "Dad's Tools," I knew I would have to make a card like this one.


If you've followed my blog at all, you know that I love fun-fold cards.  This card is a variation on a side-step card, but with only one step on the side rather than two.  To start the card, I cut a piece of 110# red cardstock 8 1/2" x 5 1/2".  I cut a slit longways down the center (at 2 3/4") from the 3 1/4" mark to the 7 1/2" mark.  Then I scored the left side at 4 1/4" and the right side at 3 1/4", 6 1/2" and 7 1/2".

For the small pieces, I cut cardstock as follows:

Red - 5 1/8" x 5/8", 2 3/8" x 2 7/8", and 2 3/8" x 5/8" (2 pieces)
Silver - 5 1/4" x 3/4", 2 1/8" x 3", and 2" x 2 1/2"
Medium Gray - 2 1/4" x 2 3/4"


On the three small pieces, I drew a horizontal black line at 1/4" and then scored on that same line.


I then adhered Scor-Tape on the sides and bottom of each piece.


The three pieces were then adhered to the silver pieces.  The gray piece was centered on the coordinating silver piece, and the red door piece was vertically scored at 1/4" from the left side and attached over the gray piece, as shown in this photo.  I drew a black line around the gray piece to give a bit more dimension.


These were then glued to the front of my step card.

I drew some lines inside the door to give the effect of the floor and shelf.

I then cut the images from the Dad's Tools die -- in both silver and white, picking out which pieces would be silver and which ones would be colored . . .


. . . and constructed the various tools.


My husband's tool check was on wheels, so using die-cut pieces from both the Classic Car and the Train, Bike and Plane dies, I made some wheels for the bottom of my tool chest.


I added the wheels to the bottom of the front of my card and placed the other die-cut pieces in the drawers and/or cabinet, utilizing one of the unused silver screwdriver handles as a handle on the cabinet door.  Because the wheels were rather small, I decided to reinforce them by cutting a strip of clear acetate packaging about 1" high and long enough to span the space between the wheels.  I added some Scor-Tape to the top and sides.


I adhered the acetate strip between the wheels, stamped an appropriate sentiment on a small piece of silver cardstock and glued it to the front of the cabinet door -- and I was finished.


Here is a photo of the inside of the cabinet.


CottageCutz dies used on this card are:

http://www.scrappingcottage.com/cottagecutzdadstools.aspx

http://www.scrappingcottage.com/cottagecutzclassiccar.aspx

http://www.scrappingcottage.com/cottagecutztrainbikeandplane.aspx

Sunday, June 24, 2018

Let's race!

Hi!

This is Anja. I have a simple card for you today. I made a card with the racing car die, and used just black and white, with a bit of blue for the sky.


For this card I used:
- Cottage Cutz dies (Racecars & Flags, Oval Set),
- Distress Inks (Pumice Stone, Black Soot, Stormy Sky),
- watercolor paper for background (20,8 x 9,8 cm, 20,8 x 1cm),
- white and black card stock for die cuts,
- black card stock for background (20,8 x 3 cm) and ovals,
- heat gun,
- water spritzer,
- pencil,
- scissors,
- paper glue.

First I made the background. I cut watercolor paper and did the smooching technique. I dried the paper with the heat gun.


I cut a strip of black paper and then I had everything for the background. I glued all the three pieces on the card base.

I die cut the cars and the flags. I used white and black card stock.


Next I cut the ovals and again colored it with smooching.


I cut two ovals from black card stock. I drew around the die with the pencil and then cut it with the scissors.


I glued the ovals together and then added the cars. When I had everything glued together, my card was finished.


Thank you for stopping by. I wish you all a nice Sunday.

Anja Z.


Cottage Cutz die I used: