Sunday, February 04, 2018

Valentine's Vines

Hi!

It's Anja here. Can't believe it's already February. This 2018 is going fast. We are all snowed in and I'm happy I can stay at home and make some cards. I have another card today for you that can be used as a Valentine's card. I really like this beautiful angel die and I think it would be a shame if I could only use it during the holiday season.


For this card I used:
- Cottage Cutz dies (Angel With Holly, Fancy Doves With Vine, Cupcake (Mini)),
- Distress Inks (Squeezed Lemonade, Spiced Marmalade, Wild Honey, Vintage Photo, Walnut Stain, Tumbled Glass, Broken China, Chipped Sapphire, Bundled Sage, Peeled Paint, Fired Brick, Barn Door),
- watercolor paper for background (9,5x20,5 cm and 8,9x19,9 cm) and die cuts,
- white card base (10x21 cm),
- white card stock for background (9,2x20,2 cm),
- Zig brush markers (flesh tones),
- black pen,
- watercolor brush,
- heat gun,
- adhesive foam pads,
- embossing tool,
- embossing surface,
- paper glue,
- water spritzer.

First I made the background. I cut tree rectangles (the sizes are written above). For the smallest rectangle I put some Distress Ink on my glass surface and spritzed a bit of water over it. Then I tapped the paper on it to pick the blue color. I dry it with the heat gun.


I colored the largest rectangle around the edges.


And then I cut another rectangle from plain white card stock.


I cut all the pieces from watercolor paper (300 g) and colored it with Distress Inks. I put the color on my surface and picked it up with the brush.


I used embossing tool to add some dimension to the vines.


When I had everything ready I glued it together. I used adhesive foam pads to glue the angel and the bird on the card. And this is the final result.


Have a nice Sunday and a crafty week ahead.
Anja Z.

Cottage Cutz dies I used:


Saturday, February 03, 2018

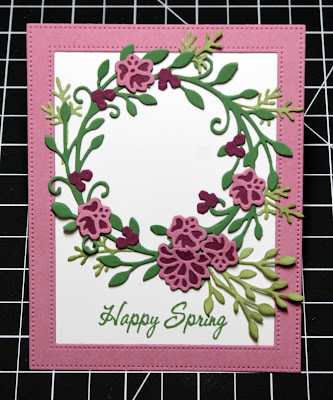
Fresh Spring Floral Wreath (new die)


Hello Scrapping Cottage friends! Thanks for taking the time to stop and visit today. It's Mary Marsh here bringing you the Saturday edition of the Blog. Hope you are staying warm during this cold snap that is currently with us.

Here is some good news that comes in the middle of winter! We have a new release of dies. There is a In-Stitches release with 12 new dies and a Spring release with 21 new designs. And, some other good news is that for a limited time, you can get the new dies at 25% off. Just in time to create your Easter or Springs cards.

Today, I am using the  new Fresh Spring Floral, Lil Bunny Peeps and Spring Meadow dies. So let's get started with some details on how I created my card.

Step 1: Since I was creating a spring wreath, I chose some spring like colors for the card base and the wide rectangle frame I was using.
Sweet Sugarplum Base: 4 1/4" x 5 1/2"
Wide Rectangle Frame: 4 3/4" x 3 3/4"
White Rectangle Layer: 4 5/8" x 3 5/8"
Step 2: I cut the wreath, flowers and stems using garden green cardstock, sweet sugarplum and rich razzleberry cardstocks for the flowers.
Step 3: I started the frame assembly at this point because I wanted to attach the wreath directly to the white panel. Used double sided tape on the white panel to attach to the rectangle frame. I decided to stamp my sentiment before I started adhering the wreath. Just thought it would be easier that way. I used my MISTI since it's a clear stamp and sometimes you don't always get a good impression on the first try. And in this case, I did not so I stamped it twice.

Step 4: Continued the assembly by attaching the wreath, flowers, and leaf stem to the white panel. Once I started, I decided to make the leaf stems a lighter shade of green. I wanted them to stand out a bit.
Step 5: I thought the card needed something else in the way of an embellishment. So I cut a butterfly from the new Spring Meadow die for the wreath center. Then I also added a bunny for the frame corner. I cut this in the rich razzleberry cardstock using the new Lil Bunny Peeps die.
To complete my card I attached the frame to the card base. I was going for the tone-on-tone look so I used dimensional foam tape on my frame to lift it off the card base. It gives it a little more depth since the card base is also sweet sugarplum.
That's it for me for this week. I hope I have given you an idea for a card using the new Fresh Spring Floral die. And, remember these dies are currently 25% off the regular price for a limited time. The rectangle die is currently 44% off the regular price.
Have a great week and I will see you next Saturday.


Dies I used to create card:
 
http://www.scrappingcottage.com/search.aspx?find=fresh+spring+floral

http://www.scrappingcottage.com/cottagecutzspringmeadow.aspx
 
http://www.scrappingcottage.com/search.aspx?find=lil+bunny+peep
 
http://www.scrappingcottage.com/search.aspx?find=pierced+wide+rectangle


Friday, February 02, 2018

My Peeps

Good morning Cottage Cutz fans - it's Jeanne today with one of my favorite dies!  First let me say that the new release is absolutely fantastic.  However, the die I'm using today is especially adorable.
In our house, no Easter basket is complete without Peeps. So this die brings back memories of those sweet marshmallow critters. This card is super easy to make but looks so cute.
I started with an 8 1/2 x 5 1/2 card base scored at 4 1/4, with a landscape orientation.  I also cut a panel from plaid paper 4 /14 x 5 1/2 inches.  The smaller white panel is cut using the second largest of the Double Stitched Rectangle dies.
I die cut a full set of peeps in two colors that coordinated with my paper.  The die cuts a row of peeps along with two single ones.
Next I used a Multi-liner pen to color the eyes and nose.  I added clear Wink of Stella to one of the single peeps to give it that sugar coated look.
I stamped the sentiment on the white stitched panel.
I assembled the panels and popped up the odd colored peep by using foam dots.

This card goes together so quick and makes an adorable piece of happy mail.

The new release featuring the Spring and In Stitches dies are on sale for a limited time  Be sure to visit the website to take advantage of these great prices.

http://www.scrappingcottage.com/cottagecutzlilbunnypeeps.aspx
http://www.scrappingcottage.com/cottagecutzdouble-stitchedrectanglesetbasics.aspx

Thanks for topping by today and have a creative weekend!


Thursday, February 01, 2018

Painting Eggs!

Hello Scrapping Cottage Family!

It is Pam from Stamper At Heart Blog Spot.  Cottage Cutz has a brand new release of two collections of dies.  They are In Stitches and Spring Designs in all there are 33 new dies.  And for a limited time the new dies are 25% off!
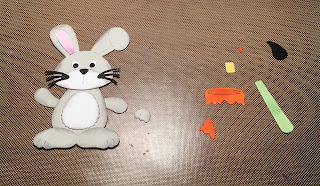
Today, I am really excited to be sharing one of our brand new Easter dies!  It is called Egg Painting Bunny!  Isn't the cutest bunny you have ever seen!!

Designer Steps:

 1.  Gather your papers for the card and use a white A2 card base. Pink DP is 5 1/4 x 4, Jelly Bean DP 4 3/4 x 3 1/2, Orange sparkle paper 1 3/4 x 5 1/4 and the rectangle was the second largest Pierced Rectangle set.
2.  Glue the pink DP down first and then add the DP Jelly Bean paper
3.  Glue down the orange sparkle strip as shown and then the pierced rectangle on top of that
4.  Cut out all of the pieces using light grey card stock and the Egg Painting Bunny die.  Ink the edges with grey ink.  Ink the nose, eyes and whiskers with black marker.  Begin the assembly of the bunny
5.  Cut out the belly, face, eyes, inside of the ears, paint brush and eggs out of white and then color with copic: Y15, 17 - YG03, 13 - YR18, 68 - RV52, 55 and black
6.  Cut the bucket out of metallic silver and then assemble all of the pieces pop the bunny to the card as shown
7.  Color and shade the eggs using the same color of copic used to for the paint brush and paint.  Glue the eggs next to the bunny.  Stamp the sentiment and layer onto pink and attach to the card

Cottage Cutz Products 


Don't forget to stop by the store to take advantage of the 25% off sale!  The new collections are adorable and you can get an early start on your Easter Cards!
Blessings
Pam

Wednesday, January 31, 2018

Spring Happy Mail!


Hi everyone and hope you're having a great week so far! It's Janet here with an extra video post to show off the Happy Mail I received from the Scrapping Cottage this week. It's the dies I ordered from the Spring and In Stitches releases that just arrived and I am super excited to share them with you!

Now, I'm always a fan of all things CottageCutz but I have to say that this release is even more wonderful than normal. The Easter and Spring themes in the release are so cute and fun! CottageCutz does animals better than anyone and you'll not be disappointed in the little critters in this release! The bunnies and chicks are adorable! There are also butterflies, eggs, flowers and scenes that will seriously get your creativity flowing. Just a few of these darlings are shown in the picture below.

The In Stitches collection included in this release are 12 images outlined and accented with stitches. You'll find fruit, flowers, bees, an owl and bird, sewing notions, mushrooms, a new sun, cloud and umbrella set, canning jars and best of all, a set of letters and numbers!
Please make sure you click on the cute animated owl at the top of the blog to visit the store. These dies are are available now and are currently 25% off. Get them while you can because I suspect some of these will sell out.

Click on the video link below to see the dies I picked up. I hope you enjoy it.


Thanks for spending a few minutes here today. I'll be back on Valentine's Day with a new video tutorial.