Thursday, February 29, 2024

Easter Parade

Hello Friends

It is Pam sharing with you! Happy Leap Day!

I am starting my Easter cards because this incredible holy holiday is early this year.  I will be featuring the Spring Parade die on a slimline card base.


Design Steps:

1.  Start by using the Windows Slimline die cut out of white card stock.  Next cut 3 pieces of DP measuring 2 3/4 x 2 3/4.  The card base is white card stock measuring 3 1/4 x 8 1/4 when folded and also cut a extra piece of white 2 7/8 x 7 7/8
2.  Use the Spring Meadow die and cut out 3 pieces of the shorter grass and 3 pieces of the longer grass in green card stock.  Glue the shorter grass to the back of the slimline window frame.  Using the Fence & Grass die cut out 3 pieces of the fence in white.  Glue the fence pieces to the blue DP squares and then add the longer grass to the front of the fence.  Glue the squares to the extra white piece measuring 2 7/8 x 7 7/8.  Make sure that they will be even when you place the Slimline Window die on top of it.  Before attaching the Slimline Window die add dimension tape to the back of it.  Then pop it over the top

3.  Use the Spring Parade die and cut out the bunny in gray, light gray, black, orange, orange striped DP and pink.  Cut out the sheep in gray, black and white.  Cut out the duck and chicks in yellow and orange.  Assemble the pieces using a fine tip glue

4.  Add the little critters to the card front using dimension dots and tucking their feet in between the grass layers.  I cut out the little sign using the Bunny Gnome 3 in brown and stamped Happy Easter
5.  Using the Spring Meadow die cut out flowers in 3 pink and  5 purple.  Also cut out 3 pink butterflies using the same die.  To give the flowers a little shape I used my stylus

6.  Add the flowers and butterflies as shown above.  To finish I added pearls to the flowers and butterflies


We have more inspiration on our YouTube Channel check it out HERE

Thanks so much for stopping by!  And I will see you next Thursday.

Blessings and Take Care


Head over to Cottage Cutz and do a little shopping today!

Get Social With Cottage Cutz

Wednesday, February 28, 2024

Santa Gnome as St Patrick Let Your Light Shine Card

Hey crafty friends,
So glad you stopped in today!Today I am sharing a fun and cute card I created with some fun Cottage Cutz dies. Check it out.

The size of my card is 5.5 x 5.5. 

Here's a closer look at my cute little gnome. He is actually a Christmas gnome die. Take a look.

Here is the little gnome I used. I pretty much used all the same pieces of him. I did cut the wavy parts of the hat rim to make them straight. I left off the holly and little ball of the hat. I added an extra belt and buckle on the hat. I used the solid portion of the candy cane. Also for the shoes I used the piece that cuts out from the beard. It is a bit larger than the shoes. 


Here's a closer look at the tree trunk and the foliage.

Here's a closer look at the additional foliage.

TIP: I needed some blue cardstock but didn't have the right color blue. Not to fear, I just cut the size I needed and then colored the edges in blue with my marker.

Here is a closer look at my saying. I used the Retro Alphabet for the lettering. I did use the Q for the G in light only because the G in the alphabet is really big. Also, the little lantern is a die cut from the ladder die cut set.


Dies Used For This Project

Santa Gnome w/Christmas Tree


Retro Alphabet

Autumn Ladder ( Lantern)

Spring Foliage Border

Tree Stump and Log For Peekers


Head over to Cottage Cutz and do a little shopping today!

Get Social With Cottage Cutz


Well, that about covers it for today. Be sure to come back real soon. You will want to keep up with my crafty adventures!  Don't forget to find me on social media too! Links are below.
Until the next time, have a wonderfully crafty day!
Melinda

Saturday, February 24, 2024

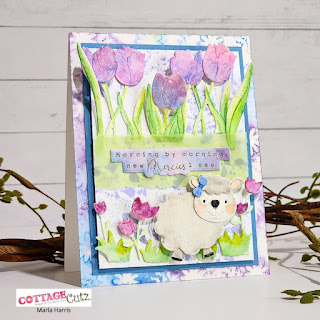
Spring Tulips and Spring Sheep


Hi friends. Marla here, back with another spring themed card. I had a couple of backgrounds on my desk. Well, actually I have a pile of them, but I regress. I don't know about you, but there are many times that I set out to create a background and for whatever reason it doesn't work out for the card I am making. Of course, I don't throw these backgrounds away, I set them aside to use later. Here's a look at two backgrounds I found, that I had created for two different projects, that I will use on my card today.


As you can see, these coordinated perfectly and ended up being the jumping off point for my card. I had several CottageCutz dies, sitting on my desk, to consider for future projects. I looked through them and settled on using the "Spring Tulips" and "Spring Sheep" dies. I envisioned a split scene for my design and thought they complimented each other.


After die cutting my images, I watercolored them using the Tim Holtz Distress Watercolor pencils. I had created my background with his Distress Inks, so I knew the watercolored images would coordinate with my backgrounds. For the larger tulips I used "Kitsch Flamingo" and "Shaded Lilac". On the sheep, I used "Hickory Smoke" "Shaded Lilac" and "Tattered Rose". I added "Rustic Wilderness" and "Twisted Citron" to the large tulip leaves and the same colors with a touch of "Cracked Pistachio" to the grass. Finally, for my small tulips I used "Cracked Pistachio" and "Seedless Preserves".


After assembling the die cuts, the card came together quickly. I cut one of my background panels down to 3.5" x 4.75" and used a piece of blue cardstock cut to 3.75" x 5" to use as a mat. Next, I added foam tape to the back and adhered it to my second background, which had been adhered to a 4.25" x 5.5" card base. Again, I had the sentiment already stamped and die cut along with the green vellum that I had trimmed using the Deckled Edge Trimmer from Tim Holtz.  I attached those pieces to the center of my top panel and then built my split scene around the sentiment. Finally, I covered the vellum and sheep and splattered the panel with a "Picket Fence" Distress paint to complete the card.


Thank you for stopping by the blog today.  Until next time.... 


Head over to Cottage Cutz and do a little shopping today!

Get Social With Cottage Cutz